Showing posts with label diy skills. Show all posts

Tuesday, 3 December 2024

Cleaning up old door hinges...

A short how to on removing paint from door hinges, I use a blow torch because it's quick and I'm lazy, but you could just wire brush the hinges, or use a heat gun (the kind for stripping paint) solvents would work as well, like the liquid paint stripper you can buy, I just prefer this method.

Works on steel hinges, I'd be careful if the hinges are brass though as excess heat may warp the metal, easiest way to tell would be to use a magnet, a magnet won't stick to brass.

After the hinges are cleaned a small drop of oil, or spray of WD-40 will make them work like new and they'll be ready for use on another door, this would work on hinges used on windows as well, and the casement stays, basically any metal that is covered in paint could be cleaned using this method, but make sure you use a well ventilated area when doing this, and be aware that the metal will get hot, so wear good heat proof gloves, or hold the hinge in some grips.

Here's the video -


Thanks for visiting.

Monday, 4 July 2011

Allotment update & a homemade hose reel ... ...

Since we had our allotment, and actually got it into a sort of usable state we haven't visited it quite so frequently, I went down today to have a look at things, and as usual I was presented with a sea of green, although this isn't a good thing, most of the green is weeds, but as I found out last time it doesn't actually take that long to weed it (about 3 hours)

Here it is - 

A lovely shade of green though it is, most of it is weeds.

I know 3 hours is a long time, but I've found that it's 3 hours every 2 weeks or so, which isn't that bad, although today's trip was just to give it a water and check to see what I'd need to do, as well as the weed issues I have to clear a space at the top for a poly-tunnel, but I could most likely get this done on a Saturday morning and still have most of the day left for other things.

Having an allotment is a lot of work, especially with a garden like ours as well, but the rewards are more than worth it, food you've grown yourself tastes so much better, I'm sure part of that is down to the fact you grew it.
We got the allotment a little later than we would have liked and as such we had already planted our main crop in the gardens (front & back) but even so we planted loads of stuff at the allotment, and today I was presented with what I can only describe as monster radishes, well perhaps not monsters, but a lot bigger than I've seen in supermarkets.

Here's a few of the largest ones, already topped and tailed -

As you can see the largest is 4 inches long !
These were grown from a cheap packet of seeds from B&Q I think they were a grand total of 49 pence for a hundred or so, not bad really and I didn't really expect that much from them, so I was pleasantly surprised, and I picked enough radishes today to make up about 2 - 3 quids worth, that's if you bought them from our local supermarket, not bad from a 49p packet of seeds, and there's still a load to come, I'm thinking I might leave some to go to seed.

Just in case you missed it, here's the beast again -

I love gardening :-)


There's loads of other stuff growing, I noticed the courgette plants had a few baby courgettes on, which is good as my wife makes a great relish from them, which if you want the recipe you can find here (opens in new window)

Well enough about that, onto the hose reel, which if I'm honest was down to me not measuring the distance between our plot and the nearest tap :-( as it turns out it's about 50 metres, which means a fair length of hose, oddly enough about 50 metres ;-) and a little extra.

Keeping that much hose in some kind of order isn't easy without something to wrap it round, so I made a hose reel out of odd bits of wood and some other stuff I had lying about.

First I fixed some wood together in an x shape (I made 2 of them)

The wood was left over from another project.
To fix these together I found the centre of each piece and marked it, then I place the other bit of wood on and marked either side to get the right width.

Like this - 

Blurry picture, but you can see what I'm getting at.
Then what I did was chop out the wood between the 2 outer lines, I did this on all 4 bits of wood, this is so I could fit them together.

Chopped out section - 

This cut out needs to be half the thickness of the wood.
Side view so you can get an idea of the depth I chopped out - 

I wasn't trying to be accurate ;-) roughly halfway is okay.

You can then fit each piece of wood into each other and fix them together like this, you can use screws or nails.


Drilling pilot holes will stop the wood splitting.


Next I cut some lengths of wood to fix between each cross shaped piece, I made them long enough to allow for the amount of hose, then I fixed them with screws to make a rough reel that I could wrap the hose round.

Here it is - 
You can see where I fixed the parts to make the reel.
Now this was okay, but to be honest it was hard work wrapping the hose round this thing, and my lovely wife pointed out that it would be better if I could make it spin so that I could let the reel do the work, like the ones you can buy (I think they are about 20 quid or so) I sat and wondered how I might go about this.

After rooting about in the shed for bits and bobs I found some old steel tube and some threaded bar, this would do for the reel to turn on, I just needed to make a frame for it all.

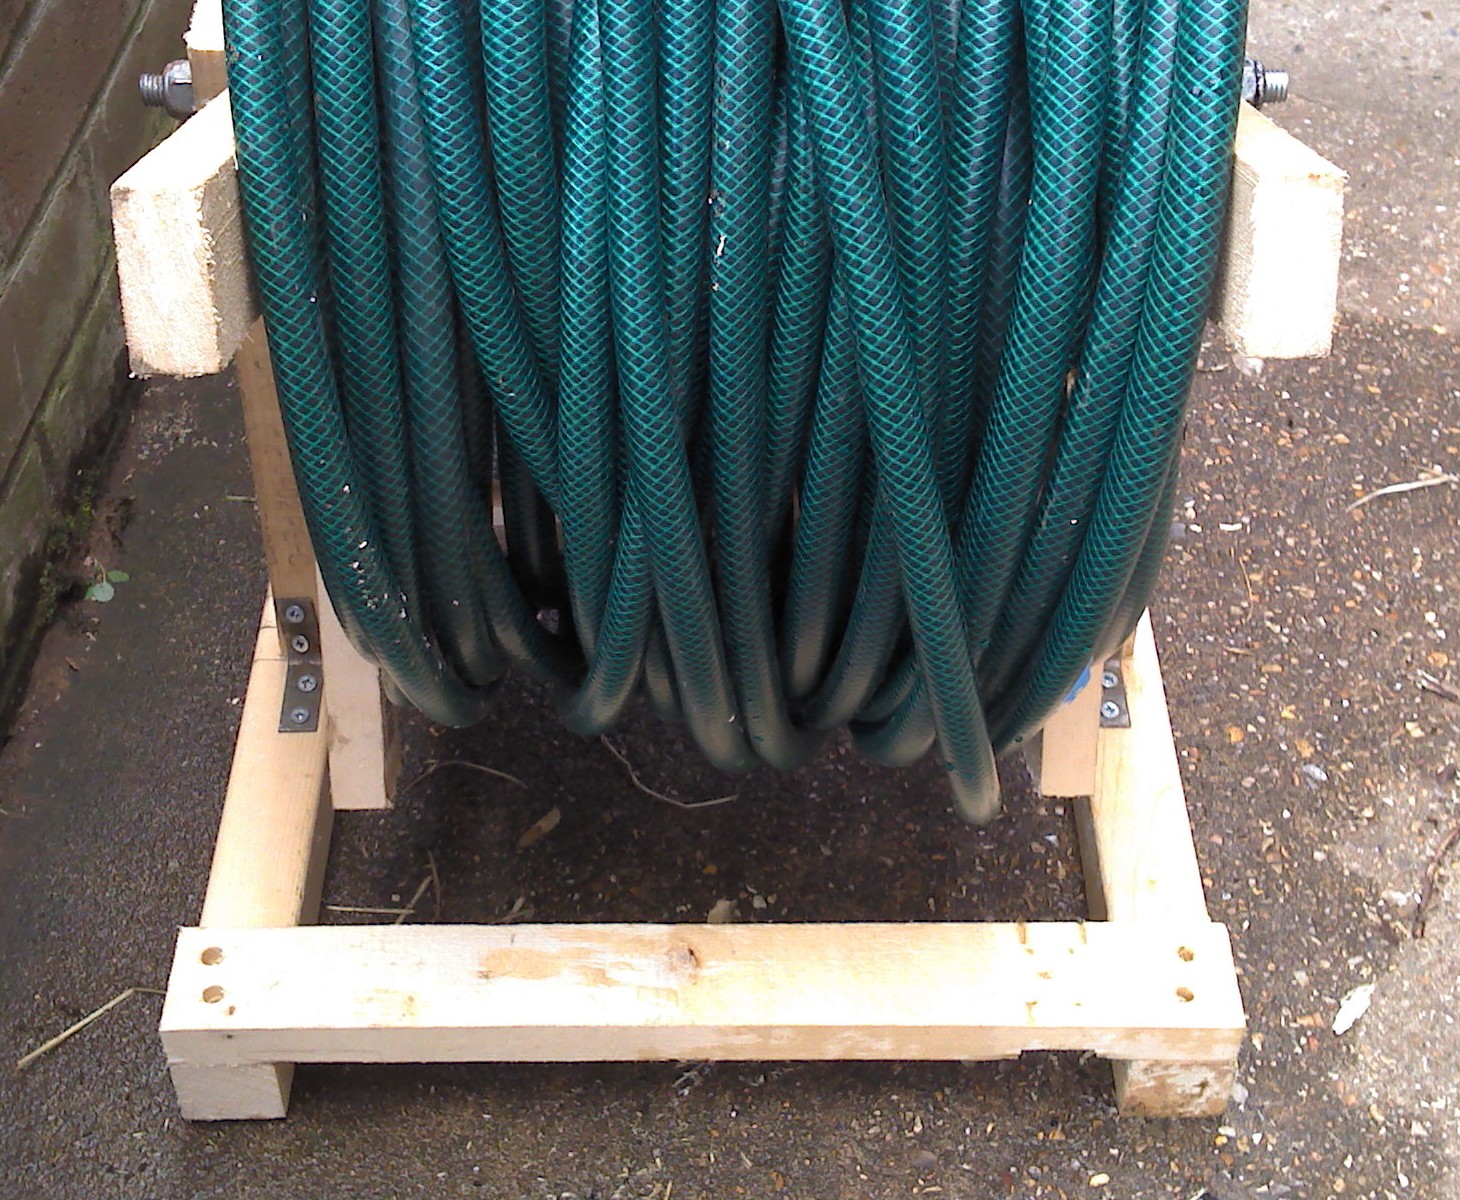
And here it is -

It works very well, even if I do say so myself


Front view of the completed reel -

This piece stops each side from moving about on it's own
And there you have it, it cost next to nothing, and cleared a little space in my shed as well (extra space is always welcome) and solved the problem of how to keep the  massive length of hose in check, makes rolling it up a load easier as well.

Thanks for reading.


Friday, 1 October 2010

Fluid design... well sort of... ...

I'm the sort of person who spends a lot of time thinking about things, all sorts of things, like how can I make this or that, what's the best way to fix this, and loads of stuff in between.
Building things makes me happy, and I think you get a grate deal of satisfaction when you find a problem and solve it, or when you build something from scratch.

With that in mind I have had to re-think the towing hitch for my bicycle trailer, I hadn't really considered it much before because what I had worked reasonably well and so I decided why fix it if it isn't broke ? that is until I realized it could be better, and because what I had was actually causing damage to my bike.

The first trailer hitched to my bike the same way as the second trailer, but it wasn't until I built the second that I decided to re-design the towing hitch, the trailer and the way it attaches to the bike are constantly being reviewed by me, hence the "Fluid design" post title. Basically I used a u-bolt to attach the trailer to my bike by way of a couple of d-shackles, these were the best option for the first trailer, and they work well for this one.

Here's a u-bolt -
U-bolt, which you can find in most hardware/diy shops.
What I did was to buy 2 of them and use the metal plate from 1 on the other, so I had 2 metal plates which I could use to clamp the u-bolt onto the bike frame, it was a pretty easy way to solve the problem of attaching the trailer to the bike.

Here's a very crude diagram of how I did it - 
Not the best technical drawing in the world.
As you can hopefully see I clamped the u-bolt to one of the rear forks of my bike, this was okay for the most part, but I started to notice that after time the bolt wouldn't stay in the right place, and it eventually moved quite a lot, especially when I had heavy loads in the trailer.

Here's a picture of the damage it has cause to the forks - 

You can see all the paint has gone, down to bare metal.
I had attached the bolt to the higher of the 2 forks, and it eventually started to move up and down, the damage on the lower fork was caused by the end of the trailers tow bar moving more than it should have been.

So not so long ago I set about re-designing the towing hitch, and I think I came up with a pretty good solution, I have managed to make a hitch that is easier to use, stronger and most importantly is very stable, it allows parts to move, but the right parts.

Here's the new hitch - 

It's a little rough, but it works.
As you can see by the picture above I still use d-shackles to attach the trailer, but the hitch is much better, I have re-used the u-bolt and the 2 metal plates from the original hitch, but I have added a strip of metal and 2 bolts, the new hitch now fixes to both of the rear forks (on the left side of the bike) the u-bolt makes up part of how it fixes to the bike. It is stuck where it is, it doesn't move in any direction, and hopefully it will stay that way, I just need to patch up the damage, I may just re-spray the whole bike.

Here's a picture of the back of the new hitch - 

The other side of the hitch.
So basically what I've done is to use the 2 metal plates to clamp the hitch to the forks, the u-bolt is in the middle of the large metal plate and using 2 extra bolts I have managed to make a much more secure fixing, which means increased stability when I have the trailer attached, it still moves a little, but it's the right kind of movement.

A picture with the trailer attached - 

I will explain the blue bar.
As you can see the shackles work well, and allow enough movement to be able to hitch and un-hitch the trailer easily. You can also see that I've used and eye bolt in the end of the towing bar and the shackles basically join the 2 to each other, you may also notice the cable that goes through the eye bolt, this is a safety and security measure, it provides a way to padlock the bicycle to the trailer, and should for some reason the towing hitch fail there is a back up, you may have also noticed the towing bar is bright blue :-) this is because I broke the original bar, and had to use this as a replacement, it's an old part of a climbing frame, very strong, but light weight (don't worry I didn't dismantle the kids climbing frame to build this)

And that's about it really, I had to find a better method, and this is it, well I think so, I have used the trailer several times since I made the new hitch and I have noticed a difference in the way the trailer behaves, it is much more stable at speed (not that I go that fast, but it wobbles less when loaded)
I will spray the hitch when I get round to spraying the rest of the bike, so it doesn't rust.

Now for my next trick....... finding a way to get rid of the bike and hitch the trailer to the dog, like a sledge :-) Just kidding.

Here's a pick of the dog -

Meet Pepper, the family mutt :-)


Thanks for reading.


Thursday, 30 September 2010

It's that time of year ... ...

Well it's arrived, autumn and all it's joys, don't get me wrong I actually prefer autumn and winter, winter more so, but the wet weather and the cold (when it arrives, probably soon) can cause issues around the house and garden, so I thought I'd give a little mention to WD-40 and good old 3-in-one oil, both of which can save time and money, here's how.

Say hello to my little friends -

WD-40 & 3-in-one, very handy.
I've used these 2 things for many years, and for various things and they have never let me down, they are great at what they do.
So what to use them for ? well it's pretty easy, and I'm guessing for most people this will be old news but I'm going to mention it anyway. Do you have padlocks in the garden ? maybe on a gate or a shed ? well as you may or may not know being exposed to the rain and the cold can cause problems with the locking mechanism itself, making the lock hard to open, this in turn might mean you bending or breaking a key in the lock and then it's pretty much useless, so with that in mind get a tin of WD-40 and make sure the little red straw is attached and then squirt a little in these 3 places 1 - the lock, where the key goes, 2 - in the 2 parts of the lock on the other side of it, the hole where you push the pad lock in to close it, and where the u shaped part is joined to the lock (basically you want to squirt lubricant anywhere there is a moving part) you don't need much, and be careful not to get too close in case it sprays out, this will sting if you get it in your eyes.

Once that's done make sure to put the key in and lock and open and close the padlock a few times to get the lubricant in as much of the lock as possible, this will help protect the lock from the rain, and also help it when things start to freeze, and if for some reason after doing this you can't get the lock open one day a little squirt of WD-40 on the moving parts of the lock should free it easily, this will also work for other locks, like bicycle locks for example, and even some older types of car door locks, you can also use a small drop or 2 of 3-in-1 oil for this as well.

One of my bicycle locks - 

Even a little squirt on a combination lock will help protect it.
It's not just locks either, WD-40 is good for all sorts of things, got a squeaky door or gate hinge ? a squirt of either will solve it, you can also use a little drop of oil or WD-40 on slide bolts as well.

One of our gate hinges - 

A little rusty I know, but they still work and they are sturdy despite the rust.
A slide bolt, we have a few of these on each door (front and back) as well as on our garden gates -

Slide bolt, I find the oil works better for these.
Do you have double glazing ? most houses have it now, least I think they do, but did you know that you are meant to lubricate the hinges from time to time ? I've always used WD-40 for this, first clean the hinges of any dust and dirt, then a little squirt on the parts that slide (see picture below) and this should be done at least once a year, again you don't need to cover it in loads of the stuff, just a little will do, then just open and close the window a few times to make sure it covers all the parts, you will notice a difference.

Here's a picture - 

Like it says in the picture :-)
It's best not to use oil for this because oil tends to collect dirt and dust more and may cause problems, so remember WD-40 is the best, and you can pick up a can for a quid (£1) yes you guessed it from a pound shop :-)

What else can we do ? well if you have a garden you may have a pruning knife or a set of secateurs for, well pruning and such like, there are other garden tools as well that this is good for, shears and lopper's.
Once you've sharpened them give them a good clean with some steel wool or fine emery paper and then get your 3-in-1 and a rag or cloth of some sort and squirt a little oil onto it, then rub the oil all over the blades of your chosen garden implements, you can also use a little to keep any moving parts working smoothly, this will keep the blades rust free over winter and when you come to use them in the spring they will be ready to go.

My secateurs - 

Just oiled.
My pruning knife, which if I'm honest does more cutting of things (like string) than actual pruning -

My pruning knife.
This is well worth doing, and for a couple of pounds for the oil etc it's not expensive, it could be if you don't look after your tools, and you can also use a little bit of oil on chisels and other tools, especially if they are out in a shed, giving them a wipe over with a little oil will help prevent rust and keep them in good condition, I have a set of chisels that I've had for nearly 10 years, giving them a wipe of oil now and then has kept them looking almost like new, I also use a little squirt of WD-40 on the tail stock of my lathe to stop the thread  up, and 3-in-1 oil is great for lubricating bicycle chains.

So for a little effort you can save money and time, just wish WD-40 worked on my joints :-)

Thanks for reading.


Tuesday, 24 August 2010

DIY skills no longer important ?

It seems that DIY skills or even basic practical skills are on the decline, why is this ? well I guess that technology has taken over a big part of our lives, although this doesn't explain why it seems that some people don't know how to wire a plug or put up a set of shelves, and according to this article in the Mail on line it seems to be an affliction people under the age of 35 ---> Mail on line article (all links open in a new window)

When I was at school we didn't get a choice in some of the things we had to learn, this I think was both a good thing and perhaps a bad thing, either way we had to attend metal work lessons,wood work lessons we also had a craft design and technology lesson, which kind of complemented the wood and metal working.
From what I know of having two older step daughters these are no longer that important in schools, and from what I know there aren't any specific lessons for wood working etc, so perhaps it's an education thing, kids just aren't being taught how to use tools to make things ?

Then again if it's the schools that aren't teaching the kids what about their parents ? surely they learned practical skills in schools ? are they not passing them on to their children ?

I don't know what the reasons are, but I have seen that the world we live in is a very different place from what it was twenty years ago, people don't tend to build things any more, or make their own furniture, or fix things that get broken, it just gets thrown away and a new one gets bought, maybe it's society that's not teaching people to do things for themselves ? I mean why make a cabinet when you can go and buy one, and even if you get a flat pack type kit you can just look through the yellow pages and you will probably be able to find someone that builds flat packs for you, we have a chap in our area who does just that, come on people, flat packs are just jigsaws at the end of the day.

The article I mentioned above isn't the only one either, it seems that these types of practical skills have been in decline for some time, and not just in England either, this article talks about how a lot of American men can't do a quarter of what their fathers did, there are a few articles on this theme, some from a few years ago, and some more recent, it's a shame and I think that people need these types of skills, and I also think that these types of skills should be past down the generations.

Here are a couple of articles from various places regarding the lack/decline of diy skills.

1 - http://www.home-improvement-blog.co.uk
2 - http://news.wickes.co.uk/brits-lack-diy-skills-452
3 - This one tickled me, apparently diy skills are in the genes - A-handy-excuse-DIY-ability-genes

As you can see it is a problem, well is it ? is it so bad that people now longer know how to use a spirit level (or what one even is) is it so bad that in 2 generations time, unless your a builder or carpenter or other tradesman you will have no idea what so ever which end of a screw driver is which ? If you ask me then the answer is yes.

These skills are what made this country (and others) what they are today, look at the Victorians, if it wasn't for them would we have half the technology we do now ? and although some of the inventors of the time were rich, or came from wealthy families they still had practical skills, they could, if need be pick up a saw or some other tool.

I for one will be teaching my kids how to do things, like putting up shelves, or wiring a plug and if they are interested how to do more elaborate things as well as how to grow their own food, which seems to be something else people have forgotten how to do, although in recent years more people seem to have taken it up again, but I bet not as many as forty years ago.

Now I'm going to get a little doom and gloom, see there is a big problem with people having little or no practical skills, not knowing how to use wood to make something, or what tool is good for what.
Lets just suppose for a moment that the year is now say 2100 everyone on the planet now has a face book profile, everyone on the planet has a computer/laptop or smart phone type device permanently attached to them, the world is electronic, nothing is made by people in sheds/workshops any more, it's all done by robot and computers in vast factories, just picture the scene, like something out of a science fiction film, Bladerunner or the like, technology every where......

What happens if it fails ? someone pulls the plug on the lot, how many people would survive with out that technology ? how would people get food ? what would you do if the fancy hover car you got won't run, would you know how to fix it ? could you adapt it to run on some other fuel if needed ? what about heat and light, how many people in this day and age know how to make a fire with out a lighter or a match ? let alone in 90 years time, makes you think ?


My point is that practical skills are needed, they should never become redundant, after all if it wasn't for early man realising that flint made a good raw material for making tools where would we be now ?

Thanks for reading.