Showing posts with label handmade. Show all posts

Sunday, 28 March 2021

Handmade wooden dibber...

A quick guide on how to make a dibber, perfect for planting bulbs of all variety's, cheap and quick to make, this one is made from an old pallet, or at least part of an old pallet.

Obviously you'd need a lathe to make this, it's what I used, but your could make one like this with hand tools easily enough, it'd just take a bit longer.


This one would be good for planting bulbs as it's quite thick and with the added lines down it, it will be easy to make sure things are planted at the right depth, the marks are made at 1cm intervals with a total of 12cm in all.


Here's the video of me making it -


Thanks for visiting.


Tuesday, 16 February 2021

Handmade valentines gift...

I've strung together some of the steps I used to make this gift for my wife, it's made in the same way as the hanging Christmas decorations, just slightly more elaborate.

I used Cherry, Pear and copper to make it and each material has a meaning or symbolism attached to it which varies from culture to culture, as an example Cherry trees in Japanese culture symbolise good fortune, new beginnings and revival and in old Buddhist stories the Cherry represents femininity, Pear wood has similar meanings as Cherry, and the shape of the fruit has long been associated with the female form and Pear trees usually live for a long time and Chinese culture associates this with immortality.

The Copper elements also have similar meanings, the metal represented Venus the goddess and the planet in Roman beliefs and copper has long been used by the Celts for making jewellery, it was in ancient times a highly regarded material, which is why it's often found in burials along with other metals such as Bronze, which is a Copper alloy.

Here's the video -


Thanks for visiting.

Thursday, 19 April 2012

Handmade outdoor play kitchen ...

I still haven't managed to get through the large pile of pallet wood I have, but I have managed to use a bit more making a play kitchen for the garden, it's pretty simple design wise but it will last and will take being played with vigorously (hopefully)

The only thing we bought to make it was a plastic bowl (cost a quid) to use as a sink, all the wood came from pallets.

Here's the finished article -

One rustic play kitchen.

It could easily be built using bought wood, plywood may be best, but if you can get hold of them a pallet or two will do just as well, I've given it a good sand and just finished it using Teak oil, but you could wax it,paint it or just leave it, obviously some kind of coating will protect the wood and it will last longer.

Here are some diagrams of how to build it, hopefully they should be easy to follow, just click on any of the pictures to en-large them.

Step - 1, making the frame work.

This is a case of making two 'A' shaped parts, one for each side of the kitchen.


I've been lucky because the pallets had nice usable lengths of wood, this is what the frames I made look like.

Frames -

Easy peasy, you can use nails or screws to fix them together.

Once the frames are done it's just a case of cutting lengths of wood for the work top and the shelf underneath.

Step - 2, adding the worktop and shelf.


You should get the idea from the diagram, but if it's not too clear here's what mine looked like after step 2.

Almost done really -

You can see where I added pieces to the front to make it look neater.
As for the construction this is about as complicated as it got, doesn't quite look like a kitchen though does it ? and to be honest it could have just been a play bench, kids are pretty good at using their imagination, but I thought I'd add some extra authenticity, you can also see the small splash back I fitted, this is optional.

Step - 3, fitting the splash back.

As it says, it's optional.

As the diagram says I had a small gap at the back that made it easier to fix the splash back to, but you can just fix to what's there, I used a thicker piece of wood to fix the splash back to, mainly because I wanted a little extra strength along the back of the kitchen.

Here's what mine looks like -


I could have avoided this by making the frames slightly thinner.

I wasn't being to accurate to be honest, going for function and durability rather than form, but making the frames a few inches shorter would have avoided this, although it does help to keep things square and more rigid, just in case the cooker gets extreme, and because mud weighs a lot.

Here's a plan of the top of the kitchen, we opted for a bowl that's about 30cm across, obviously you'll need to make a hole in the work top to fit the bowl, or you could just have it free standing.

Step - 4, work top layout.

Looks sort of kitchen like ?

Lastly I added two circles of wood to the top to act as hotplates, the bowl goes on the left, leaving a work area in between, I even made two small cooker controls for the front, otherwise there would be no way to turn the cooker on and off ;-)

One thing to remember if you use planks like I have you will need to add some extra support to the bowl area if you cut out a hole to fit it into, other wise the planks will flap about all over the place, just add a strip of wood on the underside of the work top near to where the bowl is.

Here's a couple of pictures of the controls - 


Simple to make.

They look quite realistic, well I think so.

To make them I cut out two piece of wood using a hole saw in a drill, hole saws look like a round saw and you can pick them up quite cheaply, then I stuck a strip of wood across the circle and gave them a sand to shape them a bit better.

Fixing the controls is easy as well, I just screwed through the front of the kitchen, but left them loose enough so that they will turn.

Step - 5, the cooker controls.

You get the idea ?

A close up of the cooker controls - 


I gave them a coat of black gloss, the same with the hot plates.

That's about it really, I did give it a good sand with my belt sander, just to make it smooth and reduce the chance of the kids getting splinters, then I just finished it with Teak oil which will help protect the wood.

And here's the finished kitchen again - 

All done.

I'm still thinking about adding an oven section, but for now the kids seem to be quite pleased, so I might leave it as is, unless of course they request an oven at some point.


Thanks for reading.


sunnydaytodaymama 


Thursday, 7 July 2011

Practice makes perfect, well almost ... ...

Since I've had my lathe I've been trying to get my hands on interesting bits of wood, for a couple of reasons, mainly because each type of wood is different in terms of how it looks when it's made into something, whether it's turned or carved.

But apart from the aesthetics of the wood I've been learning that each wood behaves very differently when you stick it on a lathe, there are factors like age of the wood, how long it's been sitting about before you turn it and such like.

Take these 3 items, all of which I've turned on my lathe, using the same tools and same techniques.

From left to right, Pear,Ash (or maybe Oak) and Spalted Birch.
 
I turned the Spalted Birch candle stick a while ago, but had to wait to see if I could stop it warping and cracking before I sealed it, it's now had a coat of sealer and a good polish. If you look at the top of the Birch candle stick you can see where it's warped a little, this is mainly due to the thickness of the wood, it's quite thin.

I got the Birch from a chap who lives down the road from me, he's had a load of Birch logs in his drive way for ages, so I asked him for some (he intends to use it in a log burner, a waste if you ask me) I got a length about 8 feet long in the end, I still have quite a bit left. What's good about it is that because it was chopped down a while a go it's okay to turn, although it may still warp a little.

Here's the Birch one, it's called Spalted birch because of the way the grain has gone, the dark ragged lines are caused by a fungus, the lighter patches are also a result of the same fungus.

The Birch candle stick (probably the first of many) 
I was pleased with it, even wrote a blog post about it ;-)
The next thing is made from the off cut of a fence post, a few weeks ago we went to visit relatives and on the way there a couple of workmen were fitting new gates to a house, so on the way back I asked for the offcut, I'm still not 100% sure what sort of wood it is, but either way it made a nice candle stick.
Here it is - 

It's either Oak or some kind of Ash.

I have to be perfectly honest I'm not sure what this is, I should have asked the workmen, as I've mentioned it's either Oak or Ash, although as it was part of a fence post I suspect it's Oak, never known anyone to use Ash as fence posts, but I could be wrong.

This was interesting to turn as the wood had been dried before hand (probably kiln dried) and as such it was a very different experience, I was hoping to get it a little larger but it kept loosing parts where the wood had shrunk, in the end I decided I would keep going until it stopped loosing bits and although it's quite small I love the grain in it, even more so as it was destined for the bin being an offcut.

Here's a different view of it - 
Stripey :-)
The last thing I have to show you is a small goblet, yes not another candlestick but a goblet, although it's not any good for drinking out of because of the way it's warping and cracking.

The goblet - 

Made from part of a 60 year old Pear tree.

Yes this too is made from rescued wood, although I'd have to admit I was the one who cut the tree down, in my defence it was in some one's garden and they had offered it on free-cycle, if I didn't take it, it would have been burned. It's lovely wood, but very green and it maybe some time before it's really ready for turning.

I just couldn't wait, it's been sitting in my shed for months and the other day a chopped a small piece off and stuck it on my lathe, and as with the other items it was again an interesting experience, being green wood it's very soft (even though Pear wood is quite hard) and because it's green wood it's still quite wet, which means depending on the way it's kept it may or may not crack and warp, if it's kept in a dry warm environment it will probably crack, and that's what has started to happen with the goblet, whether it will get to a point and stop I don't know, Eucalyptus wood is the same if not worse.

It's an interesting learning curve, but one I'm enjoying and even though some of the things I make suffer from warping or cracking it is a little sad because I spent the time on it, but it helps me to understand what's going on with the wood and the next time I try I will know what to expect and how to prevent it or slow it down.

Here's some more pictures of the things I've mentioned - 
A closer look at the grain.
I'm pretty sure more of the Birch I have will have more of this type of pattern in it, I'm hoping to turn some plates and small pots out of some of it, should be fun.

A closer look at the Ash / Oak candle stick - 
I'm going to keep my eyes open for more fence post offcuts :-)
  Unfortunately I don't have any of this left, so I will keep my eyes open for some more, maybe even a whole fence post or 2, I think I could make some interesting objects out of it.

This fault wasn't apparent from the outside of the wood.
Usually Pear wood has a subtle grain and unless it's polished it doesn't seem to show it, the Pear I have must have had a hard life as it has quite a few faults with it, not that it's a fault as such, I plan to incorporate these faults or natural quirks into some of my designs for extra interest, that's when I know what I turn isn't going to warp and crack apart, although I've seen warping and cracking incorporated into other wood turners designs, which is something else I might try.

All in all I'm enjoying the experience, all of it I've even started to make my own tools for turning, this as I've found is something a lot of other wood turners also do, it means you have a greater range open to you and you can make some tools that do really interesting things, from a wood turning point of view :-)

Thanks for reading.


Inspire Me Beautiful

Tuesday, 28 June 2011

String art anniversay gift & some artistic recycling ... ...

It has been two years since me and my wife got married (our anniversary was on the 24th of June) and we decided last year that we would try and stick to the traditional gifts, so for our first anniversary we gave each other handmade gifts made from paper, and this year it was cotton.

I must admit I found it quite difficult to find something I could make from cotton, I wasn't even sure I should, but thanks to twitter and the mention of string art I thought I was onto a winner, so instead of string I used cotton :-)

This is the gift I made for my wife -

I made the frame from bits of wood and the edging is buddleja.
It turned out pretty good, although I did a lot of swearing trying to get the pattern right, I also did a little swearing trying to find the right sort of pins to use, I wanted copper pins / nails and eventually I found them, after looking in 4 different places.

Here's a picture of the lovely photo frame my wife made for me -

Much modge podge was used :-)
So there's the string art, I'm sure people will remember doing similar things when they were kids ? today I sat here pondering what about using wire to do the same thing ? so I gave it ago.

I've used the same heart pattern, but this time I've used fine copper wire instead of string (I'll include a like to the website where I got the templates from) so I started the wire version in the same way as I did the cotton one, although this time I glued a piece of black card to the wood as I figured this would make the copper stand out more.

Here's the template I used - 

It's easy to follow.

After fixing the template to the wood I marked out where each pin needed to go, then I removed the template and started putting the pins in, I used to same copper pins as with the cotton one.

Putting the pins in -

Nearly done, there's only 80.
Once that was done it was time to start adding the wire,it's just a matter of repeating a sequence all the way round the circle, until it looks like the picture in the template.

First section done -

So much easier the second time round.

 One thing with using wire is that it can cut your fingers if you pull it too hard, so be careful, I'd also recommend wrapping the wire around the odd pin now and then to keep it tight, and to  stop it un-wrapping.

And here is the finished article, the picture doesn't really show it off very well, it catches the light in a way that seems to make it move almost, and as it's copper it will eventually start to go green, which adds another dimension to it, and you can hang it up outside, although I wouldn't use card as a backing, maybe paint the wood black before putting it outside, this will make it go green faster.

The finished article -

I still need to add a frame of some sort.
Now copper wire like this can be quite expensive, this uses a couple of metres of wire, which could cost a few quid, but there is a way you can get free copper wire to use for all sorts of craft type projects, including jewellery making.

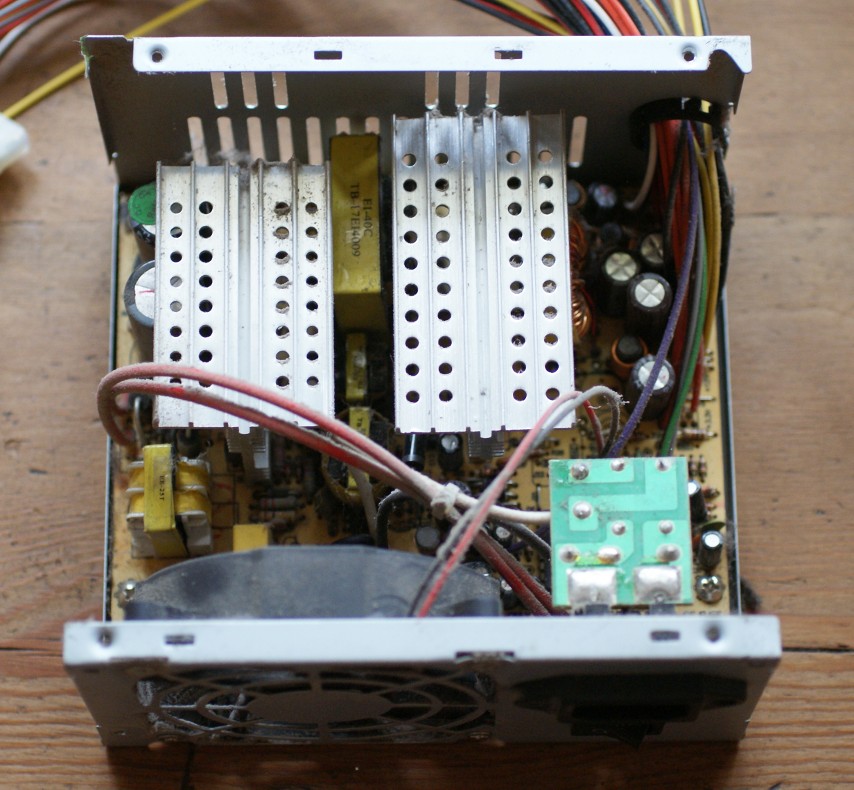
The wire I used for this came out of an old computer power supply, it was an old one that had recently decided it wasn't going to work any more, so as we do with a lot of things we took it apart to see if we could use any on it for other things.

Most electrical items will have some kind of copper wire in them, especially things that have a motor, like a hoover for example, or old stereo and other things as well, like old tv's (not the flat panel type) it's always worth taking broken electrical items apart as there are some very useful bits and bobs inside them.

Before you get to work with a screwdriver it's a good idea to let whatever you intend to take apart sit for a few days, just to make sure all the electricity has discharged.

This is what you're after - 

There is usually loads of wire on these.

Here's how to take an old computer power supply apart to find one.

It's pretty easy, just a few screws and if all you want is the copper wire then a hammer is an effective extraction tool :-)

Power supply - 

I have quite a few of these lying about.


All you need to do is undo 4 screws on the casing and then 4 more on the inside, then you should be able to get at the coil.

Case screws -

Screws already removed :-)


Once you have it open you'll need to remove the other 4 screws I mentioned, these just hold the circuit board down.

Case open -

The coil is just under the 2 silver plates with holes in.

The coil -

They are usually covered in plastic, and there's only 1.

And that's about it, the wire may vary in gauge (thickness) and there maybe some other bits of copper wire as well, so it's worth having a good look, here's the link to the website where I found my template, they have some free ones, and some you have to pay for.

Sting Art Fun ---> http://www.stringartfun.com/

Thanks for reading.

Inspire Me Beautiful

Sunday, 20 March 2011

Wooden sketch book cover ... ...

This is a continuation of my scroll saw practice / experiments, after making the jigsaw puzzles I thought I'd try my hand at some more complicated, so I set about thinking what I might make, I decided for some odd reason to make a new cover for my sketch book (all will become clear)

Here's the sketch book -

Nothing special, although the paper is nice to draw on using pens.
 As you can see it already has a cover, it's a thin plastic of some sort, it has the same on the back along with a stiff piece of card so you can lean on it, which to be honest doesn't help that much, hence the wooden alternative.
I had some thin plywood (5mm) lying about and thought it would do the job, and because it's thin (I figured) it would be easier actually getting the cover onto the sketch book, turns out I had to wrestle with it a little to get both wooden covers on it, I made one for the front and one plain one for the back, this is much better for leaning on when you don't have a flat surface.

If I'm honest I spent a lot of time trying to think of what to put on the front cover, I came up with a variety of ideas, some more practical than others.

In the end I settled for this - 

It's made of the same plywood as the cover.
 Okay so it may not be to every one's taste, but it kind of suited what I was trying to do. The design is made of two parts, the wavy bits and then the pentacle on top of that, all of which I cut out using my scroll saw and then glued onto the front cover, there is a little glue that needs cleaning off, I'll get round to it at some point.

I decided the easiest way to fix the cover to the book was to copy the way the original covers attached, so I basically took one off the book and then drew round it to get the size right and then I also drew round each hole on the cover so I could then feed the wire binding through the wooden cover (this is where the wrestling came in)

The back cover -

I used a drill bit roughly the same size as the holes.
This is what the front cover looked like before the other bits got stuck on, I used the same basic draw round and then cut and drill method for both covers, which worked pretty well, although even though the ply is only 5mm it's a lot thicker than the original cover which is a little thicker than a sheet of paper, it still fitted though.

I wanted to add something to each corner, and in the end settled on a leaf type shape that I copied from one of our many house plants, I did also toy with the idea of using metal of some sort on each corner, but in the end went for wood.

The leaf design -

Again I used the scroll saw to cut these out, it's all practice.
As with the main design I used my pyrography tool to burn some detail on so it kind of resembles a leaf of sorts, I also used the same tool on the pentacle design in the middle of the cover.

I stuck it all down with normal wood glue and then gave it a light sanding, just to remove any sharp bits, then I coated the front and back covers with linseed oil, just to feed the wood a little and bring out a bit of the grain, plywood isn't the most exciting of things, I also thought that because the wood was a little warped it might help in straightening things out a little, the wood came from an off cut bin by the way.

The end result is quite pleasing, least I think it is, and it's an interesting way to make a plain old sketch book look a little more interesting, but you could do this with all sorts of books, you could use stiff cardboard instead of wood, and paint instead of oil. It might make a fun project for kids as well, I guess it's a different take on covering a book in wallpaper or other stuff, the sky is the limit really.

The finished book -

I had to make some modifications ;-)

All done ? well sort off, for a start the cover wouldn't stay shut as flat as I wanted, so I had to add a way of keeping it closed, so I drilled a hole in the front and back covers and then used a paper fastener on the front cover as a peg to wrap a piece of string round to keep the book closed.

The fastening solution -

The paper fastener.
Obviously I attached the string to the back cover.


This simple method of keeping the book closed seems to work, it might be better with a thin strip of leather or some other material, but string is what I had to hand.
Over all I am happy with what I have ended up with, not bad for an experiment, I'm now thinking about making more covers for my larger sketch book and perhaps the large book I intend to turn into a family photo album.


" Limitations live only in our minds. But if we use our imaginations, our possibilities become limitless." ---> Jamie Paolinetti

Thanks for reading.


Inspire Me Beautiful

Saturday, 26 February 2011

Another handmade crochet hook ... ...


If you have read this blog you'll know I spend a lot of time playing about with bits of wood, I can't help it, it's almost a compulsion, and if I could spend ten hours (or more) a day just making stuff out of wood, whether it be on my lathe or by hand I would.

It's very rewarding, and oddly therapeutic,  maybe it's something to do with the repetition  I don't really know, and hand carving wood doesn't involve buying lathes and such like, all you need is a sharp knife,sand paper and a small saw, and not much else.

Recently I've been trying to perfect the method I use for making crochet hooks by hand, trying to get the dimensions as exact as is possible without machining them, although I do use my calipers to get things more or less the same.

Here's the latest crochet hook -

It's made from a small pear branch.

 I wasn't sure when I made this one whether it was going to crack of not, the branch was very green, in fact it had only been cut a few days earlier, but it hasn't, which is a bonus although I'm not going to attempt to carve or turn a larger piece until the wood has a chance to season a little, the temptation to cut a section of the tree trunk I have in my shed is almost too much.

As you can see this hook has a curve to it, I haven't tried to straighten it out as it doesn't seem to affect it's use, it actually fits nicely in the hand. I've tried to keep the design simple and also allow a couple of inches of plain wood for the shaft, which makes the hook usable.

Some more pictures - 

The twist.


The hook.
The twist is hand carved, I'm more or less happy with it, it's not as even as it could be, but compared to the metal hooks my wife has it's more pleasing on the eye, not sure whether this matters in a tool though ? I would say that it's not as decorative as some I've seen. As for the hook I have tried to get it the same width as the shaft, using fine sand paper I have managed to get the shaft and hook to within in 0.5mm of each other using my vernier, which I think is pretty good, not sure if half a millimeter will make any difference to the item being crocheted ? the width of the shaft and hook is 7.5mm (give or take the 0.5mm) if any one has any thoughts about this I'd be interested in hearing them, also if you have an thoughts, opinions on the hook as a whole I'd be interested in hearing them :-)

Here's a picture to give you an idea of scale - 

It's a little longer than a ball point pen.

Here's a picture of it the other way round - 

The other way round.

 I spent some time finishing it with a very fine sanding pad, then I gave it a few coats of linseed oil, this helps to keep it from cracking.

Last picture to hopefully show the amount of curve it has -

I used the pen to hold it up :-)
 If anyone has an thoughts on it, for example whether it's going to be a usable design and such like, my wife has tried it out and she can crochet with it, I can't get my head round crochet at all (it's a dark art ;-) so I'm not really best placed to say whether it'll be any good for the purpose I made it.

Thanks for reading.


Friday, 25 February 2011

Hand turned candle stick (feeling smug) ...

Today was a good day, mainly because we managed to get out into the garden for a few hours, the kids love being out in the garden, and as we were out in the back garden they got to run around a lot more, much more room than the front garden.
The kids now have their own planting bed, which they can use for what ever they decide to plant, I'm sure it'll be interesting if nothing else, and we got some tidying done, so the garden is looking a little neater than it did.

It's not that I'm feeling a little smug about however, not that being in the garden with the kids isn't good fun, if not a little hectic :-) no the reason is I managed to finish off a piece of wood turning I started yesterday. I had picked out a nice chunk of silver birch and already fixed it to one of my chucks, with the intention of making a small bowl of some sort, however on closer inspection I found that the end of the wood was split quite badly, so I decided to make something else, and seeing as my wife had made some nature candles with the kids for Imbolc, and was in need of candle sticks to put them on. I went for candle sticks, although I still have one to make, I'm quite pleased with the over all look of the piece, the grain is really nice, even if I do say so myself ;-)

Here it is -
This side is nice, the grain is interesting.
And another -

This is my favourite side.
I did most of the turning yesterday, and today it had it's final finishing, which consisted of using finer grades of sand paper to get it as smooth as possible, then I sealed it with our home made wax, and gave it a polish while it was still on the lathe, mainly because it's easier.

It may not be every ones cup of tea design wise, but it has meaning to me for various reasons, not least because I'm making them for my wife to display the candles our kids made. Just got one more to make which will be different, I had no intention of making a matching pair, although if I was I'd make a jig from the design of the first one so I could get them both exactly the same, or as near as possible.

More pictures - 

I like the way the shadows fall on this one.

This one was taken in natural light.


I'm really pleased with the grain, it has a great look to it, even more pleased seeing as it's the first piece of birch I've turned, I've had a six foot length of tree in my shed for a while (I didn't use the whole six feet to make this) I'm glad I waited until I had plenty of time to give it some proper attention, though it didn't actually take that long to turn.

Some close up pictures of the grain - 

This section reminds me of a map.

This part almost looks like two different types of wood.
All in all I'm feeling a little smug about it, I'm not an expert by any stretch of the imagination but I think I did good, can't wait to make the other one and have a go at turning a piece of the pear I have in the shed.
It also feels good because for parts of it I used one of the Oland tools I made myself, as you can see it worked :-) 

If you have pondered having a go at turning wood I would recommend it, it's very satisfying. You could probably find places that run wood turning courses near to where you are by searching online, it's a great thing for kids as well, I first turned a piece of wood when I was in school, but now in my opinion overly cautious health and safety laws and other factors are putting paid to kids being allowed to put their hands and their imagination to good use in schools to create pieces of art, or functional items, it's a shame, we were given hands for a reason, and even though I'm pushing buttons to write this, it's not what hands are for.

If you want to read about the candles my wife and our kids made you can on my wife's blog ---> Decorating candles, (opens in new window) and just for the hell of it I'll leave you with another picture - 

Smiling smugly ;-)
Thanks for reading.