Showing posts with label craft projects. Show all posts

Thursday, 4 August 2011

The benefits of a glue gun ... ...

Today the kids got round to making up some of the craft kits we've bought them, and as usually we ran into trouble quite early on.

Both my wife and I are pretty good at crafts in general, but when it comes to some things we always have the same issue, that being glue.

Kids and glue don't really mix well, and depending on the glue it can get quite stressful for the kids, mainly because they want their creations last week, and waiting for glue to dry doesn't always go down well.


So what to do ? you could use a faster drying glue (like super glue) but this isn't really good with kids about, and fingers stick together very quickly ;-) normally a half decent pva glue will be okay, but there's still a certain amount of waiting for it to dry, and when you get craft kits like the ones my kids did today then pva isn't going to cut it.

Here's the finished creatures -

My son did bugs.

My daughter did a polar bear and an elephant.

 As you can see these are basically pompoms and pipe cleaners, even super glue struggled to get these fixed together quickly, so we brought in the humble glue gun, obviously a glue gun needs care and attention when using it, because the glue can get very hot, so adult supervision is a must, but that doesn't mean you should teach your kids to use one.

My old glue gun -

A bit battered, but still works well.

The glue gun solves a couple of problems, the first being that it takes about a minute for the glue to cool enough for a good fixing, and the other is you get a strong fixing so what ever the kids have made should last a while.

You can get a glue gun from most diy type shops (B&Q Homebase etc) and the glue sticks are pretty cheap, the normal clear sticks can be found in pound shops, and you can even get coloured glue sticks and ones with added glitter as well, so they are quite versatile for any number of crafting jobs.

So get a glue gun, and as long as you supervise the kids and teach them how to use it properly you'll be on to a winner as you'll be able to get stuff stuck a lot quicker, from now on we'll mostly be using glue guns !

Thanks for reading.

Sunday, 20 March 2011

Wooden sketch book cover ... ...

This is a continuation of my scroll saw practice / experiments, after making the jigsaw puzzles I thought I'd try my hand at some more complicated, so I set about thinking what I might make, I decided for some odd reason to make a new cover for my sketch book (all will become clear)

Here's the sketch book -

Nothing special, although the paper is nice to draw on using pens.
 As you can see it already has a cover, it's a thin plastic of some sort, it has the same on the back along with a stiff piece of card so you can lean on it, which to be honest doesn't help that much, hence the wooden alternative.
I had some thin plywood (5mm) lying about and thought it would do the job, and because it's thin (I figured) it would be easier actually getting the cover onto the sketch book, turns out I had to wrestle with it a little to get both wooden covers on it, I made one for the front and one plain one for the back, this is much better for leaning on when you don't have a flat surface.

If I'm honest I spent a lot of time trying to think of what to put on the front cover, I came up with a variety of ideas, some more practical than others.

In the end I settled for this - 

It's made of the same plywood as the cover.
 Okay so it may not be to every one's taste, but it kind of suited what I was trying to do. The design is made of two parts, the wavy bits and then the pentacle on top of that, all of which I cut out using my scroll saw and then glued onto the front cover, there is a little glue that needs cleaning off, I'll get round to it at some point.

I decided the easiest way to fix the cover to the book was to copy the way the original covers attached, so I basically took one off the book and then drew round it to get the size right and then I also drew round each hole on the cover so I could then feed the wire binding through the wooden cover (this is where the wrestling came in)

The back cover -

I used a drill bit roughly the same size as the holes.
This is what the front cover looked like before the other bits got stuck on, I used the same basic draw round and then cut and drill method for both covers, which worked pretty well, although even though the ply is only 5mm it's a lot thicker than the original cover which is a little thicker than a sheet of paper, it still fitted though.

I wanted to add something to each corner, and in the end settled on a leaf type shape that I copied from one of our many house plants, I did also toy with the idea of using metal of some sort on each corner, but in the end went for wood.

The leaf design -

Again I used the scroll saw to cut these out, it's all practice.
As with the main design I used my pyrography tool to burn some detail on so it kind of resembles a leaf of sorts, I also used the same tool on the pentacle design in the middle of the cover.

I stuck it all down with normal wood glue and then gave it a light sanding, just to remove any sharp bits, then I coated the front and back covers with linseed oil, just to feed the wood a little and bring out a bit of the grain, plywood isn't the most exciting of things, I also thought that because the wood was a little warped it might help in straightening things out a little, the wood came from an off cut bin by the way.

The end result is quite pleasing, least I think it is, and it's an interesting way to make a plain old sketch book look a little more interesting, but you could do this with all sorts of books, you could use stiff cardboard instead of wood, and paint instead of oil. It might make a fun project for kids as well, I guess it's a different take on covering a book in wallpaper or other stuff, the sky is the limit really.

The finished book -

I had to make some modifications ;-)

All done ? well sort off, for a start the cover wouldn't stay shut as flat as I wanted, so I had to add a way of keeping it closed, so I drilled a hole in the front and back covers and then used a paper fastener on the front cover as a peg to wrap a piece of string round to keep the book closed.

The fastening solution -

The paper fastener.
Obviously I attached the string to the back cover.


This simple method of keeping the book closed seems to work, it might be better with a thin strip of leather or some other material, but string is what I had to hand.
Over all I am happy with what I have ended up with, not bad for an experiment, I'm now thinking about making more covers for my larger sketch book and perhaps the large book I intend to turn into a family photo album.


" Limitations live only in our minds. But if we use our imaginations, our possibilities become limitless." ---> Jamie Paolinetti

Thanks for reading.


Inspire Me Beautiful

Tuesday, 22 February 2011

Handmade row markers ... ...

To go with our new veg beds, we decided to make some bespoke ;-) wooden row markers, after all you need to know what you planted and where, with a memory like mine I need all the help I can get :-)

Here they are (the ones we've done so far, there will be more)

Ta da ! 
Okay they are simple enough to make, these are made from scraps of wood, the one in the background was made from a scrap of wood left over from the pallets we used to make the raised beds.
Nothing special, built more for function than form I guess. The lettering was done using a pyrography tool which if I'm honest has been sitting around for more than a year, this is the first time I've used it (pyrography is basically burning designs into wood) as you can see it's not perfect, probably requires a steadier hand than mine, I used a letter stamp set as a template, stamping the letters on in ink first, then burning them into the wood.

The other three markers were made out of a couple of bits of tongue and groove, I marked a basic stake sort of shape out on the wood and then cut them out on my scroll saw, you could use a coping saw or a hack saw, then I gave them a quick sand, I haven't coated them in anything yet, I'm still wondering about what to coat them in, I'll probably use a varnish of some sort.

Some more pictures -

I should have drawn a line on them to get the letters level :-)
And another - 

Handy if vampires invade the garden ;-)
I got to thinking that this would make a nice project for older kids to do, I say older kids because of the tools involved, but there's no reason younger kids can't do it, you could do the cutting out and such like for them, then they can decorate them, they don't even have to be wood, you could make them out of clay, although it would need a varnish or some other coating, it might make a nice project for kids to do as well, why not set them the task of designing their own row markers ? they could research designs,materials and it doesn't matter if you don't grow veg or have a garden they could be presents for relatives who do.

This is the one I made from a piece of scrap left over from the veg beds - 

A slightly more decorative one.
They don't have to be plain stake like markers, which is why I thought about making it into a project, or why not just for fun ? you can find scrap bits of wood in the off cuts bin in most diy type shops, you could make them from branches that have fallen off trees, or as I mentioned clay, or some other material.

The stake like ones in the veg beds - 

Beans.

Peas.
And there you have it, it didn't take long to make them, I've since made a few more for the various other things we've planted, and I'll make more as we go along. Okay so we didn't need to bother, but why not add a little bit of a personal touch to the garden ? no harm in it, and as I've said it might keep the kids busy for a little while.

Thanks for reading.


Inspire Me Beautiful

Wednesday, 26 January 2011

Chinese paper yo yo's ... ...

That's right folks it's my turn :-)

My wife has been writing various blog posts about our Chinese new years crafts, you can check them out here (opens in new window) the kids have been enjoying it loads, especially running around with their goldfish kites, which I have to say are weathering quite well, despite the vigorous usage.

So to compliment my wife's posts we have made some Chinese paper yoyo's.

Here they are -

Pink ones.

Spotty ones.

And orange, this was a prototype.
These are really easy to make and quick, you can make a couple in 10 minutes, and all you need is some dowel, or thin sticks (straighter the better) some paper, you can use wrapping paper,wall paper, or you can stick some strips of a4 together if you don't have rolls of paper lying about.

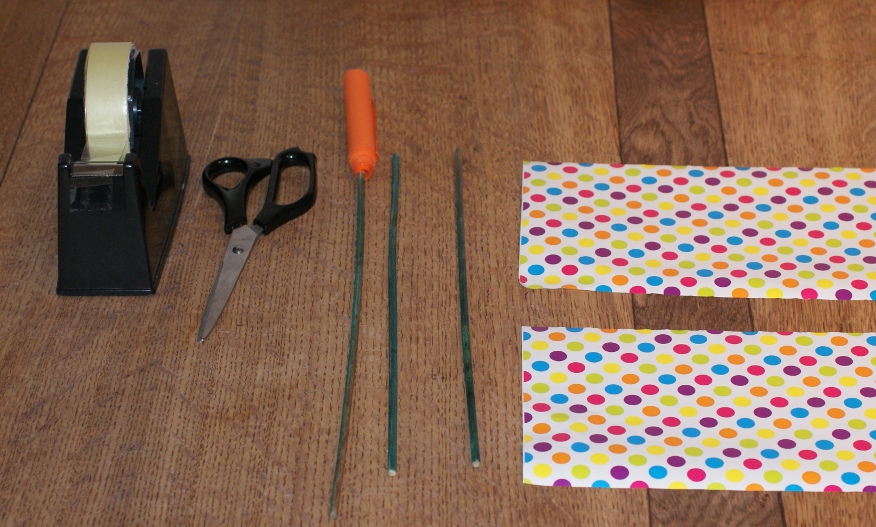
First get some supplies - 

This is about all you need.
To make the yoyo you will need a strip of paper about 20cm wide and a meter long, any colourful paper will do, if you don't have any long pieces folder a couple of sheets of a4 paper will do, fold them in half and then cut them into 2 strips, and stick them together in a line with sticky tape (this is how I made the orange yoyo)

The sticks were out of the garden cupboard, just little garden canes really, but anything stick like would do, some lengths of garden cane about half a meter long would be ideal.

Time to commence construction -

Sticky tape is quick and works well.
Take some sticky tape and place 2 or 3 strips onto the paper so the sticky side is pointing up, this is for attaching your stick of choice. Once that's done take you stick and place it onto the tape and roll it up, the tape should stick to it and start to roll with the stick.


Some extra tape here will help it stay together.

Keep rolling until the end of the paper.
You need to keep rolling the paper as tightly as you can, once you reach the end of the paper hold it for about a minute, or slightly longer to make sure the curl stays in the paper.


Holding... ... has it been a minute yet ?


You could just place a book on it to hold it down.
If the end starts to un-ravel you can always roll the end the other way to help keep it together.

Like so - 

Use another stick to help roll the paper.
And you should end up with something that looks like the first lot of pictures. The way they work is quite simple, the paper works kind of like a spring as you flick it about.

When they are extended they should look like this - 

See spring like :-)

This one had already been played with.
They should spring back by themselves, you might need to roll them up tightly now and then to keep them nice and springy.
If you don't have any coloured paper you could always decorate some plain white a4 before making it into strips, get the kids to draw Chinese related things on the paper ? like dragons maybe.

Thanks for reading.


Tuesday, 21 December 2010

Spinning star tree decoration ... ... (rough draft)

I just thought I'd write a quick post to carry on from the one I did about the spinning tree decoration.
This is more or less the same thing, only it's a star and instead of slicing it up I've cut out smaller star shapes, which spin within each other.

Here's a picture (it's a prototype)

Cardboard wasn't the best material to spray with paint.
Okay so it's not neat and tidy, but it'll do as a model to see if the idea works well, and also to work out the best way to make it. In this case something harder than cardboard will be better, especially if you intend to spray it silver or gold for example.
The problem was that the cardboard soaked up the paint and became very floppy, it's okay now it's dried but for a moment I thought it might fall apart.

Next time I'll use wood (maybe thin plywood) ;-)

It's easy to make, basically you find a shape, I used a star seeing as it's nearly christmas, but a circle or other shape would work just as well. You can see that it's a star within a star within a star, they all turn independently. 
You cut out the shape from your chosen material, then you draw a smaller shape inside it, and then another until you get to the middle, I left a fairly large shape in the middle, if I'd have used wood I could have gone smaller.

Now you want to remove some of the sections you've drawn so that there's a gap between each shape, like the picture below (which you can copy if you want to use a star, just print it out and use it as a template) I've marked parts in red, these are the parts you want to remove, you should be left with 3 sections.

Star template - 

You may want to make it smaller, or larger. Note the red sections.
You should get the idea from the template, once you've removed the red sections you can then assemble the decoration, I used a needle and thread to join the pieces, with beads separating each part so that they can spin without catching each other.
If you use wood you will need to use a drill bit to make the holes for the thread or wire if you prefer and what you should end up with is something like the first pictures (only some what neater) I will update this post with pictures of a wooden one if I get round to making it before christmas day ;-) if not have fun making your own ones, you can get the kids to decorate them with glitter and what ever else you feel like, have fun.

Thanks for reading.


Monday, 20 December 2010

Spinning christmas tree ornament ... ...

Just a short post on another of our christmas creations, at this rate we will have more or less refitted the tree in handmade decorations.

Here it is.
My wife had mentioned making tree decorations like the one above out of some foam sheet we have, but after looking at the thickness of the foam we decided it wouldn't work very well.
So this afternoon I set about making one out of wood.

They are simple enough to make, you need a few tools though, mainly a saw of some kind (a small hacksaw, or coping saw will do) and a thin drill bit and drill (a 2mm drill bit) all you have to do is mark out your shape on some wood (I used a scrap piece of 10mm tongue and grove) I've chosen a tree shape, but you could do a snowman, or a circular decoration, you could also use a star shape and instead of slicing it like I have you could cut a series of stars out of the main one, so that they all spin inside each other (I'll most likely write a post about it at some point)

Once you have marked your shape out you need to divide it into equal sections, I made my sections about 10mm (1cm) thick, then mark the centre of your shape, this makes it easier to align the holes you will drill through each section.

A closer up picture - 

It's not really wonky, it's the camera angle ;-)
Use the saw to slice up your shape, try and keep the pieces in the order your saw them (although with a simple shape it's easy to figure out where the bits go) then take each piece and drill a hole in the middle (use the centre line you made as a guide) do this for all the parts, if you use wood you may want to give each part a sand after you've cut and drilled them for a smoother look.

Then the fun bit, you can use thin gauge wire,string,wool or cotton thread for this part, you'll need some small beads or something to put between each section as well.
I used a larger bead at the bottom of the tree, but one the same size as the others would do, you could also use a small bell for extra jingle. Thread your chosen material through each part, you can use the first bead/bell to tie the string or wire to, so it doesn't all slide off.
After each section add a bead, then another section, then a bead and so on, until you get to the top, at this point you can either use the last section, or use a large bead, or bell or maybe if you have some star shaped beads you could use them, that's the beauty of crafts, you can do what ever you feel like, it's about imagination. Then just leave a loop to hang it on the tree with.

Here it is again, in case you missed it at the start of the post ;-)


It doesn't take long to do, and you can get the kids involved, although you may want to do the sawing or cutting, then you can decorate them however you want, I've used some silver spray and a little glitter spray, you can use glue and glitter or anything else you have.

You don't need to use wood either, some thick cardboard would work just as well, and if you don't have a saw this may be a better option, it should work in the same way.
And there you have it, a spinning christmas tree decoration.

Thanks for reading.


Monday, 13 December 2010

A star is born ... ...

Instead of buying a load of new christmas decorations this year we have been making our own, we have made them out of paper,pine cones,card and for the stars below wire and string, much more fun than fighting through shops looking for decorations that probably won't last half as long, it's good for the kids to do some christmas crafts as well.

Here's the stars -

They may not be to every one's taste.
The colour of the silver spray didn't really come out in the picture, they are easy enough to make, all you need is some wire (I used gardening wire) and some string, any string will do, or wool. You can also make them from string instead of wire, but it's a little harder to keep it altogether, you can spray them what ever colour you like, we used silver and some glitter spray, you can use gold as well.

Making them doesn't take long, although if you spray them you will need to wait a short while for the paint to dry. If you use wire you will need a jig (no fiddles involved) to make the basic star shape, unless of course you feel like making them free hand.

To make the jig you'll need some nails, a piece of wood, a hammer and a template, which you can either print out from your pc or draw on a bit of paper, then all you do is place the paper onto the wood and hammer nails into it at all the angles of your shape.

The jig with nails already hammered in - 

It should look something like this.
It makes it a lot easier to bend the wire into shape using a jig. Next take a piece of string and wind it round all the nails to make a star, basically you use the string to measure how much wire you will need, you want to leave a little extra wire so you can twist it together.

Using the string to measure - 

Measuring done.
Time to get some wire, you can see that I've used slightly more string than is needed, this will make it easier to fix the wire together. Next get your wire and use the string to measure out a length of it, then cut it (I should have mentioned that you may need wire cutters, or pliers) then all you need to do is wind the wire around the nails in the same way you did the string, thinner wire will bend easier, I got ours from the garden section at b&q.

Once that's done twist the wire together where the two ends join, again pliers will do the job, depending on how thick the wire is, then all that's left is to wind your string of choice around the wire frame, when you are happy with it, either tie the string to the frame and cut off any extra, or you can use a spot of glue to fix it. 

You don't have to spray them, you could use paints from a pot, get the kids to do it or you could just cover them in glue and glitter or anything else that you feel like really, it's up to you.

A close up - 

Still didn't manage to get the glitter to show, it's there I promise.
And that's it, they may not be flashy shiny plastic type shop bought ones, but to be honest I think they look better, and they'll last for a while, and even if you don't want to hang them on your tree if you got the kids to decorate them they will have had a great time, and that's what it's all about, and you don't have to make stars, why not try different shapes ? like snowmen or christmas trees ?

Thanks for reading.


Homemade quilling tool ... ...

What is quilling ? well you can read a little about it here and here (links open in new window)
Basically it's curling paper to make nice things, you should get the idea from the links above, but for a great example of quilling have a look here ( a shameless plug for my lovely wife's blog)

Quilling tool -

Does what it says on the tin.

Now you don't need a tool to do it, you can use a large needle (large enough to get the paper through the eye) my wife used some card, which makes the finished item stronger, but  tool will make it easier.

You can buy a tool, but they can be a few quid, you can also buy starter kits that contain paper and the tool as well, but for the sake of 5 minutes work it was easier and cheaper to make a tool, Warning ! you will need a sacrificial needle ;-)

To make the tool you will need a needle, some pliers (with a wire cutting section) or some wire cutters, and a stick that feels comfortable to hold, you could instead of a stick use a pencil perhaps.

Here's how to make the tool.

Once you have your stick sorted out, you can decorate it, or carve it or just leave it plain like the one above, you need to fix the needle to the stick, the easiest way I've found is to put the stick in a vice, if you don't have a vice you can manage without, then lightly hammer the needle into the end of the stick (pointed end first of course) it's best to do this before you cut the end off the needle.

Don't hit the needle too hard, you don't want to break it, once it's secure you can then cut the end off the needle.

You can use pliers or wire cutters -

Pliers are good, as long as they have the wire cutting part.
Then carefully snip the end of the needle, try to cut it as close to the top as you can, and it's best to keep your hand over it when you cut as the end will fly off, watch your eyes as well ;-)

Snip carefully - 

Watch your eyes ;-)
And that's pretty much it, when you have cut the end off the needle you should have something that looks like the first picture, below is a close up of the end of the needle after I cut it.

Nearly done - 

Not quite level, but it will work just the same.
All that needs to be done is to smooth the prongs, you can use some fine sand paper, a nail file, or emery cloth, but be careful because you can break the prongs if you are too rough with them, and that's it your very own quilling tool made in just a few minutes and for next to nothing, unless you had to buy some needles ;-)

Here's a nice example of a handmade quilling tool ---> handmade quilling tool

Thanks for reading.


Monday, 6 December 2010

Today day I made a snake ... ...

Just a quick post, and as the title suggests it's about a snake.

My son has a wooden snake that we got him last christmas, and my daughter has decided she likes it very much, which has resulted in some small arguments between the two of them, so in a flash of genius I decided I'd make another snake, and thus solve the problem.

Here's the snake -
It's not to scale ;-)
Okay so it isn't anatomically correct, but it is vaguely snake like, at least the kids thought so.
It's made from a piece of eucalyptus, which was basically the first thing I picked up, some string and a bit of red felt.

It was easy to make, I tried to get a bit clever by cutting the segments with a curve in each to make it articulate a little better, the head and tail I carved a little to a sort of snake like look.
To hold it all together I used some string, which I fixed into a hole I made in the head and tail ends with a drill bit, using a little glue helps make sure the string won't come out easily, each segment had a hole drilled through it so I could thread the string, then I put a knot in after each segment to help it stay together if it gets pulled at each end.

Another couple of pictures - 

Can you tell what sort of snake it is ? ;-)
It ended up with a kind of cheeky looking face.
After sticking all the segments together I drew a couple of eyes on it and made a mouth shape and stuck some red felt into it to create a snake type tongue, the felt may be a little large.
It's not meant to be an accurate model of a snake, it's a toy for my daughter, which she likes a lot, and as it turns out so does my son, so much so that he now wants a snake like this, and I've got to make another one, so I guess I did good, maybe a little too good, I think it's great though that in this day and age, with all the technology that's about my kids get enjoyment out of a few bits of wood and some string, why not have a go at making a wooden snake ? it's easy to do.

Instructions.

Just find a length of wood, maybe from a tree that's been pruned, you could even use a piece of wooden dowel from a diy shop.

Cut it into how ever many segments you want, making sure to leave slightly bigger segments for the head and tail, then drill a hole about an inch deep in the head and tail end, this will be where you glue the ends of the string to make it secure.

Drill holes through each of the remaining segments, you should use a drill bit slightly bigger than the thickness of string you plan to use, you can use a little sand paper to smooth any rough edges.

For the head and tail you can add as much detail as you like, I used a stanley knife to carve the respective ends into a vaguely snake like tail and head.

Then start putting it together, glue one end of the string into the tail part (or head, depending on which end you start with) then tie a knot in the string, try and get it as close to the wood, then thread the next segment and tie another knot, and so on until it's put together, then glue the end of the string that's left into the head or tail, which ever bit is left.

You can then make a small cut for the mouth, or just draw it on, along with the eyes, and once the glue has set you should have a pretty robust toy, if you prefer you can paint it what ever colour you choose, or just leave it with the bare wood.

Thanks for reading.


Saturday, 4 December 2010

Artistic recycling ... ...

It seems that these days it's all about recycling stuff to save the world, round our way we have 3 bins now, a blue one for recyclables like paper,tin cans and such like, we have a black bin (most are green) for normal waste and just recently we got a mini bin for cooked food waste, not that we have much, what we don't eat the dog does ;-) we also have the option for a brown bin that costs extra for garden waste, but we compost all ours.
 I will freely admit that it's a hassle sometimes, sorting stuff into various bins, but I guess it has to be done.

Now I have long been a fan of making things out of odd stuff, which makes the whole recycling thing a lot less tedious, especially if you get good results.
Have you heard of a website called " Instructables " ? I'm pretty sure a lot of people will now the site, but just in case here's the link ---> instructables (link opens in new window) it's a fantastic site for inspiration on just about everything you can imagine, sewing,wood working,metal working (the list is probably endless)

Whilst I was having one of my regular trawling of websites sessions I found an excellent craft idea on the site I mentioned above, and it's the best use of a drinks can I've ever seen (from an artistic point of view) here's the instructable page ---> drink can tinwork (opens in new window) take some time to look through the various steps used to create this piece of artwork, it's worth it, but please come back here after ;-)

I have to say that I was impressed a fair bit by this, it beats squashing the cans and taking them to the recycling bin, I haven't actually tried to make the box, but I will.
This set the wheels in motion and gave me the inspiration to have a go at creating my own artwork using a similar method. Now we don't really have drinks cans lying around, we don't drink fizzy drinks or beers, we do however have some cans of coconut water, so I've been bugging my wife to drink them so I can have the cans.

The items I have made are prototypes really, I have been playing around with different ways of putting them together, and different materials.

Here's what I've managed to make so far -

Be nice ;-)

You can see how I've applied the method used to create the tin box for my own ends, basically using some wire wool I've rubbed all the printing of the cans to get back to bare tin, this actually gives quite a nice effect, then I've applied a pattern to one side so that it appears raised on the other, there's nothing stopping me from switching them round so that the patterns look like it's been engraved.

The tin is pretty easy to work with, it's not very thick which helps when getting a design onto it, all I've used is a ball point pen and the end of a metal crochet hook, you don't need to press too hard.

Here's a picture of the first ones I made - 

The best one is the bottom left in my opinion.
The designs aren't as crisp as I wanted, the best I think is the bottom left one (the triskelion / triskele) and the frame on the bottom right isn't to my liking, I was trying different ways of making the frames, I think I'll stick to the way I did the frames on the other 2.
Since I made these 3 pictures I've bought a scroll saw, which means I can make templates of various designs, so I can get the designs crisper and neater, and also put them on the tin faster, still working on a quick, but neat and tidy way of making the frames.

Here's a picture of the templates - 

I printed out some designs and stuck them to the hardboard.

My lovely wife remarked that with a bit of spray paint the templates would look pretty good as well, that's why she's the brains of the out fit.

Here's one made with a template - 

The wood for the frames comes from our garden.
In my opinion this one looks neat compared to the others. As it says in the caption all the wood comes from our garden, the frame for the one above is actually made from buddleja that I had to prune because it got damaged by the wind, the string hanging loop is an off cut of string left over from knitting hanging baskets, the only part of these that doesn't come from our house is the hardboard back I have fixed the tin to, I got 2 off cuts from a bargain bin in one of our local diy stores, so it is kind of recycling as they generally throw the smaller stuff out if no one buys it.

And it's not just designs like the one above either, it's possible to do loads of different designs, especially if you use a template ;-)

Here's one I made for my wife - 

Again I've used buddleja for the frame.
The one above I made by printing out the word on paper and then using some masking tape to secure it I drew round the letters with a ball point pen, can't really get easier than that ?

There's a bit of flexibility on how you can display them, for example with these ones I've used string to make a loop, I have also worked out a way to make them stand up like a picture frame does, you can also hang them together to make bigger hangings, have a look at the picture below.

Hung in a group of 3 - 

Looks pretty good, but then I'm biased ;-)
Just by using a drawing pin you can hook them up in groups like this, and make combinations of them, and if you had 3 that were all words you could make up short sayings, so there's a fair bit you can do with them (have I sold the idea to you yet ?) so why not have a look round your home or garden and see if you can make your own unique piece of recycled artwork.

Thanks for reading.