Tuesday, 24 August 2010

Grrrrr ! Man biscuits, well sort of ... ...

I'm not ashamed to admit I like to dabble in the kitchen, I cook the Sunday roast (although not as well as my wife) we have recently been foraging for stuff, and have made blackberry jam, and I'm in the process of making blackberry wine (should be fun)

So when the weather is bad and the kids are driving you nuts (as mine frequently do) why not venture into the kitchen and do some baking, go on it's okay, men are allowed to do kitchen stuff :-)

I'm not talking about large scale baking, massive cakes and such like, I'm talking biscuits, they are great, and easy to make, the kids will love them, and you can feel pleased that you made them from scratch, and that they aren't full of preservatives and such like, believe me if your kids like this kind of thing you don't need preservatives, the biscuits won't last long enough to go mouldy.

So to the biscuit making, I use a recipe that my wife showed me, it's easy to do, and you can use it as a base for loads of different types of biscuit.

The ingredients.

Baking marge (the stork stuff is good)
Sugar, you can use caster sugar, but I tend to go for muscovado sugar, it adds a nice flavour to the biscuits.
Self raising flour.
A tablespoon of golden syrup (this helps keep the biscuits moist)
What ever you want as a flavouring, chocolate chips,coconut, raisins, peanuts.
Grease proof paper and a couple of flat baking trays.

I will give you amounts of stuff to make about 20 or so biscuits, depending on how big you want them.

100grams of baking marge
100 grams of sugar
150 grams of self raising flour

As for the flavouring, then this is up to you, but around 50 grams of what ever is a good start.

To make the biscuits.

First clean your hands and the kids if they are helping.

Add your sugar and marge together in a bowl and mix them together well, you want a creamy paste.

You can add the syrup here.

Next add the flour and mix again, until it's all mixed together.

Then you can add your choice of flavouring and mix again.

Once it's all mixed together you then need to get 2 flat trays and either grease them or cut a couple of sheets of grease proof paper.

Then grab small amounts and roll into a small ball and flatten out and then place on the tray, you should get about 12 or so on each tray, leave space around each one for them to expand.

Chuck them in the oven, you want to cook them for around 6 - 8 minutes on about 200°C keep checking them as they cook, when they are a golden brown colour take them out and let them sit for a few minutes, it's easier to get them off the trays once they have cooled a little, then you can put them onto a cooling rack.

When they are cool enough to eat..... eat them (always the best bit)

Here's some pictures of some I made the other day -

White chocolate and coconut.


And these - 

Peanut cookies.


These I made today, coconut with smarties (I know sweets aren't that good for kids, but there's only a couple on each cookie) as decoration, I found sticking the smarties on while the biscuits/cookies are hot helps them stick. 


With sweets.


And there you go, man biscuits, well sort of, but who cares they taste great, and when it's raining outside this will easily kill and hour or two of time, and kids love doing this sort of thing.

Thanks for reading.


DIY skills no longer important ?

It seems that DIY skills or even basic practical skills are on the decline, why is this ? well I guess that technology has taken over a big part of our lives, although this doesn't explain why it seems that some people don't know how to wire a plug or put up a set of shelves, and according to this article in the Mail on line it seems to be an affliction people under the age of 35 ---> Mail on line article (all links open in a new window)

When I was at school we didn't get a choice in some of the things we had to learn, this I think was both a good thing and perhaps a bad thing, either way we had to attend metal work lessons,wood work lessons we also had a craft design and technology lesson, which kind of complemented the wood and metal working.
From what I know of having two older step daughters these are no longer that important in schools, and from what I know there aren't any specific lessons for wood working etc, so perhaps it's an education thing, kids just aren't being taught how to use tools to make things ?

Then again if it's the schools that aren't teaching the kids what about their parents ? surely they learned practical skills in schools ? are they not passing them on to their children ?

I don't know what the reasons are, but I have seen that the world we live in is a very different place from what it was twenty years ago, people don't tend to build things any more, or make their own furniture, or fix things that get broken, it just gets thrown away and a new one gets bought, maybe it's society that's not teaching people to do things for themselves ? I mean why make a cabinet when you can go and buy one, and even if you get a flat pack type kit you can just look through the yellow pages and you will probably be able to find someone that builds flat packs for you, we have a chap in our area who does just that, come on people, flat packs are just jigsaws at the end of the day.

The article I mentioned above isn't the only one either, it seems that these types of practical skills have been in decline for some time, and not just in England either, this article talks about how a lot of American men can't do a quarter of what their fathers did, there are a few articles on this theme, some from a few years ago, and some more recent, it's a shame and I think that people need these types of skills, and I also think that these types of skills should be past down the generations.

Here are a couple of articles from various places regarding the lack/decline of diy skills.

1 - http://www.home-improvement-blog.co.uk
2 - http://news.wickes.co.uk/brits-lack-diy-skills-452
3 - This one tickled me, apparently diy skills are in the genes - A-handy-excuse-DIY-ability-genes

As you can see it is a problem, well is it ? is it so bad that people now longer know how to use a spirit level (or what one even is) is it so bad that in 2 generations time, unless your a builder or carpenter or other tradesman you will have no idea what so ever which end of a screw driver is which ? If you ask me then the answer is yes.

These skills are what made this country (and others) what they are today, look at the Victorians, if it wasn't for them would we have half the technology we do now ? and although some of the inventors of the time were rich, or came from wealthy families they still had practical skills, they could, if need be pick up a saw or some other tool.

I for one will be teaching my kids how to do things, like putting up shelves, or wiring a plug and if they are interested how to do more elaborate things as well as how to grow their own food, which seems to be something else people have forgotten how to do, although in recent years more people seem to have taken it up again, but I bet not as many as forty years ago.

Now I'm going to get a little doom and gloom, see there is a big problem with people having little or no practical skills, not knowing how to use wood to make something, or what tool is good for what.
Lets just suppose for a moment that the year is now say 2100 everyone on the planet now has a face book profile, everyone on the planet has a computer/laptop or smart phone type device permanently attached to them, the world is electronic, nothing is made by people in sheds/workshops any more, it's all done by robot and computers in vast factories, just picture the scene, like something out of a science fiction film, Bladerunner or the like, technology every where......

What happens if it fails ? someone pulls the plug on the lot, how many people would survive with out that technology ? how would people get food ? what would you do if the fancy hover car you got won't run, would you know how to fix it ? could you adapt it to run on some other fuel if needed ? what about heat and light, how many people in this day and age know how to make a fire with out a lighter or a match ? let alone in 90 years time, makes you think ?


My point is that practical skills are needed, they should never become redundant, after all if it wasn't for early man realising that flint made a good raw material for making tools where would we be now ?

Thanks for reading.

Monday, 23 August 2010

Make your own polish for wood ... ...

Just a quick post on how to make your own polish for wooden furniture, that's real wood furniture, not chip board on mdf type stuff, I mean real good honest wood, oak,beech even good old pine stuff.

A while a go we got an old dining table from a charity shop, it has two pull out leaves and can sit 8 people at a push, but sits 6 comfortably, we have our meals everyday around it, yes we still sit at a table to eat, no trays on laps here.

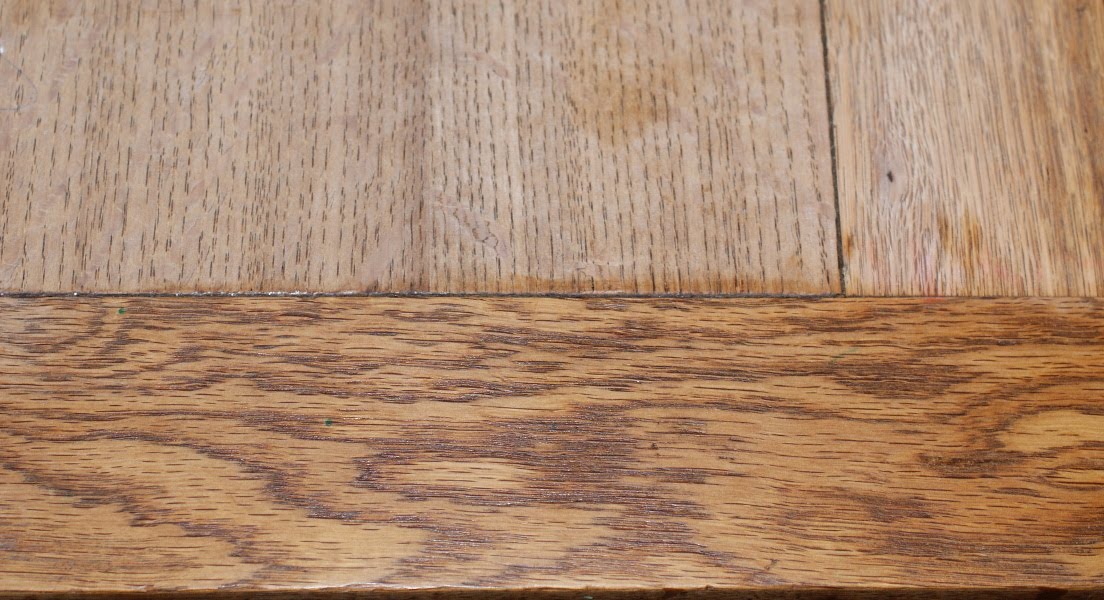
When we first got it, it was varnished and it looked a little sad, so I sanded it back to the bare wood, and then we realised that we didn't have anything to put on it, and we didn't want to varnish it again, so I made some polish, which isn't really that hard.

We could have just bought a wax polish from a diy shop or such like, but they can be pricey, and you don't get that much, so making a wax polish seemed the best idea, we've been making our own polish for the last couple of years, we use it on all our real wood furniture, it protects the wood and makes it look great.

To make your own polish all you need is some beeswax sticks, we get ours from a hardware shop (yes they still exist in England if you know where to look, great places) the sticks cost about 25pence each, linseed oil, which you can get for about £3.99 for 500ml (this will make a fair bit of polish) and some essential oil, doesn't matter what flavour, lavender is good, or citronella (helps keep bugs away) and something air tight to store it in.

Ingredients.

To make the polish all you need to do is melt the wax, I use the tub I keep it in, which is just a plastic tub with a lid that seals well, I heat it in our microwave, but you could use a pan on the hob, but that would mean having to get wax out of it, so my way saves a little time and cleaning.

Once the wax has melted add some linseed oil, basically what you're looking for is about 1part wax to 3 or 4 parts oil you want the polish to be soft enough to use, but not too soft, so a little tweaking maybe needed, once you add the oil heat it again in the microwave, it's important to know that wax and linseed both have a flash point between 200 - 250 °C although you shouldn't need to heat it anywhere near that high, the wax should melt at about 60 - 75°C

Melting the wax.

Be careful this will burn if you get it on you while it's hot.

The next step is to add your essential oil, a few drops is all that's needed, then give it a quick stir and then leave it to cool, if when it's cool it's a little too hard or soft then either add a little more wax or oil depending, what you want is something a little harder than shoe polish.

I have also seen polish recipes that use a little white spirit as well, the first time I made polish I did add some white spirit, but to be honest it doesn't seem to make any difference if it's used or not, and white spirit does smell quite strong, so I'd stick with essential oil instead.


Once you have it so it's soft and it's cooled, then all you need to do is get a rag, I use old t-shirts and go polish something.

All you need is a rag and elbow grease.


You can see the difference it makes to bare wood.

The darker section has been polished.

I think it brings out the grain and colour of the wood, and the wood seems to like it, you can make a load of polish from a little of the ingredients, so if you buy a few wax sticks and a bottle of linseed oil it should last you a while, depending on how much you polish your furniture I guess.

We use it on all our wooden furniture, our craft box that doubles as a seat seems to like it a lot, always seems to come up with a better shine than the kitchen table.

Our craft box.

Thanks for reading.


Thursday, 19 August 2010

Which is better, fixing something or throwing it ?

I like music, who doesn't ? (I'm sure someone somewhere doesn't) but I don't really get the chance to listen to music that much, at least not on my stereo, which hasn't really been used for years, probably due to the volume the thing is capable of :-)
I have some old pc speakers in the shed that I plug my mp3 player into, this is good if I'm doing something repetitive, like wood turning, removing the wood until you have what you want can take some time, so music helps pass the time, just lately AC/DC has been my preference.

If however I'm not in the shed I don't really have a choice but to use my mp3 player with some headphones, I don't have anything fancy, but they put out good sound (which is the important thing) but for some reason I keep breaking them, and it's always where the jack plugs into the mp3 player, probably how I put it in my pocket or something like.

I did have a set of headphones that had an in-line volume control, these are good to have because if someone tries to talk to you, or you need to talk to someone it's easier to just turn the volume right down, rather than ferreting about in pockets for small music players, and because I broke my set that had the in-line volume control I was a little stumped, I didn't want to pay loads for a new set (I got mine on offer) so I got a cheap set and decided to frankenstein me some headphones :-)

Yes I could have just thrown them out and got a new set, or gone for something like this - headphone volume control (opens in new window) but that's just adding to the rubbish and all I needed to do was chop and change what I had a little, I kept the leftovers, pretty sure they will come in handy at some point.

So this is what I did, basically I took the damaged set of headphones and cracked open the volume control.

You need some tools to do this, soldering iron,solder, a knife or flat headed screw driver to open the volume control, if your soldering on the kitchen table use a bit of scrap wood, pliers and a sharp knife or wire strippers.

Here's a picture of what I used -

The stuff.

I cut the good headphones in half, all I needed was a length of wire with the jack on the end (I could have just bought a new jack for the other headphones as well, but it seemed easier this way)
Then I cracked open the volume control unit.

Here's what it looked like inside - 

The gubbins.

As you can see it's pretty simple inside, so then I de-soldered the damaged section, and took the plastic casing and the small black plastic grommet, I planned to use the casing on the new cord to give it some more strength, the grommet was need to make sure the new lead was held securely in the volume controller.

Casing and grommet - 

Casing and grommet.

Next thing was to thread the casing onto the new lead, this took a little longer than I expected.

Threading the casing - 

This took longer than I thought it would.

Once this was done I then set about soldering the new lead onto the volume controller. Now if you haven't ever messed around with headphone wire before then you may find this helpful. I think they do this for all headphones, perhaps not really cheap ones ? but there's a coating on each of the wires and a kind of thread running through each one as well, this has caused me problems in the past and the best way I've found to deal with it is to burn it away with a lighter or such like, but be careful because if you heat the wires too much they sometimes loose colour, this may cause further problems when it comes to soldering, you can also scrape the coating off with a sharp knife (Stanley type blade) 

The wires and thread - 

Not the best picture, but you can sort of see the thread.

So to the soldering, I always find I need three sometimes four hands when I'm soldering, should probably make some kind of vice type system, anyway the contact on the volume controller are quite small, so if you have a finer tip for your iron use it, it will make a difference.

The contacts - 

If you have glasses, wear them.

I got my lovely wife to take a picture of me soldering, luckily pictures don't show the swearing I did as I toasted my finger tips with my soldering iron :-(

Soldering - 

Finger toasting.

Now when you solder small terminals make sure you don't join terminals with the solder, or things don't work properly, and when you have finished soldering don't put it all back together just yet, test it all first, there's nothing more frustrating than finding all you hard work needs to be undone because something went wrong.

Testing music is a preference, I found AC/DC to be adequate for my testing -

Let's rock ! :-)

If everything is working as it should, both left and right ears are working then you can go ahead and stick it all back together safe in the knowledge that you saved money, didn't add anything to the rubbish and you are clever because you did fixing :-) so if you have something that's broke why not see if you can fix it before you retire it to the bin.

Thanks for reading.


Wednesday, 18 August 2010

Rocks rock ... ...

I thought I'd post about my rock, it was a stone from the garden that my son painted for me for fathers day, I think it's great, and I thought that if the weathers been bad where you are why not grab a couple of stones from the garden, or the beach if the weathers okay, or where ever else stones and rocks like to live and give them a paint.

It's something that may give the kids something to do for a while, it's not a new idea, people have been painting rocks,stones and such like for years, I pretty sure I painted them in school when I was a kid, although I may not be remembering correctly, brains not as good as it used to be.

All you need are some paints, acrylic type paints will be best, but other paints work, you could add a little pva glue to poster paints, or you can even stick stuff to them to make them look like bugs and other things.
I did a quick search, I was surprised at how many different designs people have used, there's a lot of inspiration out there.

Here's my rock -

Rock's are great :-)

As you can see mine has eyes, these can be bought from craft shops, or anywhere that sells crafty type stuff, most pound shops sell this type of thing, so it doesn't have to cost a fortune, and it's good fun for kids and adults alike.

Here are some sites that have painted rocks - (links open in new windows)


Or if you feeling a bit daring just google (or use your search engine of choice) "Painted rocks " or " Rock painting " As I said I was surprised at the designs some people have used on rocks, some look like cats curled up, some look like faces, and it seems some people make a living out of selling painted rocks, but either way it's a good fun project and they make great little gifts.

Thanks for reading.

Thursday, 12 August 2010

Home made honeycomb... a blast from the past... ...

As a family we have been trying to save money in general and make use of things that you can find around and about. Like fruit that grows out in the wild, so to speak, this time it's blackberries, we managed to pick a kilo and a half the other day, and we saw a load of baby and adult common lizards, which was a bonus.

We have been looking at things you can make yourself, rather than buy, and as we are finding most of the time things you make yourself taste better and are better for you, and cheaper, which is always good.

My wife was looking for recipes that use blackberries and whilst she was looking she found a recipe for home made honeycomb, or cinder toffee as it's also known (in America ?) I remember eating loads of this stuff when I was a kid, it was one of my favourite sweets, still is if I'm honest.

I had to give it a go and make some myself, so I did, it was great fun :-) and easy to do.

What you will need -


  • 200grams of caster sugar.
  • golden syrup - you will need 4 tablespoons for this.
  • 3 teaspoons of bicarbonate of soda.
  • Some water in a tub,cup (all will be revealed)
  • A fairly deep sided baking tray.
  • Some grease proof paper, or you could just grease the baking tray really well.
  • A medium sized saucepan.
  • A wooden spoon, or similar stirring implement.
  • If you have one a sugar thermometer would be handy.
  • A tablespoon of water.
The method is pretty simple.

Put the 200grams of caster sugar,4 tablespoons of syrup and the 1 tablespoon of water into the saucepan.

Heat the saucepan until the contents start to melt, bring to the boil and make sure you keep stirring.
Then simmer on a low heat for about 10 - 15 minutes, now you need to keep an eye on the mixture to make sure it doesn't burn, this is where the sugar thermometer is handy, it should read about 138°C

Test the mixture by dropping a little into the tub of water, if it goes hard then it's ready for the next step.

Right this is where it gets fun, add the bicarbonate of soda, it helps if you weigh this out first and put it into a tub or something, the reaction is pretty quick and having to weigh stuff out while things are foaming all over the place isn't ideal.

The mixture will start to foam a lot, so the deeper the baking try the better really (or you could use less bicarbonate of soda) keep stirring and make sure it's all well mixed, you will need to be pretty quick as the mixture will be cooling, pour it into the baking try, don't worry if you get some on the work top, it comes off easily, but make sure you don't get any on yourself, hot sugar and skin don't mix, and it hurts.

Let it cool some where out of the way, it will take a while, which will give you time to tidy up. Once it's set hard just get it out of the try and break it into bits, you can store it in an air tight jar.

Here's a picture of how it looked - 

Blast from the past.

I'm pretty pleased with the way it turned out, seeing as it's the first time I've tried to make it, everyone seems to like it, and I tried some crushed on top of our home made blackberry ice cream, really nice.

Now here are some things I'm going to change when I make the next batch. Firstly the amount of bicarbonate of soda, I'm going to see if it still foams up enough with just two teaspoons, secondly I think I may have left it a little too long in the pan, so next time I'm going to check the mixture while it's cooking at regular intervals, and as soon as it goes hard when dropped into water I will mix the bicarb in, the other thing is that the tray I used wasn't quite deep enough, and a fair bit ended up on the work top, so a deeper tin is a good idea, and lastly, next time I make it I will do away with the grease proof paper and just grease the tray really well, the paper can be a bit of a pain to get off.

As for cleaning when you've finished, it's easy enough, just use some hot water and some washing up liquid, it's not hard to clean the saucepan or the work top, and it's worth it for a nice treat.

Thanks for reading.


Tuesday, 10 August 2010

Got a bicycle ? You need slime ... ...

As I've mentioned in previous posts I use a bicycle to get about, I leaned to ride a bike when I was about 8 years old, it was christmas and had snowed a lot, and it was hell, but I learned to do it.

I've been riding a bike for most of my life (about 26 years, but not constantly obviously) and I have learned that carrying certain equipment is a must, I've lost count the amount of times I've been caught out by a puncture, or a cable breaking or something coming loose.

This is why I now carrying a variety of stuff with me, even if I'm only going to the shops, I have some tools, an adjustable spanner, and of course a pump and a puncture repair kit (which includes tire levers) and in the past I've also carried a tin of tire weld (link opens in new window) which is basically a foam type substance that you can squirt into your tires or inner tubes if you get a puncture, this is usually enough to get you home so you can make a more permanent repair.

But what about puncture prevention ? you can avoid riding over a broken bottle, and other things, but sometimes you pick up a thorn or other sharp object and there's nothing you can really do about it, you can't avoid everything.

That's where slime (link opens in new window) comes in, it's basically a green (at least the stuff I use) coloured goo that you fill your inner tubes with, it has some kind of fibres in it as well, and the idea is it will stop punctures and holes up to a couple of millimetres which means you won't (or shouldn't) get caught out by a surprise puncture.

I've been using it for a few months now on my bike, and it has already come in useful, for some reason the tire on the back wheel developed some cracks in it, and the inner tube came through a little, enough for it to make contact with the ground, this isn't ideal and the inner tube did suffer a little, but the slime held and I got home, fixed the puncture and fitted a new tire, with out it I would have had a long walk home with a rucksack full of shopping, not good.

So get yourself a tube or two of slime, it's great stuff, and it works. If you enjoy cycling with the kids it's probably going to come in quite handy as well, you can use it in the inner tubes of bicycle trailers as well, I intend to get some for my trailers wheels, it's easy to use, you basically undo the valve on the inner tube (the tube comes with a tool for removing the valve) and squirt it in, a tube should be enough for two inner tubes, the wheels on my bike are 26inches and a tube did both of them.

Thanks for reading.