Showing posts with label boxes. Show all posts

Thursday, 13 September 2012

The future's bright, the future's 'O' rings ...

If you visit regularly you'll know that I like to make various turned wood boxes, be they memory boxes, needle cases and all the other stuff as well.

Now I have for sometime now made the lids in the same way (more or less) like in my latest piece, it's a very basic way to do things.

Here's the latest box -

Pointy box.

The lid basically fits inside the body of the box, probably the easiest way possible.


You can see how it fits into the box - 

Simple, but it works.

And that's as complicated as it gets, the lid sits in the body of the box, and the little extra bit stops it from sliding off, I do tend to make them a tight fit, but as it's wood it doesn't always stay tight, and sometimes it gets tighter, so what to do about it ?

Well I have experimented with various ways of securing the lids, the first thing I tried is a click fit lid, it involves making a rim on the lid that fits into a gap in the body of the box.

The click fit lid - 

You can just make out the shape.

The box body - 


The lid clicks into the body of the box.
 
The lid then clicks into the gap in the body, with a click oddly enough, and this it seems is a good way to stop the lids coming off the body, this is good if you've got needles or other items in the box, how ever it does take a fair bit of time (at least for me) to get it all lined up, and if the wood happens to shrink a little or indeed expand you can end up with the same issues, either too tight or not tight enough.

And that's when I started to think about rubber, or more specifically rubber rings ('O' rings) lots of different types of storage use a rubber seal of some kind, so I decided to try a similar thing.

'O' rings - 

Not sure why they are popular, maybe they asked a plumber.

It's handy to have them around anyway for fixing leaky taps - 


Small rubber rings.


To get the rings onto a box lid is pretty easy, I just turned the lid and box as I normally would, but with the addition of a small groove, which the O ring sits in, this seems to allow for a good secure fit, but the tightness of the lids seems to stay pretty constant, even if the wood shrinks or expands a little, as the rubber also expands and contracts with the wood.

So far I've tried two boxes with this idea, one with the rubber ring on the lid, and one with the rubber ring on the box body, both ways seem to work well, which is good as the two pots are both for storing pins, and they both have a built in pin cushion.


This Pear wood pot has the rubber ring on the lid - 


The rings fit well.

And as you can see even if I hold the box upside down the lid stays on - 


No spillage here.

The next box is made from Cherry, and has the rubber ring on the box body, rather than in the lid, again it works just as well.


Here's a picture of the groove ready for it's rubber seal - 

It's easy to make the small grooves.

Rubber seal fitted - 


All ready.

And now the upside down test - 


Another success.

I'll no doubt keep experimenting with this and other methods of making these boxes a touch more secure, I have plans to make a lockable one, all be it with a simple lock.


Here are the boxes the right way up - 


Cherry with a velvet cushion.

Pear with a velvet cushion.


Thanks for reading.

Wednesday, 14 September 2011

Under monitor storage box ... ...

I'm always cluttering up my desk with stuff (yes I'm part squirrel) and ever since I started drawing I seem to have loads of drawing implements lying about my desk, as well as the odd screw driver, pliers, torches and memory cards and a load of other junk (all of which I use ;-)

So I decided I needed some kind of easy to get to storage solution, and as I use 2 monitors I also needed a way of putting the small one on the same level as the larger, so I made a single drawer chest of draws, which is what it amounts to.

Here's my desk (with the storage drawer) -

Slightly tidier than usual ;-)

You can see the box under the monitor, and that's basically all it is, just a box with a drawer in it, it's easy to make and I had enough bits of wood lying about to make it, but you could buy the wood cheaply enough.

Here's a couple of diagrams to give you a rough idea of how I made it, I'm sure you can buy things like this ? and although flat panel monitors take up less room this little box is still a handy thing to have.

(You can click on the pictures to get a larger view)

Diagram time - 


The drawer casing / housing.
As you can see it's just a box with one side missing.

The drawer, again just another box, all be it slightly smaller.

Obviously the drawer needs to be smaller than the housing ;-)
And there you have it, you'll need to work out how big you want yours, mine is about 12 inches square, which is just enough for the monitor and a few bits and pieces in front of it, like the rock my kids decorated for fathers day :-)

You don't have to keep it plain wood, you can paint it anyway you please or decorate it with paper, or even drawer on it, it's up to you, but it does make a desk tidier, you might be surprised how much stuff you can find to put in it ;-) 

Here's a few more pictures of mine.

I still need to paint the thing, but you can't see the top ;-)

I did plan to paint the box, but as yet I haven't got round to it, and if I'm honest I'm not entirely sure what to paint it with, or how to paint it.

And another picture - 

I've used a combination of plywood and pine.

I may replace the top with some pine, that's if I decide not to paint it, it does look a little rough, but in my defence it's unfinished.

I also added a few rubber washers (one on each corner) to lift it up slightly, this makes sure the drawer doesn't catch on the desk when you open it.

The feet (rubber washers) - 

Little feet, the rubber also stops it from sliding about.

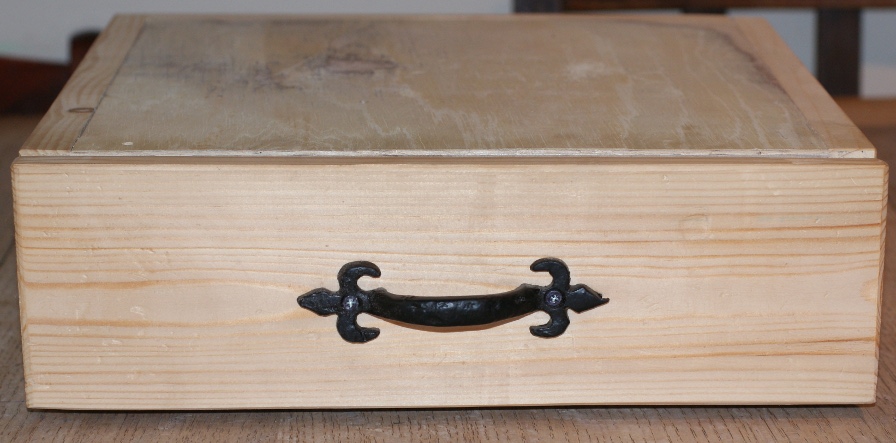
You can put any type of handle on the front of the drawer, or you could just cut a hole in it, or use a piece of rope as a handle, the skies the limit :-) I went for an iron look handle, mainly because I had it lying about from another project.


The handle - 

I quite like it, maybe I should stain the box a dark colour ?

So if you need a little space then this is an easy to build way of getting some, and if you still use a crt monitor this would probably come in really handy, and if not I'm sure you can still find a use for it.

You don't even have to use it for under monitor storage, it could go in a craft room, or anywhere you might need to store things.

Thanks for reading.

Inspire Me Beautiful