Tuesday, 18 October 2011

Weave your own web for halloween ... ...

With Halloween just around the corner I thought I'd share something we did last year, but have expanded a little on this year.
Last year we did a load of Halloween based crafts, conker spiders and such like, and we also made spider webs from pva glue that we stuck in the windows.

This is a really easy thing to do and all you need is a smooth flat surface, flexible if possible (I use a laminator sheet) as it makes it easier to get the web off once it's dried, pva glue and you can add glitter as well.

It's really easy to do, but it will take about 24 hours for the glue to set completely.

This is what you end up with -

The picture doesn't do it justice.

To make your own webs all you need to do is draw a web shape on your smooth surface with the glue.

Drawing the web - 

Web weaving.

Start by drawing intersecting lines, until you have as many as you want, this depends on how big the surface is and obviously how big you want it, I find a tube like the one in the picture is best as it is easy to draw neat lines with it, and this would be better for kids to use.

Easy really.

Once you have enough lines, I find 4 is enough, this will give you 8 spokes to your web. Then all you have to do is draw a line in a slight curve in between each spoke, and keep going until you have filled it all up.

Like so -

Complete with purple glitter.

And that's it really, you can add glitter, or leave it plain and you can use paint to colour the glue, but you'd need to get all the glue out of the tube and then put it all back once you've mixed in the paint, I guess you could also use a piping bag for this as long as you don't mind having to throw it out after, but use a fine nozzle.

You can make a web like the one above and place it anywhere on a window, if your surface was nice and flat and smooth the web should stick with no trouble, I find the laminator sheet is handy for this for a few reasons, one being it's nice and smooth and you can move the web out of the way of little fingers while it dries, and with a flexible surface it's easy to peel the web off once it's dried.

Here's another one, this one is for a corner of a window - 

We used silver this time.
Complete with bat :-)


Thanks for reading and Happy Halloween.

Classified: Mom

Sunday, 16 October 2011

Latest wood turning project ... ...

Apologies if you've been waiting for a post, seems we are currently in a situation where there really aren't enough hours in a day (or days in a week for that matter)

Due to other things I haven't been able to spend as much time at my lathe as I would like, although I'm hoping to sort that out soon.

I have managed to experiment further with the cypress I've recently acquired, I have just the other day got a load more of this type of wood, which to be honest I'm liking a lot, it's easy to work with and even though it's very green I seem to be having a lot less trouble with it in terms of warping and such like.

Latest piece -

Do you want soldiers with that ?


Yes I've made an egg, an egg box actually, again this is made from the cypress I got through freecycle, I'm going to get some more of this, but much larger pieces which I'm hoping to make some much larger pieces from, and perhaps some bowls.

Like most of the boxes / pots I make this is turned from one piece of wood, and I've applied the same logic to turning this as I did with the other cypress pot, that being I turned it a little (roughed it out) and then left it for a week or so then finished it off, this approach seems to be working, but I need to test it on some of the more difficult wood I have, mainly the fruit wood.

This piece isn't perfect, there are some small cracks on the top part (the egg) these I can easily turn out as they aren't very deep, this usually happens around knots in wood, least it does for me.

Some more pictures - 

Lid off, you can see the small cracks in the egg part.
Not as bad as they look.


I have been in some what of a dilemma about these cracks, I have to admit I quite like them, they seem to fit seeing as it's meant to be an egg, so I've wondered about making a small feature of them, however this may not be to everyone's liking so I'm not sure whether to as I intend to sell the piece in my shop, technically it's probably not a good idea to sell things with cracks in them, these won't get any worse, but as I said some people may take a dim view of the box being for sale with defects, I guess if I do decide to leave it as is and put it in my shop I'll find out.

The next thing I'm going to try with this wood is turning it end grain on, mainly to see what patterns appear as often a dull looking piece of wood yields some very interesting features when turned slightly differently, so keep a look out for that.

A few more pictures showing the grain -

The grain seems to suit designs like this.

I may turn the egg part from a different wood next time.

Thanks for reading.


Wednesday, 28 September 2011

Leyandii ... ...

I don't consider myself to be an expert in all things wood, in fact more often than not I find I'm left puzzled by the way some woods behave, despite my best efforts to prevent said behaviour, I do learn though, probably learned more about different types of wood in the last few years than I have my whole life.

And  few weeks ago I got another lesson, in Leyland cypress which is also known as Leylandii, yes the scourge of the neighbourhood, in fact there was a program on the BBC the other day all bout this particular tree ---> Hedgewars (opens in new window)

I know that these trees have caused endless arguments all over the UK, there's a good chance that when you look down your street you'll probably see some, I always liked them when I was a kid as the larger tree's are pretty good for climbing, if you don't mind getting covered in the sticky sap that is, and now I have an new appreciation for them, in a slightly different form though.

I've been on the look out for new supplies of wood to turn and I put an e-mail out to my local freecycling group and I got a surprise in the form of a chap who had just cut down a load of them, in fact there were quite a few and some as tall as 40 feet or more, so I now have a pretty large pile of wood, and I've only made one trip, got loads more to go.

This is the first thing I made from it (which actually took 3 weeks to make) -

I was surprised by the grain.
It is still very green wood (which just means it hasn't be cut down for long) and I was a little worried about cracking and warping, turning exposes the heart wood and forces the wood to dry out faster than it would do normally, but this pot has been in the house for a few weeks and so far it's fine (it's now in my shop) I do this with all my turned stuff, once it's finished I bring it in the house if it cracks it's no good for selling, if it doesn't it goes in the shop, kind of like quality control :-)

Having this wood has also changed the way I approach turning, hundreds of years ago people didn't dry wood out in kilns, they just cut it down and turned it roughly and then left it for a few weeks, then they finished it off.

This is how I'm looking at the wood I use for turning, I cut it to a good length and leave it for a week or 2, then I turn it roughly, then leave it for a week or 2 then I finish it, and it seems to work, not sure this would work with some of the fruit wood I have, but it's worth a try, yes it takes longer, but I'm getting less failures, and it's still quicker than leaving a bit of wood for 2 or more years for it to season.

So if you happen to notice your neighbours hedge growing a little tall, just take a minute to think about how nice looking this wood is, and instead of cutting it all down and burning it, why not try your hand at carving or turning it :-) and if you don't want to, some one else might want it, maybe your friendly neighbourhood wood turner.

Interesting stuff - 

Leylandii can grow 1 metre a year, and no one actually knows how tall they will get,some have speculated that they may even get as large as Redwoods, which is huge, Leyland Cypress (Leylandii) are actually a hybrid tree, their parent species being Monterey Cypress and Nootka (Alaskan Cypress) at least that's according to this page on Wikipedia - Leyland Cypress (opens in new window)

I'll leave you with a few pictures, thanks for reading.

Pictures - 


Monday, 19 September 2011

Experimenting ... ...

I tend to think of myself as an experimental type of person, I'm always messing around with ideas on how to do things differently, and it has to be said I don't always get things to work how I wanted, but it's no reason to stop trying.

Just lately my main focus has been on wood turning (no surprise really) and although I have loads of wood I can't use it all as I have to wait for it to season a little first, and it was this that got me to thinking about ways to make sections of wood for turning, with out waiting for wood to season, so I can use already seasoned wood.

And not only that but I was thinking about patterns and wood grain and how to make some more interesting designs, this isn't a new idea for years wood turners have glued various types of wood together for artistic reasons and made some fantastic things.

 So the other day I made this -

What do you think ?

 Okay so it's an experiment, I'm quite happy with it, I like the way the grain goes in kind of a zig zag pattern, this pot is made from 3 different bits of wood, I'm now planning another one, but I'll be putting it together in a slightly different way to see if I can get the grain pattern a little more fluid looking.

It's made from 3 bits of 3inch by 2 inch wood, just normal pine I had lying about, I cut 3 sections and glued them together, with each section aligned differently, I tried to get the grain to run in opposite directions, the next one I make will hopefully stand out a lot more.

I also wanted to see if the glue I used would stand up to being put on a lathe and spun at 2500rpm, was a little worried that things might fly apart at speed, but it held, I left it to set for about 48 hours, and it's just normal wood glue, I also used some clamps to make sure it was held nice and tightly.

One of the problems I need to work on is hiding the joins, I think I can do this by thinking about where I put various design features, and by being clever with my cuts.
You can see the join in both pictures.

The join -

Notice the straight line about half way up ?

It has to be said that you can't see the join that well from various angles, so it won't take much more tweaking, least I don't think it will ? but I'm hoping I can make it as near to invisible as possible, this might be helped by changing the way I glue the wood together, maybe even change the glue, like I said it's all in the tweaking :-)

Over all though I was pleased with it, and the idea works, it just needs a little messing with to perfect it, at least on the outside as having the join visible on the inside isn't as important as what it looks like from the outside, it's a pot, you tend not to spend time staring into it that much, least I don't

You can clearly see the join on the inside - 

The join from the inside.

I could make it less visible by sanding the inside and polishing it, but for this piece I didn't pay too much attention to the inside :-)

Another picture - 

A nice little pot / box

Feel free to add any comments you have on the design, and whether it's worth taking further, I will start working on the next experiment, which is along the same lines, so stay tuned for that.

Thanks for reading.

Sunday, 18 September 2011

Homemade peg loom ... ...

The other day I figured I'd make a wooden peg loom, and after a little research I set about finding materials and tools.

I have to be honest I'm not sure what else you can make on a peg loom apart from long rectangle / square type things, so rugs and scarf's :-) but I do know it's pretty easy to make one.

All you need to make a peg loom is a length of wood, it needs to be wide enough to accommodate your pegs, and you'll need something to make the pegs from, lengths of dowel are ideal and all these things can be picked up from any diy shop.

Here's the loom -
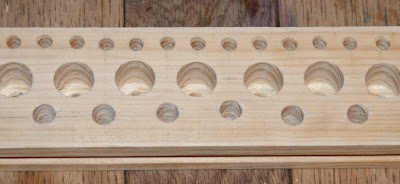
Load of holes.
I decided that if I made a couple of rows of holes I could use different sized pegs, which in turn means I can weave different sized things and of different thicknesses, so I guess it's a multi function loom ?

To make the holes all you need is a drill and some drill bits roughly the size of of the dowel you plan to use, you can also use spade bits, again roughly the size of the dowel, spade bits are better for larger dowel sizes.

In case you're wondering, this is a spade bit - 

Bit old and rusty, but it works.
 I made a grid on my piece of wood, I put a mark every half an inch, be sure to leave enough space between each hole as you'll need room to remove the pegs, and you'll also need room for your yarn / wool etc.

The wood ready marked - 

Ready for drilling.
Close up.
So onto the drilling, basically you just need to drill a load of holes evenly (ish) spaced, I should have used a slightly larger piece of wood for my loom as getting all the holes on it was a little bit of a squeeze.

To drill the holes I used my power drill and a drill guide, I would have used my drill stand but it broke, but you don't need to use a guide, just try and keep each hole as straight as possible.

My drill guide ready to go - 

Drill guide not essential.
The other good thing about the drill guide is you can set the depth you want to drill to, but you can just wrap a bit of tape round your spade bit or drill bit.

Using tape for depth guide - 

Insulation tape works well.
I also have a depth guide for drill bits that's a little more secure than tape, I'm pretty sure you can buy depth guides for drill bits in most diy shops.

Drill bit depth guide -

These fix on very securely.
Once you have you drill set up get drilling, try and make the holes deep enough so that the peg won't pull out easily, saves everything falling apart if the loom gets knocked over.

Once you have the holes drilled you then need to sort your dowel out, I used 3 different thicknesses and I cut them to lengths of between 3 inches and 5 inches, 3 inches for the smallest dowel, 4 inches for the next sized up and 5 inches for the largest.

The dowel - 

Ready for cutting.
3 different sizes.
You can use a hack saw to cut the dowel or any type of saw really, it's best to make sure you have enough pegs to fill every hole, even if you don't plan to use loads of pegs, you might later on.

Dowel all cut to length - 

I use rubber bands to hold them in bundles.
Now you need to sand both ends of each dowel (which may take some time) this will make sure the wool / yarn doesn't get snagged on the pegs, if your pegs are a little too tight in their holes you can sand the ends, or use a sharp knife to trim them a little.
Sanding them like this is okay - 

Nice and smooth, sort of.
The last thing you need to do is drill holes in each peg, this is to thread the yarn  you will be using to hold it all together (don't worry I have some pictures of me using it to give you an idea of what I'm on about :-)

I found that having the pegs in the loom was the easiest way to drill the holes, you want each hole about 1cm above the length of wood, and you'll need to make sure that the holes in each peg aren't too big as this will weaken the pegs, you can use larger holes in the larger sized pegs.

Holes drilled in the pegs, nearly ready to weave - 

Ready to weave.
 It's really easy to use a loom like this, and it's easy to build it as well, so it would make a great project for kids to try themselves, although smaller children may need supervising when doing some parts of the build, like the drilling for instance, it's also cheap, I had most of the stuff, and the dowels cost about £4 for all of them.
 You can use all sorts of things to weave with, wool, rope, t-shirt material, you can find some great how to's online and by searching for weaving on a peg loom.

Now here's a few pictures of me weaving on the loom so you have half an idea of what to do with it.

To start get some wool and thread it through each peg - 

Use a needle to help with threading.
Just using 6 pegs for now.
Once you have your pegs threaded you can then start weaving, this is basically a case of winding the thread round the pegs, remember to tie the ends of the thread together, otherwise it'll all slide off the end.

Weaving begins -

Tie your yarn to the starting peg.
Then start winding between each peg.

And this is how you continue, once you reach the top of your pegs you can then pull them out and slide your work down, then put them back into their holes and start winding your yarn again.

About half way.
Carefully slide each peg out.

Don't worry about the gap as you can slide it altogether.

And once you've got to your desired size you can just pull all the pegs out and then all you need to do is cut the threads from the pegs and either tie them off of stitch them back into your work, again watching a few how to's will be an idea (I plan to watch some as well as I quite enjoyed weaving on the loom)

My finished piece, all be it a tester and very small :-)

Not bad ?

I found you can adjust the piece once you've finished it (before you tie it all off) you can bunch it all up or spread it out, it's quite flexible.
And there you have it, now the nights are drawing in and things are getting colder this might be an ideal thing to keep you busy at night and you can make yourself a nice rug :-)

It would also be possible to tie the threads to a piece of dowel and weave through each thread in much the same way you would with a traditional loom, and by looping the wool over the pegs instead of going through them you'll only need to tie off one end, and it has to be said there is a lot of satisfaction to be had in making your own equipment and then making something with it.

Thanks for reading.

Inspire Me Beautiful

Wednesday, 14 September 2011

Under monitor storage box ... ...

I'm always cluttering up my desk with stuff (yes I'm part squirrel) and ever since I started drawing I seem to have loads of drawing implements lying about my desk, as well as the odd screw driver, pliers, torches and memory cards and a load of other junk (all of which I use ;-)

So I decided I needed some kind of easy to get to storage solution, and as I use 2 monitors I also needed a way of putting the small one on the same level as the larger, so I made a single drawer chest of draws, which is what it amounts to.

Here's my desk (with the storage drawer) -

Slightly tidier than usual ;-)

You can see the box under the monitor, and that's basically all it is, just a box with a drawer in it, it's easy to make and I had enough bits of wood lying about to make it, but you could buy the wood cheaply enough.

Here's a couple of diagrams to give you a rough idea of how I made it, I'm sure you can buy things like this ? and although flat panel monitors take up less room this little box is still a handy thing to have.

(You can click on the pictures to get a larger view)

Diagram time - 


The drawer casing / housing.
As you can see it's just a box with one side missing.

The drawer, again just another box, all be it slightly smaller.

Obviously the drawer needs to be smaller than the housing ;-)
And there you have it, you'll need to work out how big you want yours, mine is about 12 inches square, which is just enough for the monitor and a few bits and pieces in front of it, like the rock my kids decorated for fathers day :-)

You don't have to keep it plain wood, you can paint it anyway you please or decorate it with paper, or even drawer on it, it's up to you, but it does make a desk tidier, you might be surprised how much stuff you can find to put in it ;-) 

Here's a few more pictures of mine.

I still need to paint the thing, but you can't see the top ;-)

I did plan to paint the box, but as yet I haven't got round to it, and if I'm honest I'm not entirely sure what to paint it with, or how to paint it.

And another picture - 

I've used a combination of plywood and pine.

I may replace the top with some pine, that's if I decide not to paint it, it does look a little rough, but in my defence it's unfinished.

I also added a few rubber washers (one on each corner) to lift it up slightly, this makes sure the drawer doesn't catch on the desk when you open it.

The feet (rubber washers) - 

Little feet, the rubber also stops it from sliding about.

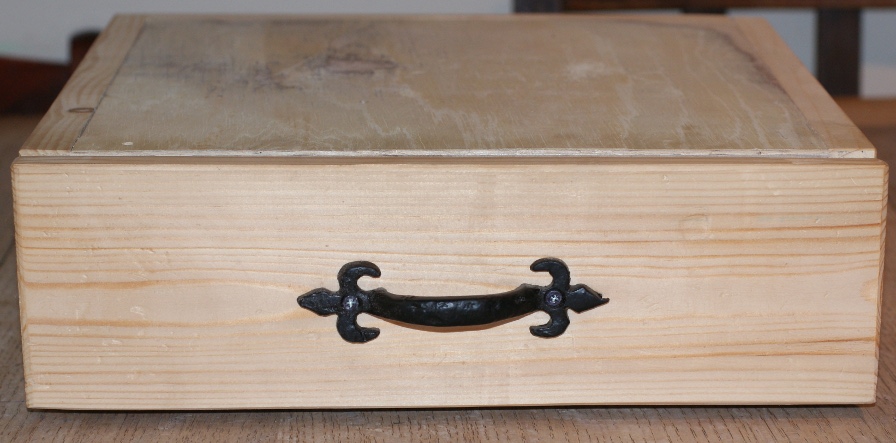
You can put any type of handle on the front of the drawer, or you could just cut a hole in it, or use a piece of rope as a handle, the skies the limit :-) I went for an iron look handle, mainly because I had it lying about from another project.


The handle - 

I quite like it, maybe I should stain the box a dark colour ?

So if you need a little space then this is an easy to build way of getting some, and if you still use a crt monitor this would probably come in really handy, and if not I'm sure you can still find a use for it.

You don't even have to use it for under monitor storage, it could go in a craft room, or anywhere you might need to store things.

Thanks for reading.

Inspire Me Beautiful

Monday, 12 September 2011

Magpie Monday ... "Free" coffee table / chest

I thought I'd do a Magpie Monday post, been meaning to join in for ages, just never seem to get the timing right.

Me and my wife spend time looking through charity shops and such like when ever we get the chance, you find some great stuff, and more often than not it's better made and will last twice as long as a lot of the things you can buy today.

Furniture is one of those things, years ago people made furniture from real wood, non of this laminated chip board stuff, and they used real carpentry to put things together, and not just a load of screws.

So on the way back from the city a few weeks ago I came across this bit of furniture in one of our local charity shops.

You can just make out the label, it says free !

Yes that's right it was free, apparently it had been in the shop for a while at various prices and no one bought it, yes it needed a little tlc, but even so I'd have bought it had I seen it, but on the day I went past they had decided it had to go, so they put it outside with a big "free" label on it, and no one took it ! I passed the shop well after lunch time and it had sat there all morning and part way into the afternoon, why did no one take it ? I'm still wondering.

It's a chest, at least that's what we call it, it now sits in our living room and acts as a coffee table, desk for the kids to work at, a foot rest when we are watching a film, oh and as it opens (the drawers don't open) it also gets used as storage. Old furniture may not be everyone's cup of tea, but I like it.

I had to sand it down, all over which didn't take as long as I thought it would, then I used a natural beeswax polish on it, to give it a protective coat and feed the wood, I normally use the beeswax polish for turned wood, but it worked well on the chest.

More pictures - 

Not the best picture.

And that's about it, a perfectly good piece of furniture for nothing, free ! and you can't really get much cheaper than that, all it needed was a sand and a good coat of something to feed the wood, a similar piece of furniture would cost quite a bit now, especially for solid wood.

It's worth looking out for bits of furniture in charity shops, you never know when you'll find an absolute bargain :-)

Thanks for reading.

Me and My Shadow