Saturday 26 November 2016

Allotment update - supplemental...

Okay so if you read my post on pumpkins you may have seen me mention about waiting to hear about another (full sized) plot, well shortly after that we were given the larger plot we applied for, we will for next year anyway keep our smaller plot on as well as the new bigger plot, but at the end of next year we'll give up the smaller plot and just work the larger one.

So today I decided to make a start on getting it ready, there's lots to do, fences need fixing (most of which I've now done) I need to make a new gate and I have also at some point got to move all the stuff from the small plot to the large plot, like the shed and such like (that'll be fun) but for today it was just clearing and seeing what's what.

The plot -

Lots of weeds.
You may well be wondering why I took the picture through this mesh, well you see the plot was locked with a big chain and padlock, so the first job was to actually get into it.

You shall not pass - 

Okay, I see the problem.

I had to cut through part of the gate to get it open, it doesn't matter as I'll be making another gate.

I'm in - 

Doesn't look any better from here.

This plot does come with some bonuses, the first being two large grape vines, one is huge and runs along the entire front of the plot, so I decided to tackle that first.

It's all in here somewhere - 

Nettles everywhere.

And after an hour or so of getting stung all over the place things were looking better - 
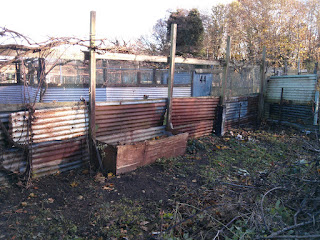
Much improved.

You can see the vine running along the top if the fence, I pruned this back and pulled up the nettles and other assorted weeds, it seems there's a compost bin here as well, although this will be taken out.

I plan to put the shed and a new compost bin along this fence, the area in the corner is quite shady so not so great for growing things, this will be where the shed goes, I did also have to repair some holes in this fence, and I've got to sort out a new gate posts as the ones already in are a bit wobbly.

The other grape vine pruned - 

Bit hard to see.

After thinking about it for a while I think I shall move this grape vine to a better location, it's kind of in an awkward place here, so it'll be moved closer to the other vine, near to where the shed will go.

Along with a fork and a shovel I also found some metal cages, a few people on the site use these for covering plants to stop the birds eating them, so I'll be able to use them as pigeon proofing.

Metal cages - 

These will come in handy.

I found some wood from an old apple tree, this has now been added to my wood turning supplies, they aren't thick pieces, but they'll do for making shawl pins and similar things.

In the past this particular plot had been vandalised, and the apple tree was cut down by the vandals so I'm putting the wood to good use, although I'm not sure why they chose to cut down that apple and leave the other two but there you go.

Turning supplies - 
I'm sure I can make use of this.

As well as the grape vines and the two apple trees there are also some currant bushes, in a bit of a poor state but at least one will survive once it's tidied up and there are at least two gooseberry bushes, again these need some tlc, but should be okay and there's some rhubarb plants (at least one, maybe more) and from what I can tell there are a few saplings around the plot, these may turn out to be fruit trees, they look like apples but I'll have to see.

And even though the one apple tree was cut down it's not dead, it's showing signs of new growth so I maybe able to get it to grow, but it'll be some time before it bears fruit, if at all.

Life finds a way - 

Can't keep a good tree down.

Well that was enough for one day, I spent longer there than I meant to, but I got a lot done, there's still lots to do in order to get the plot in a usable state before spring, more fixing of things and working out where things will go and then there's the digging, the whole plot needs digging over, I think there might even be  a few rows of spuds still in the ground although they may not be usable, but you never know.

Here's what the plot looked like when I left - 

I shall be having a large bonfire soon.

Thanks for reading, and stay tuned for updates, I suspect this will keep me busy throughout the winter months.


Thursday 24 November 2016

Antique style clothes airer / horse...

It's the time of year when putting the washing out on the washing line isn't really practical, it'll probably end up wetter than when you started, so how about making a clothes horse / airer, which if I'm honest is something I've been meaning to do for ages.

Yes we could have bought one, but we don't really like the wire ones and the wooden ones you can buy more often than not can be made quite cheaply and then there's the look of the thing, the modern ones don't really fit with most of the stuff we have in our house, so we made an old looking one.

Here it is -

Really simple and cheap to make.
It's made from 19mm x 38mm batten which you can buy in packs of eight from some diy shops the pack we bought cost £12.10, which makes each 2.4 metre length around £1.51 each and we used six lengths, so the wood for this cost about £9, I did also buy some upholstery tacks for £1 (because I forgot I already had some) so the whole thing cost £10 which isn't bad.

Making it is easy, basically you need four long pieces for the legs and then (in our case) six pieces to make the bars, and what you're aiming for is something that looks a bit like a ladder.

Here's a small diagram with some measurements - 

Click for a larger image.

I made the uprights 52 inches (132cm) and the bars 24 inches (60cm) which makes the whole thing  just over four feet high and four feet wide, this was because when we have the heating on the horse will pretty much cover one of our larger radiators.

The spacing for the bars was worked out roughly, I measured from the top down 4 inches  (10cm) for the top bar and from the bottom up 12 inches (30cm) for the bottom bar, and then just divided the distance between the top and bottom bars for the middle bar.

The reason for leaving a little bit above the top bar is to stop washing sliding off the top bar when the horse is moved.

I used a mitre saw to cut the wood, and my daughter helped, this is a really simple build, no fancy joints or anything like that, the wood was just screwed and glued together.

Work commences - 

Time for some measuring.

After a bit of cutting we have what we need, on to fixing - 

Now for some screws and glue.

After marking out where the bars were going to go the next step was to find the centres where we needed to drill for the screws, I used a home made centre marker (you can find loads of different ones online) it's basically a bit of wood with two pegs either end and a pencil in the middle.

Once marked out I used a screw digger to make the holes, screw diggers are basically a drill bit with a built in counter sink, it saves time not having to switch between drill bit and counter sink, I tend to use one that gives me an 8mm counter sink so that I can cover the screws with wooden plugs.

Screws in - 

The holes will be filled.

First section built - 

Rinse and repeat.

Both sections done - 

Now on to the decoration.

First thing to do now it's all fixed together is to fill the screw holes, I haven't made the plugs fit flush, instead I've left them a little proud as this gives the whole thing a more arts and crafts type look. The plugs are just 1cm lengths of 8mm dowel (hence the use of the 8mm screw digger) and after rounding off one end I glued them into the screw holes.

Plugs cut - 

Pine plugs, fiddly but worth the effort.

Plugs glued in place - 

Just a small detail, but it works with the overall look of the thing.

Once the screw holes were covered I sanded (with the help of my daughter) the two frames and rounded off the ends, after that it was on to making it look a little less brand new.

I use a homemade stain to make the wood look a bit more aged, it's basically white vinegar with some wire wool in it, which after being left a while gives the wood a slightly orange appearance and when a dark wax (Black Bison Dark Oak) is applied it gives the finished look more depth, at least I find it does.

One section stained, onto the next - 

White vinegar makes a cheap wood stain.

Once the stain has dried I then applied a coat of dark oak coloured wax, and after that I polished the two sections with a natural beeswax polish, and then it was on to the hinges which are made of leather believe it or not, although metal hinges would do just as well.

I did do some research into vintage and antique clothes horses and found that most of them had some kind of material to act as a hinge, from canvas to leather, and seeing as we have some leather scraps I went for leather, which is just tacked onto each section with upholstery tacks.

Like so, it works and helps to make it look older - 

It's fixed in a kin of 'S' shape.

It looks a bit too new in this picture, but as the leather ages it'll look better, it's a simple way of allowing you to open and close the clothes horse and it stops it falling over, I did also add a small brass catch I had lying about to keep the frame closed when not it use, but a loop of string over the top would do just as well.

Small catch - 

Stops it from flapping about when you move it.

We have been using it quite a lot recently and it's doing what it should, so far we've kept it in our utility room, which as well as a small radiator also houses the boiler which creates a fair bit of heat and clothes seem to be drying quite quickly where it is, and it's right by the back door should the sun make an appearance.

Thanks for reading.


Tuesday 8 November 2016

The humble pumpkin...

Whilst I sit twiddling my thumbs waiting to hear about a larger allotment plot I thought I'd write a post about pumpkins, perhaps not the most exciting of vegetables but hey ho.

This year was a good year for pumpkins, we grew the largest two we've ever managed on our allotment and oddly we weren't even trying, happy accidents you might say.

Here are the largest two of this years pumpkins -

We were pleased with them.
I had thought we weren't going to get any large pumpkins this year, we lost a load of plants to marauding slugs and had to sow more, and as a result by the time some of our other pumpkin plants were growing fruit we had some plants that were showing no signs of doing anything productive at all.

And then around the middle of August I noticed these two small pumpkins, on separate plants - 

Small, about grapefruit/melon size here.

At this point I thought, well it's late in the season so they probably won't come to much, but I'll leave them anyway, by the end of August start of September they had grown a fair bit, the one by the fence had grown quite a lot, it went from being grapefruit sized to watermelon sized in a couple of weeks and the other one was about the same size.

Fence pumpkin - 

Larger than it looks.

The other one - 


Again larger than it looks.

A month later when I picked them they had gotten considerably larger, I haven't done anything special with them, just plenty of water and sunshine (you can also use tomato food on them) and that's it, and in the space of about six weeks they went from grapefruit/melon sized to weighing 25.5kg between the two of them, the largest is 13.5kg and the smaller one 12kg, they can grow very quickly if they get plenty of sun and water.

Harvest time, I had to use my bike trailer - 

A good haul.

Currently we have a kitchen full of pumpkins (and other squash) they will all get used, we've started processing some of them already, the one we carved for Halloween has been made into puree and frozen for soups and pies (and anything else we can think of) a couple have been turned into relish made by my wife some of the puree was used in the flat breads my wife makes as well, and we roasted the seeds with some olive oil and spices, they make a great snack.

Pumpkins are very useful, did you know that around 18,000 tonnes of pumpkin gets thrown away each year in the UK after Halloween ? and why ? they can be eaten so why throw it away ?

The internet is awash with recipes and ideas for what to do with pumpkins and squashes.

Here's a list of things we do with pumpkins, 

Puree for soup
Cut up in stews, and curries
Pumpkin pie
Roasted with the spuds for Sunday dinner
Pumpkin flat breads
Pumpkin relish
Pumpkin wine, which is very nice even if I do say so myself
Grated into a shepherds pie or a chilli, makes the mince go further
Pumpkin muffins (kids love them, probably because they are sweet)
Seeds roasted for a nice healthy snack

And pumpkins have numerous health benefits and they are very high in vitamins and minerals, like vitamin C, vitamin A and calcium and iron and they are a fun to grow, kids get a kick out of watching them get bigger.

So rather than chucking your pumpkins in the bin after Halloween why not try to use them, after all you are throwing food away, and if you don't want to use them see if anyone in your area is running a pumpkin/squash rescue event where you can donate your pumpkins and know they'll be used to help someone who is perhaps a little less fortunate than you, it has to be better than chucking them away.

In the mean time we'll be finding uses for this lot - 

This isn't all of them.

Thanks for reading.