The other day I figured I'd make a wooden peg loom, and after a little research I set about finding materials and tools.
I have to be honest I'm not sure what else you can make on a peg loom apart from long rectangle / square type things, so rugs and scarf's :-) but I do know it's pretty easy to make one.
All you need to make a peg loom is a length of wood, it needs to be wide enough to accommodate your pegs, and you'll need something to make the pegs from, lengths of dowel are ideal and all these things can be picked up from any diy shop.
Here's the loom -
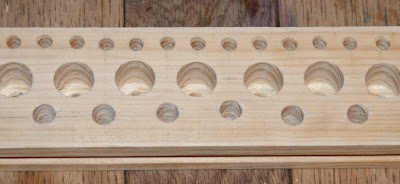 |
| Load of holes. |
I decided that if I made a couple of rows of holes I could use different sized pegs, which in turn means I can weave different sized things and of different thicknesses, so I guess it's a multi function loom ?
To make the holes all you need is a drill and some drill bits roughly the size of of the dowel you plan to use, you can also use spade bits, again roughly the size of the dowel, spade bits are better for larger dowel sizes.
In case you're wondering, this is a spade bit -
 |
| Bit old and rusty, but it works. |
I made a grid on my piece of wood, I put a mark every half an inch, be sure to leave enough space between each hole as you'll need room to remove the pegs, and you'll also need room for your yarn / wool etc.
The wood ready marked -
 |
| Ready for drilling. |
 |
| Close up. |
So onto the drilling, basically you just need to drill a load of holes evenly (ish) spaced, I should have used a slightly larger piece of wood for my loom as getting all the holes on it was a little bit of a squeeze.
To drill the holes I used my power drill and a drill guide, I would have used my drill stand but it broke, but you don't need to use a guide, just try and keep each hole as straight as possible.
My drill guide ready to go -
 |
| Drill guide not essential. |
The other good thing about the drill guide is you can set the depth you want to drill to, but you can just wrap a bit of tape round your spade bit or drill bit.
Using tape for depth guide -
 |
| Insulation tape works well. |
I also have a depth guide for drill bits that's a little more secure than tape, I'm pretty sure you can buy depth guides for drill bits in most diy shops.
Drill bit depth guide -
 |
| These fix on very securely. |
Once you have you drill set up get drilling, try and make the holes deep enough so that the peg won't pull out easily, saves everything falling apart if the loom gets knocked over.
Once you have the holes drilled you then need to sort your dowel out, I used 3 different thicknesses and I cut them to lengths of between 3 inches and 5 inches, 3 inches for the smallest dowel, 4 inches for the next sized up and 5 inches for the largest.
The dowel -
 |
| Ready for cutting. |
 |
| 3 different sizes. |
You can use a hack saw to cut the dowel or any type of saw really, it's best to make sure you have enough pegs to fill every hole, even if you don't plan to use loads of pegs, you might later on.
Dowel all cut to length -
 |
| I use rubber bands to hold them in bundles. |
Now you need to sand both ends of each dowel (which may take some time) this will make sure the wool / yarn doesn't get snagged on the pegs, if your pegs are a little too tight in their holes you can sand the ends, or use a sharp knife to trim them a little.
Sanding them like this is okay -
 |
| Nice and smooth, sort of. |
The last thing you need to do is drill holes in each peg, this is to thread the yarn you will be using to hold it all together (don't worry I have some pictures of me using it to give you an idea of what I'm on about :-)
I found that having the pegs in the loom was the easiest way to drill the holes, you want each hole about 1cm above the length of wood, and you'll need to make sure that the holes in each peg aren't too big as this will weaken the pegs, you can use larger holes in the larger sized pegs.
Holes drilled in the pegs, nearly ready to weave -
 |
| Ready to weave. |
It's really easy to use a loom like this, and it's easy to build it as well, so it would make a great project for kids to try themselves, although smaller children may need supervising when doing some parts of the build, like the drilling for instance, it's also cheap, I had most of the stuff, and the dowels cost about £4 for all of them.
You can use all sorts of things to weave with, wool, rope, t-shirt material, you can find some great how to's online and by searching for weaving on a peg loom.
Now here's a few pictures of me weaving on the loom so you have half an idea of what to do with it.
To start get some wool and thread it through each peg -
 |
| Use a needle to help with threading. |
 |
| Just using 6 pegs for now. |
Once you have your pegs threaded you can then start weaving, this is basically a case of winding the thread round the pegs, remember to tie the ends of the thread together, otherwise it'll all slide off the end.
Weaving begins -
 |
| Tie your yarn to the starting peg. |
 |
| Then start winding between each peg. |
And this is how you continue, once you reach the top of your pegs you can then pull them out and slide your work down, then put them back into their holes and start winding your yarn again.
 |
| About half way. |
 |
| Carefully slide each peg out. |
 |
| Don't worry about the gap as you can slide it altogether. |
And once you've got to your desired size you can just pull all the pegs out and then all you need to do is cut the threads from the pegs and either tie them off of stitch them back into your work, again watching a few how to's will be an idea (I plan to watch some as well as I quite enjoyed weaving on the loom)
My finished piece, all be it a tester and very small :-)
 |
| Not bad ? |
I found you can adjust the piece once you've finished it (before you tie it all off) you can bunch it all up or spread it out, it's quite flexible.
And there you have it, now the nights are drawing in and things are getting colder this might be an ideal thing to keep you busy at night and you can make yourself a nice rug :-)
It would also be possible to tie the threads to a piece of dowel and weave through each thread in much the same way you would with a traditional loom, and by looping the wool over the pegs instead of going through them you'll only need to tie off one end, and it has to be said there is a lot of satisfaction to be had in making your own equipment and then making something with it.
Thanks for reading.


