Showing posts with label wood carving. Show all posts

Tuesday, 9 October 2012

The Staff of Shed-a-roth ...

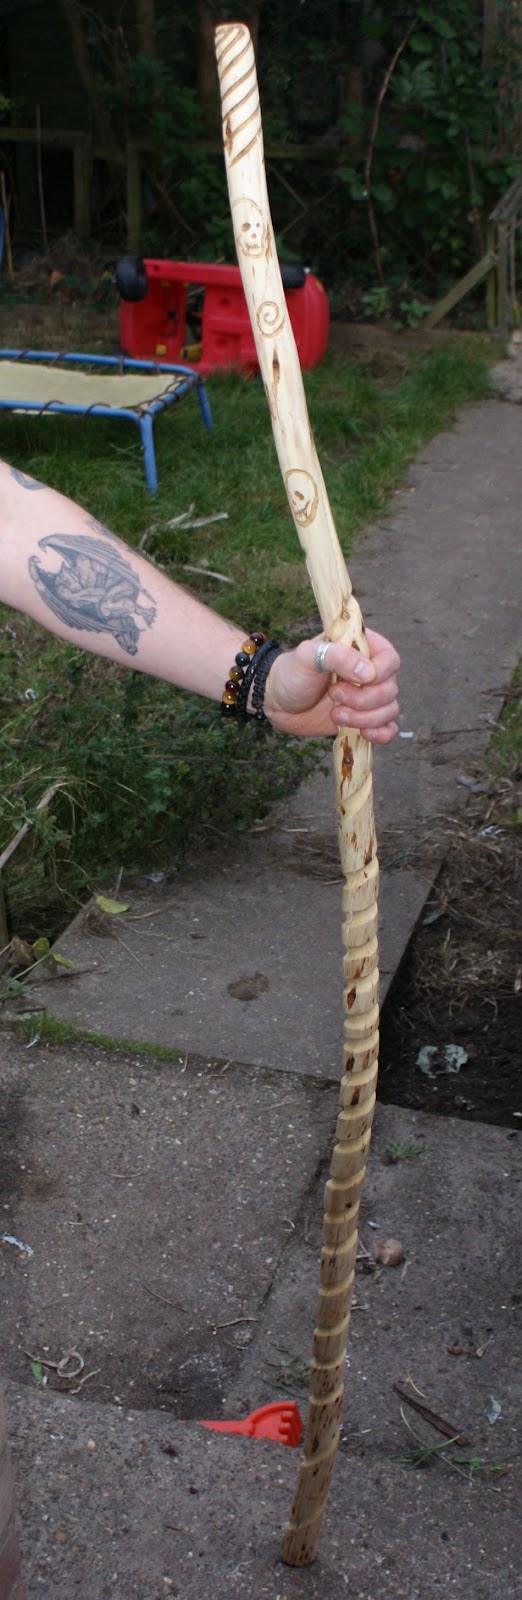
Imagine if you will an object of unspeakable power, crafted in the depths of hell (my wife's name for my shed) it wields so much energy it's very fibres are cracked and warped.


Behold ! The Staff of Shed-a-Roth -


Scared yet ? What do you mean no ?

Okay so it's not some kind of ancient artifact capable of levelling a small city, it was meant to be a handle for my digging hoe, I cut down a section of Eucalyptus, which I've been coppicing, however it started to crack and warp more or less straight away, so I wondered what to do with it, even though it's cracked and only slightly warped, so I figured I'd make a prop for Halloween.


Big cracks started to appear in various places -


It's still in one piece, despite the cracks.


All I've done is carve some stuff into it, and added a twist that runs from the bottom of it to almost the top, the idea being that the spiral will channel the energy from the earth up the staff and into the person holding it, see I've put some thought into it.


The twist -

It's quite easy to do this.

I haven't been too accurate with the detailing on the staff, it's only a bit of fun, but I have been experimenting with adding this kind of barley twist type design onto some wood working projects I've been doing.


Another twist, this time on the top of the staff - 


This is done the same way as the other twist detail.

The two different twist designs (I use the term designs loosely) are done with various sized rasp files, then different grades of sand paper.

The other little details I did using the various carving bits I have for my multi-tool (think dremel-ish) to be honest I haven't used the wood carving bits that much, manly because I kind of like doing things by hand where possible, and because I'm not that good at using the power tool method of carving (yet)


The other little details - 


Spirals - 

Could do with being neater.

The skulls - 

I definitely need more practice with the carving bits.

Initially I thought the length of wood was going to split into bits, but it has settled down now and is actually quite strong.


The cracks haven't got any bigger - 


They seem to fit in with the theme of it.
 
I like the way the cracks seem to fit into the theme of the staff, overall I'm quite pleased with it, seeing as it nearly ended up on the fire, and it's only a bit of fun. 

I especially like the twists, so much so that when I do get a length of wood for a hoe handle I'm going to carve a twist into it, for no other reason than I can, might do something similar to the other gardening tools I have.


Thanks for reading, and Beware The Staff of Shed-a-Roth.

Sunday, 16 October 2011

Latest wood turning project ... ...

Apologies if you've been waiting for a post, seems we are currently in a situation where there really aren't enough hours in a day (or days in a week for that matter)

Due to other things I haven't been able to spend as much time at my lathe as I would like, although I'm hoping to sort that out soon.

I have managed to experiment further with the cypress I've recently acquired, I have just the other day got a load more of this type of wood, which to be honest I'm liking a lot, it's easy to work with and even though it's very green I seem to be having a lot less trouble with it in terms of warping and such like.

Latest piece -

Do you want soldiers with that ?


Yes I've made an egg, an egg box actually, again this is made from the cypress I got through freecycle, I'm going to get some more of this, but much larger pieces which I'm hoping to make some much larger pieces from, and perhaps some bowls.

Like most of the boxes / pots I make this is turned from one piece of wood, and I've applied the same logic to turning this as I did with the other cypress pot, that being I turned it a little (roughed it out) and then left it for a week or so then finished it off, this approach seems to be working, but I need to test it on some of the more difficult wood I have, mainly the fruit wood.

This piece isn't perfect, there are some small cracks on the top part (the egg) these I can easily turn out as they aren't very deep, this usually happens around knots in wood, least it does for me.

Some more pictures - 

Lid off, you can see the small cracks in the egg part.
Not as bad as they look.


I have been in some what of a dilemma about these cracks, I have to admit I quite like them, they seem to fit seeing as it's meant to be an egg, so I've wondered about making a small feature of them, however this may not be to everyone's liking so I'm not sure whether to as I intend to sell the piece in my shop, technically it's probably not a good idea to sell things with cracks in them, these won't get any worse, but as I said some people may take a dim view of the box being for sale with defects, I guess if I do decide to leave it as is and put it in my shop I'll find out.

The next thing I'm going to try with this wood is turning it end grain on, mainly to see what patterns appear as often a dull looking piece of wood yields some very interesting features when turned slightly differently, so keep a look out for that.

A few more pictures showing the grain -

The grain seems to suit designs like this.

I may turn the egg part from a different wood next time.

Thanks for reading.


Saturday, 26 February 2011

Another handmade crochet hook ... ...


If you have read this blog you'll know I spend a lot of time playing about with bits of wood, I can't help it, it's almost a compulsion, and if I could spend ten hours (or more) a day just making stuff out of wood, whether it be on my lathe or by hand I would.

It's very rewarding, and oddly therapeutic,  maybe it's something to do with the repetition  I don't really know, and hand carving wood doesn't involve buying lathes and such like, all you need is a sharp knife,sand paper and a small saw, and not much else.

Recently I've been trying to perfect the method I use for making crochet hooks by hand, trying to get the dimensions as exact as is possible without machining them, although I do use my calipers to get things more or less the same.

Here's the latest crochet hook -

It's made from a small pear branch.

 I wasn't sure when I made this one whether it was going to crack of not, the branch was very green, in fact it had only been cut a few days earlier, but it hasn't, which is a bonus although I'm not going to attempt to carve or turn a larger piece until the wood has a chance to season a little, the temptation to cut a section of the tree trunk I have in my shed is almost too much.

As you can see this hook has a curve to it, I haven't tried to straighten it out as it doesn't seem to affect it's use, it actually fits nicely in the hand. I've tried to keep the design simple and also allow a couple of inches of plain wood for the shaft, which makes the hook usable.

Some more pictures - 

The twist.


The hook.
The twist is hand carved, I'm more or less happy with it, it's not as even as it could be, but compared to the metal hooks my wife has it's more pleasing on the eye, not sure whether this matters in a tool though ? I would say that it's not as decorative as some I've seen. As for the hook I have tried to get it the same width as the shaft, using fine sand paper I have managed to get the shaft and hook to within in 0.5mm of each other using my vernier, which I think is pretty good, not sure if half a millimeter will make any difference to the item being crocheted ? the width of the shaft and hook is 7.5mm (give or take the 0.5mm) if any one has any thoughts about this I'd be interested in hearing them, also if you have an thoughts, opinions on the hook as a whole I'd be interested in hearing them :-)

Here's a picture to give you an idea of scale - 

It's a little longer than a ball point pen.

Here's a picture of it the other way round - 

The other way round.

 I spent some time finishing it with a very fine sanding pad, then I gave it a few coats of linseed oil, this helps to keep it from cracking.

Last picture to hopefully show the amount of curve it has -

I used the pen to hold it up :-)
 If anyone has an thoughts on it, for example whether it's going to be a usable design and such like, my wife has tried it out and she can crochet with it, I can't get my head round crochet at all (it's a dark art ;-) so I'm not really best placed to say whether it'll be any good for the purpose I made it.

Thanks for reading.


Friday, 25 February 2011

Hand turned candle stick (feeling smug) ...

Today was a good day, mainly because we managed to get out into the garden for a few hours, the kids love being out in the garden, and as we were out in the back garden they got to run around a lot more, much more room than the front garden.
The kids now have their own planting bed, which they can use for what ever they decide to plant, I'm sure it'll be interesting if nothing else, and we got some tidying done, so the garden is looking a little neater than it did.

It's not that I'm feeling a little smug about however, not that being in the garden with the kids isn't good fun, if not a little hectic :-) no the reason is I managed to finish off a piece of wood turning I started yesterday. I had picked out a nice chunk of silver birch and already fixed it to one of my chucks, with the intention of making a small bowl of some sort, however on closer inspection I found that the end of the wood was split quite badly, so I decided to make something else, and seeing as my wife had made some nature candles with the kids for Imbolc, and was in need of candle sticks to put them on. I went for candle sticks, although I still have one to make, I'm quite pleased with the over all look of the piece, the grain is really nice, even if I do say so myself ;-)

Here it is -
This side is nice, the grain is interesting.
And another -

This is my favourite side.
I did most of the turning yesterday, and today it had it's final finishing, which consisted of using finer grades of sand paper to get it as smooth as possible, then I sealed it with our home made wax, and gave it a polish while it was still on the lathe, mainly because it's easier.

It may not be every ones cup of tea design wise, but it has meaning to me for various reasons, not least because I'm making them for my wife to display the candles our kids made. Just got one more to make which will be different, I had no intention of making a matching pair, although if I was I'd make a jig from the design of the first one so I could get them both exactly the same, or as near as possible.

More pictures - 

I like the way the shadows fall on this one.

This one was taken in natural light.


I'm really pleased with the grain, it has a great look to it, even more pleased seeing as it's the first piece of birch I've turned, I've had a six foot length of tree in my shed for a while (I didn't use the whole six feet to make this) I'm glad I waited until I had plenty of time to give it some proper attention, though it didn't actually take that long to turn.

Some close up pictures of the grain - 

This section reminds me of a map.

This part almost looks like two different types of wood.
All in all I'm feeling a little smug about it, I'm not an expert by any stretch of the imagination but I think I did good, can't wait to make the other one and have a go at turning a piece of the pear I have in the shed.
It also feels good because for parts of it I used one of the Oland tools I made myself, as you can see it worked :-) 

If you have pondered having a go at turning wood I would recommend it, it's very satisfying. You could probably find places that run wood turning courses near to where you are by searching online, it's a great thing for kids as well, I first turned a piece of wood when I was in school, but now in my opinion overly cautious health and safety laws and other factors are putting paid to kids being allowed to put their hands and their imagination to good use in schools to create pieces of art, or functional items, it's a shame, we were given hands for a reason, and even though I'm pushing buttons to write this, it's not what hands are for.

If you want to read about the candles my wife and our kids made you can on my wife's blog ---> Decorating candles, (opens in new window) and just for the hell of it I'll leave you with another picture - 

Smiling smugly ;-)
Thanks for reading.


Sunday, 30 January 2011

Hand carved pen / pencil grips ... ...

I've been messing around with bits of wood again :-)

This time I've been making pencil or in my case pen grips, you know the type of things that you put onto a pen or pencil to help you ... well grip it better.

I used to draw (or doodle if you prefer) when I was younger and I've recently taken it up again, basically I spend time drawing abstract pieces of artwork with fine line pens.

Stuff like this -

May not be every one's cup of tea.


Now as is the case with most things it seems that pens have changed over the years (why wouldn't they ?) and they are thinner than I remember, at least the ones I have chosen to use, or maybe it's my fingers that have got bigger ? either way gripping the pens is problematic at times, I have had operations on my hands which has dulled the senses in my finger tips some what, this doesn't help.

So a quick and simple solution was a grip, yes I could of bought some, but if you read this blog on a regular basis you'll know I try to make things before I part with cash ;-)

So here they are, I made more than one.

This is the first one I made, it's kind of rough, but functional.

This one I made to fit a different type of pen that I use,
I've left 3/4mm of wood to make the walls of the tube.
They are pretty simple as it goes, just a wooden tube, making them is easy, I could have turned them on my lathe, but I kind of like the hand finished feel they have, as you can see they aren't perfectly round, the top one I made in a few minutes a while back, when I started to have issues gripping the pens.

Now these two are quite plain, not much design wise, but I've gone for function rather than form, however I did start to wonder if I couldn't improve them by making them fit the way I feel comfortable holding the pens, more ergonomic so to speak.

So I came up with this one - 

I've been using this one and it's pretty good.
As you can see it's a little more decorative, but I've also tried to make it usable, it actually feels comfortably, perhaps more so than the other ones.

Here are some more pictures - 

These are the basic ones.

The more ergonomic one ;-)

This picture was just for the hell of it ;-)
After doing a little searching online I've found that there are many different types of pen / pencil grip, some are made from different types of plastic, some are rubber, there's material ones, some that are a thread or string wrapped round the pen or pencil. 

You can also just wrap a rubber band round to help with any grip issues (I had teachers in school that did this) we also used bought pencil grips when my son first started to write, he found they helped him hold the pencils he used in a comfortable way, some maybe you and the kids could have a go ? you might want to do the tool related parts, but there's no reason the kids couldn't decorate them in some way.

If you feel like making one yourself it's pretty easy, you can go as mad as you like with the design.

I use a piece of tree branch (I used eucalyptus for all three) but you could use a piece of dowel, this would cut down on time spent making it round.

Cut your chosen wood to about an inch and a half (about 4 / 5 cm) or what ever you feel suits your needs, make sure it's thick enough to hold the pen / pencil with out cracking, you'll want a good 3 / 4mm thickness (see above pictures)

If you use branches like I have you can either leave the bark on, or shave it off, you can do this with a sharp knife (a stanley knife or craft type knife) 

Once that's done you'll need to drill a hole all the way through, I have a load of drill bits, so finding one a touch smaller than the thickness of the pens was easy, but I would suggest using a slightly smaller bit, and if the fit is too tight then roll up a little sand paper and sand the inside of it until it's a snug fit, you don't want it sliding about while your trying to use the pen, if you do make the hole too big a little tape wrapped round the pen will sort it out.

After that it's up to you, you can give it a sand as it is, or carve some kind of design into it, or shape it to fit your fingers better. I used a lavender wax on the ones I made, it feeds the wood and adds a little extra grip to it.

And that's that, pretty simple when you think about it, a few tools and some old tree branch (if you have it) what could be simpler ?

One thing I've found is that depending on the wood you grip may shrink a little around the pen / pencil this is okay, but may make it difficult to remove, so apply a little water to the wood, and if you can get some water into the inside of the grip this helps more, leave it for a few minutes or so and then try and remove it, the water should soak into the wood and make it expand a little.

Thanks for reading.