Saturday, 23 July 2011

Homemade mini lathe ... ...

In my wood turning pursuits I've discovered that having a smaller lathe might be handy for, well smaller work, I plan to make my daughter a dolls house and no doubt I shall want some tiny spindles, which might be a little difficult on my lathe.

I've tried to turn very small things on it before, but it's a bit large and in all honesty it's designed for turning rather large bits of wood, so I set about looking for a cheap mini lathe, they are quite expensive for what they are, so then I thought about making one, and after looking at a few homemade mini lathes I realised I had just about everything I needed to make a small lathe.

Here's the power plant for the lathe -

I knew I'd find a use for this :-)
It's what's left of an old bench grinder, I modified it a few years ago to run a sharpening stone for a while, then I got a drill to power it and built a proper system for sharpening things, so the old bench grinder was left on a shelf, until now that is.

As it's an old bench grinder it has 2 speeds, off and on :-) it spins some where around 2000 rpm to 3000 rpm (give or take) it handles the load when turning a piece of wood quite well, and doesn't get too hot, I may at a later date make some kind of speed control for it.

I spent some time considering how to go about making a usable head stock, and tail stock, in the end I decided to use old chucks from a broken cordless drills as the head and tail stocks.

A bit battered from removing it, but it still works.


The end of the drive shaft was ground down using a file while it was spinning to keep it centred, then I threaded it with a tap and die set and basically screwed the chuck onto the shaft, in much the same way as it was fixed to the drill, this makes for a very easy system for changing the way you mount wood to the lathe, you can use a threaded screw or you could trim down one end of the wood and fix it straight into the chuck.

I've basically tried to make a smaller version of my lathe, which can turn wood up to a metre in length and about 50cm in width, the mini lathe can go to about 30cm in length and about 10cm in width, I've already used it to turn a couple of things :-) it worked better than I expected.

The tail stock is built to slide back and forth, which makes it easy to accommodate different lengths of wood, it's kind of how my larger lathe works.

The tail stock -

It's a bit hacky, but it works :-)

You can see the idea, the tail stock slides back and forth along the 2 bars, and is clamped down with a bolt and a wing nut for easy adjustment, it doesn't look very pretty, but it doesn't matter as long as it works.

I've used another old chuck for the tail stock, I did this because it means I can use various things as centres, in the picture I've poached the revolving centre of my big lathe. The 2 bars that the tail stock slides on are as centred as possible, I used a pendulum to find the right line from the head stock.

The tail stock chuck -

Looks a little odd, but does the job.

I've fixed this chuck the same way as the head stock chuck, just threaded it onto the threaded bar, and used bolts to keep it from moving. The chuck is fixed to an L shaped bracket, which I thought would be okay, but it turns out it had a little too much flex in it, so I added the white coloured brackets to give it a little more strength.

As I mentioned I poached the revolving centre from my big lathe for this, but I made an adapter so that I can easily remove the centre and fix it back onto the big lathe should I need to.

The revolving centre - 

A little large for this lathe, but it'll do.

I did originally make a dead centre for the lathe, but I found this to be a little problematic because it moved too much in the end of the wood, this might be down to a few things, but I figured using this centre was better anyway, turns out it is much better, although if it's not tight enough into the wood it makes a horrendous squeaking noise :-/ This centre is designed to just push on and off a peg, so I made the adapter the same way, out of an old 8mm socket, mainly because is was just about the right size to start with, the socket is meant for using in a cordless drill, so it's ideal for this and when I need to use the centre elsewhere I just need to tap it off with a small hammer.

The clamp for the tail stock is just a bolt and a wing nut, I used this as a way to make things easy to move about, my big lathe uses a similar method, all be it a much larger nut and bolt.

The clamp -

Simples :-)

You can see the ends of the white brackets I used for extra strength, I will at some point weld these to the other bracket, although at the moment there is a certain amount of spring in the brackets which means that when the clamp is tight it works a little like a spring washer and keeps it from undoing :-) so I might just leave it.

Here's a picture of the tail stock as it was originally -

Probably a little weak for this, hence extra brackets.
Here's the original centre as well -

Just a bit of threaded bar with a point ground in.

And here it is, drum roll please ;-) the Acme mini lathe -

Not pretty, but it works, bit like me ;-)

There are some things I want to add to it, for a start a tool rest, at the moment I'm using a block of wood, I'd rather have some kind of adjustable rest, but it'll do for now. I also need to work out an effective way to clamp it down to a work bench or even to the bed of my big lathe, but that's all for the future, at the moment things are screwed down and bolted but I will probably weld it where I can for extra strength, I want it to last as I have plans to use it quite a lot, for small work, like the light pulls I made to test it out.

The light pull -

Not a great picture.
Another light pull, made of Pear wood.

 My wife remarked that she didn't like the small plastic ends of the light cords in the bathroom so I made these to test out the lathe, one is made from part of an old towel rail and the other from a small piece of Pear wood, nothing special but it would have been a little hard to turn it on the big lathe, the light pulls are about 8cm long and about 1.5cm to 2.5cm thick, I could have turned them on the big lathe, but the tool rest would need some modification so as I could get it into the right place for turning small pieces, which to be honest I couldn't be bothered to do, and besides making this mini lathe was more fun ;-)

I've now added a rough tool rest to the mini lathe, and discovered the tail stock has a little too much play in it, so more tweaking is needed, I recorded a short video of the lathe working, it's quieter than I thought, I'm also using one of my haomemade Oland tools as well, can't be bad.


Thanks for reading.

Tuesday, 19 July 2011

Pot project ... ...

This is the result of a little project I've been working on.

As I've been learning to turn wood I decided to have a go at turning some end grain, this is basically turning the wood at a different angle to the lathe.

This will hopefully go some way to explaining what I'm talking about.

The wood on the lathe is the lid.

So what we have here is a picture of the wood I used for the lid, in the picture I've marked the direction of the grain, the horizontal line under the wood is the direction of the grain for that piece of wood and the vertical line marks the direction of the grain when turning end grain.

One of the reasons for turning the wood like this is because it shows of the grain in a different way, but there is a down side (as I found out) the wood behaves differently, for example it tears at the ends, which isn't a big problem it does require more care and your chisels need to be razor sharp, and even then you'll have a fair bit of sanding to do, as it turns out I used my Oland tools to turn the pot and the lid, I seem to be bale to get them much sharper.

There are ways to combat the tear off like using oils,waxes and even water, but I still didn't have much luck, not that I'm that bothered by it as this was a voyage of discovery :-)

A picture of the lid on the lathe -

It has a nice pattern.

The lid is mounted on my screw chuck, whilst this is a good chuck there's a little waste which I wouldn't get if I used an expanding chuck, which I'm hoping to buy soon, they are a little pricey (about £100 for one that fits my lathe) but it will be worth it.

This next picture is the base of the pot, this is one of the reasons an expanding chuck would be handy.

Fixing holes from screw chuck -

Not a big issue, but not good if I wanted to sell it.
 
You can see the holes where I've fixed the wood to the chuck, whilst these can be sanded out and made less obvious, it would be better to turn them out, and that's where an expanding chuck would be handy because I could mount the pot the other way round and turn out the fixing holes.

A picture of an expanding chuck, this will be the one I get, each jaw moves independently, which will be very useful.

I will be adding this to my collection soon :-)

Here's a picture of the pot I took while finishing it, it wasn't going to have a lid originally, but I changed my mind at the last minute :-)

The pot -

I'm very pleased with the pattern, it looks great.

You can see where the wood has been affected by the fungus that causes the patterns in the grain, it makes for some interesting features, I'm lucky in that all the Birch I have seems to have this all the way through it, on the downside I'm not sure where I might find some more.

The pot looks a little orange, this is mainly because of the oil I've been coating it in to try and prevent any cracking and such like.

The remains of the tree trunk -

I still have a fair bit left, and there's always the Pear ;-)

And here is the finished article -

Not perfect by any means, but an interesting piece.

There's a lot wrong with it, for a start the pot rim has warped slightly and is now an oval shape instead of round, and the lid has shrunk a little so it's quite loose fitting, there are a number of things I could do to fix it though. I could re-turn the rim of the pot down to where the wood is slightly thicker, this would help prevent warping, and I could also make a new lid, but make sure it's a little bigger than it needs to be, this would then help the rim keep it's shape, but it would make getting the lid off a little hard, at least until the wood had settled down.

As it's my first pot type thing though I'm happy with it, and I've learned a lot so the next one I make I can approach it in a different way and hopefully I'll be happier with it.

From a slightly different angle -

I think the pattern of the lid works well with the pattern of the pot.

And another slightly different angle -

Shame about the lid, I may try and fix it, not sure yet.

And that's about it really, the pot has changed colour slightly and now looks a little less orange, it's worth giving it a good few coats of oil though as it keeps the wood in good shape.

The pot after a few days -

Still a little orangey, but it will fade as the oil soaks in.

One of the other down sides of wood turning is the mess, I've been bagging the shavings up so I can use them as a mulch either in the garden or at the allotment, or both :-) it gets very dusty so I've had to come up with some kind of extraction system, which I made using 2 hoovers, I'll write a post about it some time ;-)

Here's a picture of the mess, I have a lot of spiders in my shed, which is why some of the shavings seem to be stuck to the wall :-)

It gets every where.

Hopefully I've solved this little problem now :-) we shall see.

Thanks for reading.

Thursday, 7 July 2011

Practice makes perfect, well almost ... ...

Since I've had my lathe I've been trying to get my hands on interesting bits of wood, for a couple of reasons, mainly because each type of wood is different in terms of how it looks when it's made into something, whether it's turned or carved.

But apart from the aesthetics of the wood I've been learning that each wood behaves very differently when you stick it on a lathe, there are factors like age of the wood, how long it's been sitting about before you turn it and such like.

Take these 3 items, all of which I've turned on my lathe, using the same tools and same techniques.

From left to right, Pear,Ash (or maybe Oak) and Spalted Birch.
 
I turned the Spalted Birch candle stick a while ago, but had to wait to see if I could stop it warping and cracking before I sealed it, it's now had a coat of sealer and a good polish. If you look at the top of the Birch candle stick you can see where it's warped a little, this is mainly due to the thickness of the wood, it's quite thin.

I got the Birch from a chap who lives down the road from me, he's had a load of Birch logs in his drive way for ages, so I asked him for some (he intends to use it in a log burner, a waste if you ask me) I got a length about 8 feet long in the end, I still have quite a bit left. What's good about it is that because it was chopped down a while a go it's okay to turn, although it may still warp a little.

Here's the Birch one, it's called Spalted birch because of the way the grain has gone, the dark ragged lines are caused by a fungus, the lighter patches are also a result of the same fungus.

The Birch candle stick (probably the first of many) 
I was pleased with it, even wrote a blog post about it ;-)
The next thing is made from the off cut of a fence post, a few weeks ago we went to visit relatives and on the way there a couple of workmen were fitting new gates to a house, so on the way back I asked for the offcut, I'm still not 100% sure what sort of wood it is, but either way it made a nice candle stick.
Here it is - 

It's either Oak or some kind of Ash.

I have to be perfectly honest I'm not sure what this is, I should have asked the workmen, as I've mentioned it's either Oak or Ash, although as it was part of a fence post I suspect it's Oak, never known anyone to use Ash as fence posts, but I could be wrong.

This was interesting to turn as the wood had been dried before hand (probably kiln dried) and as such it was a very different experience, I was hoping to get it a little larger but it kept loosing parts where the wood had shrunk, in the end I decided I would keep going until it stopped loosing bits and although it's quite small I love the grain in it, even more so as it was destined for the bin being an offcut.

Here's a different view of it - 
Stripey :-)
The last thing I have to show you is a small goblet, yes not another candlestick but a goblet, although it's not any good for drinking out of because of the way it's warping and cracking.

The goblet - 

Made from part of a 60 year old Pear tree.

Yes this too is made from rescued wood, although I'd have to admit I was the one who cut the tree down, in my defence it was in some one's garden and they had offered it on free-cycle, if I didn't take it, it would have been burned. It's lovely wood, but very green and it maybe some time before it's really ready for turning.

I just couldn't wait, it's been sitting in my shed for months and the other day a chopped a small piece off and stuck it on my lathe, and as with the other items it was again an interesting experience, being green wood it's very soft (even though Pear wood is quite hard) and because it's green wood it's still quite wet, which means depending on the way it's kept it may or may not crack and warp, if it's kept in a dry warm environment it will probably crack, and that's what has started to happen with the goblet, whether it will get to a point and stop I don't know, Eucalyptus wood is the same if not worse.

It's an interesting learning curve, but one I'm enjoying and even though some of the things I make suffer from warping or cracking it is a little sad because I spent the time on it, but it helps me to understand what's going on with the wood and the next time I try I will know what to expect and how to prevent it or slow it down.

Here's some more pictures of the things I've mentioned - 
A closer look at the grain.
I'm pretty sure more of the Birch I have will have more of this type of pattern in it, I'm hoping to turn some plates and small pots out of some of it, should be fun.

A closer look at the Ash / Oak candle stick - 
I'm going to keep my eyes open for more fence post offcuts :-)
  Unfortunately I don't have any of this left, so I will keep my eyes open for some more, maybe even a whole fence post or 2, I think I could make some interesting objects out of it.

This fault wasn't apparent from the outside of the wood.
Usually Pear wood has a subtle grain and unless it's polished it doesn't seem to show it, the Pear I have must have had a hard life as it has quite a few faults with it, not that it's a fault as such, I plan to incorporate these faults or natural quirks into some of my designs for extra interest, that's when I know what I turn isn't going to warp and crack apart, although I've seen warping and cracking incorporated into other wood turners designs, which is something else I might try.

All in all I'm enjoying the experience, all of it I've even started to make my own tools for turning, this as I've found is something a lot of other wood turners also do, it means you have a greater range open to you and you can make some tools that do really interesting things, from a wood turning point of view :-)

Thanks for reading.


Inspire Me Beautiful

Monday, 4 July 2011

Allotment update & a homemade hose reel ... ...

Since we had our allotment, and actually got it into a sort of usable state we haven't visited it quite so frequently, I went down today to have a look at things, and as usual I was presented with a sea of green, although this isn't a good thing, most of the green is weeds, but as I found out last time it doesn't actually take that long to weed it (about 3 hours)

Here it is - 

A lovely shade of green though it is, most of it is weeds.

I know 3 hours is a long time, but I've found that it's 3 hours every 2 weeks or so, which isn't that bad, although today's trip was just to give it a water and check to see what I'd need to do, as well as the weed issues I have to clear a space at the top for a poly-tunnel, but I could most likely get this done on a Saturday morning and still have most of the day left for other things.

Having an allotment is a lot of work, especially with a garden like ours as well, but the rewards are more than worth it, food you've grown yourself tastes so much better, I'm sure part of that is down to the fact you grew it.
We got the allotment a little later than we would have liked and as such we had already planted our main crop in the gardens (front & back) but even so we planted loads of stuff at the allotment, and today I was presented with what I can only describe as monster radishes, well perhaps not monsters, but a lot bigger than I've seen in supermarkets.

Here's a few of the largest ones, already topped and tailed -

As you can see the largest is 4 inches long !
These were grown from a cheap packet of seeds from B&Q I think they were a grand total of 49 pence for a hundred or so, not bad really and I didn't really expect that much from them, so I was pleasantly surprised, and I picked enough radishes today to make up about 2 - 3 quids worth, that's if you bought them from our local supermarket, not bad from a 49p packet of seeds, and there's still a load to come, I'm thinking I might leave some to go to seed.

Just in case you missed it, here's the beast again -

I love gardening :-)


There's loads of other stuff growing, I noticed the courgette plants had a few baby courgettes on, which is good as my wife makes a great relish from them, which if you want the recipe you can find here (opens in new window)

Well enough about that, onto the hose reel, which if I'm honest was down to me not measuring the distance between our plot and the nearest tap :-( as it turns out it's about 50 metres, which means a fair length of hose, oddly enough about 50 metres ;-) and a little extra.

Keeping that much hose in some kind of order isn't easy without something to wrap it round, so I made a hose reel out of odd bits of wood and some other stuff I had lying about.

First I fixed some wood together in an x shape (I made 2 of them)

The wood was left over from another project.
To fix these together I found the centre of each piece and marked it, then I place the other bit of wood on and marked either side to get the right width.

Like this - 

Blurry picture, but you can see what I'm getting at.
Then what I did was chop out the wood between the 2 outer lines, I did this on all 4 bits of wood, this is so I could fit them together.

Chopped out section - 

This cut out needs to be half the thickness of the wood.
Side view so you can get an idea of the depth I chopped out - 

I wasn't trying to be accurate ;-) roughly halfway is okay.

You can then fit each piece of wood into each other and fix them together like this, you can use screws or nails.


Drilling pilot holes will stop the wood splitting.


Next I cut some lengths of wood to fix between each cross shaped piece, I made them long enough to allow for the amount of hose, then I fixed them with screws to make a rough reel that I could wrap the hose round.

Here it is - 
You can see where I fixed the parts to make the reel.
Now this was okay, but to be honest it was hard work wrapping the hose round this thing, and my lovely wife pointed out that it would be better if I could make it spin so that I could let the reel do the work, like the ones you can buy (I think they are about 20 quid or so) I sat and wondered how I might go about this.

After rooting about in the shed for bits and bobs I found some old steel tube and some threaded bar, this would do for the reel to turn on, I just needed to make a frame for it all.

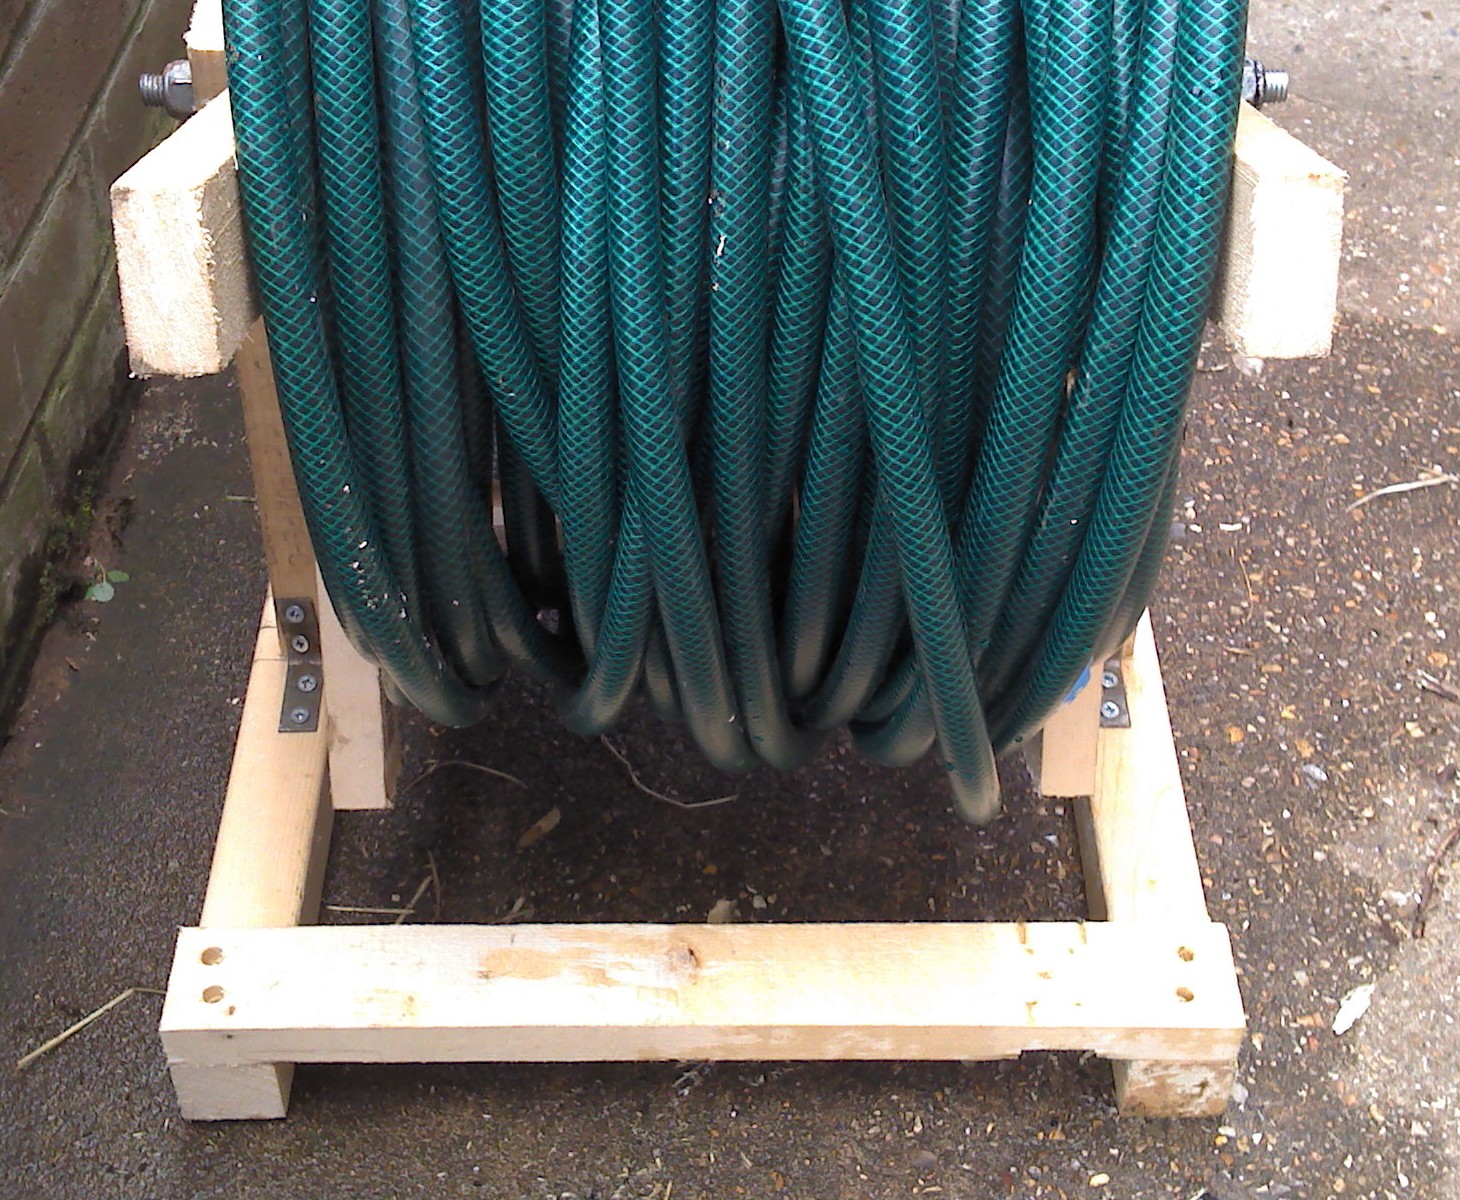
And here it is -

It works very well, even if I do say so myself


Front view of the completed reel -

This piece stops each side from moving about on it's own
And there you have it, it cost next to nothing, and cleared a little space in my shed as well (extra space is always welcome) and solved the problem of how to keep the  massive length of hose in check, makes rolling it up a load easier as well.

Thanks for reading.


Tuesday, 28 June 2011

String art anniversay gift & some artistic recycling ... ...

It has been two years since me and my wife got married (our anniversary was on the 24th of June) and we decided last year that we would try and stick to the traditional gifts, so for our first anniversary we gave each other handmade gifts made from paper, and this year it was cotton.

I must admit I found it quite difficult to find something I could make from cotton, I wasn't even sure I should, but thanks to twitter and the mention of string art I thought I was onto a winner, so instead of string I used cotton :-)

This is the gift I made for my wife -

I made the frame from bits of wood and the edging is buddleja.
It turned out pretty good, although I did a lot of swearing trying to get the pattern right, I also did a little swearing trying to find the right sort of pins to use, I wanted copper pins / nails and eventually I found them, after looking in 4 different places.

Here's a picture of the lovely photo frame my wife made for me -

Much modge podge was used :-)
So there's the string art, I'm sure people will remember doing similar things when they were kids ? today I sat here pondering what about using wire to do the same thing ? so I gave it ago.

I've used the same heart pattern, but this time I've used fine copper wire instead of string (I'll include a like to the website where I got the templates from) so I started the wire version in the same way as I did the cotton one, although this time I glued a piece of black card to the wood as I figured this would make the copper stand out more.

Here's the template I used - 

It's easy to follow.

After fixing the template to the wood I marked out where each pin needed to go, then I removed the template and started putting the pins in, I used to same copper pins as with the cotton one.

Putting the pins in -

Nearly done, there's only 80.
Once that was done it was time to start adding the wire,it's just a matter of repeating a sequence all the way round the circle, until it looks like the picture in the template.

First section done -

So much easier the second time round.

 One thing with using wire is that it can cut your fingers if you pull it too hard, so be careful, I'd also recommend wrapping the wire around the odd pin now and then to keep it tight, and to  stop it un-wrapping.

And here is the finished article, the picture doesn't really show it off very well, it catches the light in a way that seems to make it move almost, and as it's copper it will eventually start to go green, which adds another dimension to it, and you can hang it up outside, although I wouldn't use card as a backing, maybe paint the wood black before putting it outside, this will make it go green faster.

The finished article -

I still need to add a frame of some sort.
Now copper wire like this can be quite expensive, this uses a couple of metres of wire, which could cost a few quid, but there is a way you can get free copper wire to use for all sorts of craft type projects, including jewellery making.

The wire I used for this came out of an old computer power supply, it was an old one that had recently decided it wasn't going to work any more, so as we do with a lot of things we took it apart to see if we could use any on it for other things.

Most electrical items will have some kind of copper wire in them, especially things that have a motor, like a hoover for example, or old stereo and other things as well, like old tv's (not the flat panel type) it's always worth taking broken electrical items apart as there are some very useful bits and bobs inside them.

Before you get to work with a screwdriver it's a good idea to let whatever you intend to take apart sit for a few days, just to make sure all the electricity has discharged.

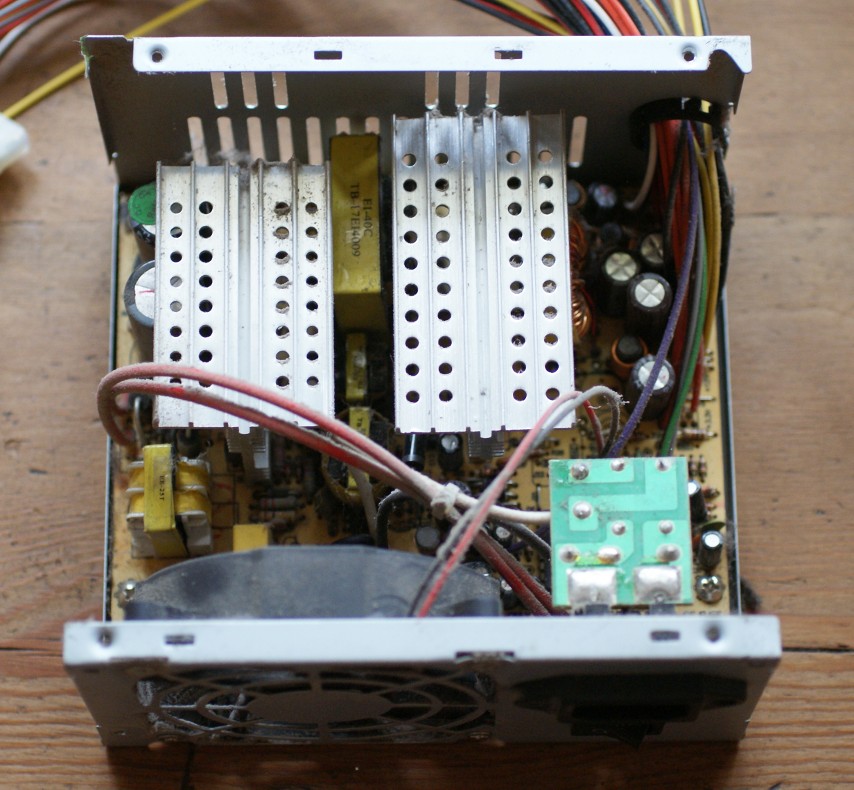
This is what you're after - 

There is usually loads of wire on these.

Here's how to take an old computer power supply apart to find one.

It's pretty easy, just a few screws and if all you want is the copper wire then a hammer is an effective extraction tool :-)

Power supply - 

I have quite a few of these lying about.


All you need to do is undo 4 screws on the casing and then 4 more on the inside, then you should be able to get at the coil.

Case screws -

Screws already removed :-)


Once you have it open you'll need to remove the other 4 screws I mentioned, these just hold the circuit board down.

Case open -

The coil is just under the 2 silver plates with holes in.

The coil -

They are usually covered in plastic, and there's only 1.

And that's about it, the wire may vary in gauge (thickness) and there maybe some other bits of copper wire as well, so it's worth having a good look, here's the link to the website where I found my template, they have some free ones, and some you have to pay for.

Sting Art Fun ---> http://www.stringartfun.com/

Thanks for reading.

Inspire Me Beautiful

Monday, 20 June 2011

Knitted back scrubber ... ...

It seems there is some kind of singularity or some other anomaly that eats random objects from our house, least that's my theory. The latest thing to be eaten is the back scrubber we had in the bathroom, we have no idea where it went it's just vanished, although I suspect it'll turn up in years to come in a very strange place for a back scrubber.

I have to say I was a little annoyed at it's disappearance, as back scrubbers go it was a good one, nothing special, just plastic with plastic bristles, but it did the job :-)
So I decided I would make one, although not out of plastic and it's not a brush either, it's just not satisfying to get out of the shower without giving your back a good scrub.

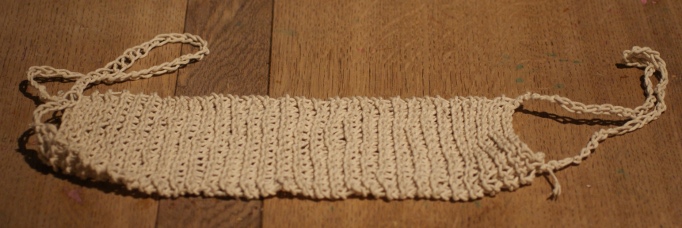
Here it is -

Yes it's knitted, and yes it is made of string :-)
Yes I've been knitting again ;-) it may seem odd to use string in this way, but we noticed when I made the dish cloths that the string was similar to the fancy exfoliating cloths you can get, so I though that string would make a good back scrubbing material, it works well, and cost less than a new back scrubber (under £2) it's washable, not sure this matters considering it's for use in the bath or shower ? and it will start to break down eventually and you can just chuck it on the compost heap when it's reached the end of it's life, so it's biodegradable unlike those nylon shower scrubber things.

Knitting one is easy, even for someone with limited knitting skills such as myself, all you need to do is a basic stitch and knit a strip about 5 or 6 inches (15cm) wide and about 12 inches (30cm) long.
Then you need a couple of straps / handles to hold onto so you can actually use it, to do this I just crocheted 2 chains of string about 12 inches (30cm) long, you can knit them as well, once you have your 2 straps it's just a case of tying them to each corner of the larger strip, a few knots should do the trick.

Here's a picture of each end -

One end with the strap attached.

And the other end, which oddly enough looks very similar ;-)

All finished, ready to scrub :-)
 And there you have it, one fancy recyclable back scrubber for very little money, a ball of parcel string costs about £2 but you can get them from poundland type shops, so if you need a back scrubber because yours has been sucked into another dimension why not knit one from string ?

Thanks for reading.