Showing posts with label anniversary gift. Show all posts

Saturday, 23 June 2012

Third wedding anniversary present ...

Tomorrow is mine and my wife's third wedding anniversary, and the traditional gift is something made from leather, or involving leather and as we said we would try and make all our wedding anniversary presents I had to come up with something made with leather.

My first idea failed quite badly, it's funny how an idea that seems fantastic in your head actually isn't that great when it comes to actually making it.

I'm pleased to say that my second idea (plan b) actually worked very well, least I think it did.


Here it is -


It's written in runic in case you are wondering.

I've used the same sort of idea as I did with the valentines gift I made for my wife, that being a Buddleja frame, mainly because it is quite straight and it's easy to make it all fit together.

The writing says ' I love you ' and it's in runic (I know soft git aren't I) I basically stitched the wooden back ground with thin leather, all in all it didn't take that long to do, maybe two hours spread over a few days, I spent more time on getting the translation as accurate as I could, after all it should say I love you, and not be a recipe for pickled herring or such like, another reason for using runic was because the characters are easy to create as they are quite angular, I also like that it's an ancient language.


Here's the lettering - 


Pickled herring anyone ?

I printed the characters out on paper, then marked the points where the angles change on the wood, then I drilled holes at each point with a small drill bit, then it was just a case of threading the leather through the holes.

The frame is the same sort of frame I always use for this type of thing, mainly because it's easy to make a frame with Buddleja wood, then I used a clear varnish on the frame, and I gave the leather and the wooden back ground a coat of Linseed oil.


The frame with varnish - 


It has more of a shine than I intended.

And lastly I added a strip of leather to the top as a means to hang the plaque up with, I just used small tacks to hold the strip of leather onto the back of it.


The hanger - 


It was a bit long, so I added a knot.


That's about it, one wedding anniversary gift using the traditional leather, next year if we stick to tradition it's flowers I think (that's an easy one) or I might go for silk, which is also given for the fourth wedding anniversary.


Here it is again - 


I quite like it.

Happy anniversary to my lovely wife xxx


Thanks for reading.


Tuesday, 28 June 2011

String art anniversay gift & some artistic recycling ... ...

It has been two years since me and my wife got married (our anniversary was on the 24th of June) and we decided last year that we would try and stick to the traditional gifts, so for our first anniversary we gave each other handmade gifts made from paper, and this year it was cotton.

I must admit I found it quite difficult to find something I could make from cotton, I wasn't even sure I should, but thanks to twitter and the mention of string art I thought I was onto a winner, so instead of string I used cotton :-)

This is the gift I made for my wife -

I made the frame from bits of wood and the edging is buddleja.
It turned out pretty good, although I did a lot of swearing trying to get the pattern right, I also did a little swearing trying to find the right sort of pins to use, I wanted copper pins / nails and eventually I found them, after looking in 4 different places.

Here's a picture of the lovely photo frame my wife made for me -

Much modge podge was used :-)
So there's the string art, I'm sure people will remember doing similar things when they were kids ? today I sat here pondering what about using wire to do the same thing ? so I gave it ago.

I've used the same heart pattern, but this time I've used fine copper wire instead of string (I'll include a like to the website where I got the templates from) so I started the wire version in the same way as I did the cotton one, although this time I glued a piece of black card to the wood as I figured this would make the copper stand out more.

Here's the template I used - 

It's easy to follow.

After fixing the template to the wood I marked out where each pin needed to go, then I removed the template and started putting the pins in, I used to same copper pins as with the cotton one.

Putting the pins in -

Nearly done, there's only 80.
Once that was done it was time to start adding the wire,it's just a matter of repeating a sequence all the way round the circle, until it looks like the picture in the template.

First section done -

So much easier the second time round.

 One thing with using wire is that it can cut your fingers if you pull it too hard, so be careful, I'd also recommend wrapping the wire around the odd pin now and then to keep it tight, and to  stop it un-wrapping.

And here is the finished article, the picture doesn't really show it off very well, it catches the light in a way that seems to make it move almost, and as it's copper it will eventually start to go green, which adds another dimension to it, and you can hang it up outside, although I wouldn't use card as a backing, maybe paint the wood black before putting it outside, this will make it go green faster.

The finished article -

I still need to add a frame of some sort.
Now copper wire like this can be quite expensive, this uses a couple of metres of wire, which could cost a few quid, but there is a way you can get free copper wire to use for all sorts of craft type projects, including jewellery making.

The wire I used for this came out of an old computer power supply, it was an old one that had recently decided it wasn't going to work any more, so as we do with a lot of things we took it apart to see if we could use any on it for other things.

Most electrical items will have some kind of copper wire in them, especially things that have a motor, like a hoover for example, or old stereo and other things as well, like old tv's (not the flat panel type) it's always worth taking broken electrical items apart as there are some very useful bits and bobs inside them.

Before you get to work with a screwdriver it's a good idea to let whatever you intend to take apart sit for a few days, just to make sure all the electricity has discharged.

This is what you're after - 

There is usually loads of wire on these.

Here's how to take an old computer power supply apart to find one.

It's pretty easy, just a few screws and if all you want is the copper wire then a hammer is an effective extraction tool :-)

Power supply - 

I have quite a few of these lying about.


All you need to do is undo 4 screws on the casing and then 4 more on the inside, then you should be able to get at the coil.

Case screws -

Screws already removed :-)


Once you have it open you'll need to remove the other 4 screws I mentioned, these just hold the circuit board down.

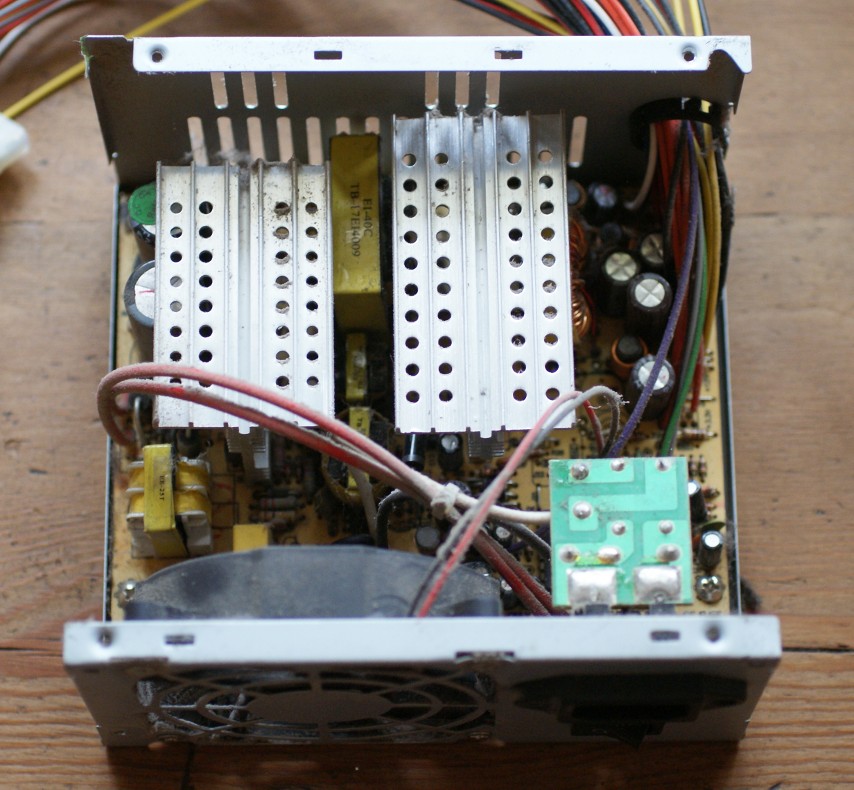
Case open -

The coil is just under the 2 silver plates with holes in.

The coil -

They are usually covered in plastic, and there's only 1.

And that's about it, the wire may vary in gauge (thickness) and there maybe some other bits of copper wire as well, so it's worth having a good look, here's the link to the website where I found my template, they have some free ones, and some you have to pay for.

Sting Art Fun ---> http://www.stringartfun.com/

Thanks for reading.

Inspire Me Beautiful