Showing posts with label artistic recycling. Show all posts

Tuesday, 27 April 2021

Making pincushions...

I've been trying to use up some of the scraps of wood I have, I tend to hoard small bits of wood as they might come in useful at some point, I've made pincushions before on my lathe and it is a quick and simple use of any small off cuts of wood and indeed material as well.

The one's I've made in the video are all from recycled materials, even the polyester padding, it's from an old cushion, I'm quite pleased with the way they turned out.

Here's a video on how to make them - 


And here's a picture of the ones I made recently - 


Thanks for visiting.

Saturday, 21 January 2017

When is a stool not a stool?

When is a stool not a stool?.....when it's a picture frame.

For a while now I've had an old stool in my shed, it's in bits as I figured it would come in useful and recently I decided to see what I might make out of the seat part, which was the largest part, the rest being made up of various turned parts, which I'll find a use for eventually.

I give you exhibit 'A' -

But what to do with it?
Not much to look at really, it's in a sorry state, so what to make from it? well I decided on a picture frame, I had thought about making one but in the end I made eight small picture frames and not square ones either, I made round ones, well I have a lathe so might as well go round.

So the first thing to do is cut it up, I flipped it over and marked out the largest piece I could get out of it, it was then I realised that I could probably make more than one if I made them smaller.

Wood marked up - 

Worked out at around 6 and a half inches (17cm)
Next I cut out the square on my band saw - 

Plenty of wood left over.
Onto to turning, using a forstner bit I made a hole so that I could mount the square onto my lathe using an expanding chuck, then I gave it a quick turn to mark out a circle so that I could cut off the excess, it saves time basically.

Circle marked - 

Chop off the unwanted bits.
The fist thing I did was turn the back of the frame in order to make a rebate for the hardboard backing to sit in, then I realised I didn't have a chuck large enough to hold the frame so I could shape the front, to solve that small problem I made a chuck out of some old chipboard (parts of an old wardrobe) fixed to a face plate.

Chipboard chuck - 

Simple, but effective.

Frame mounted onto chuck, held in place by friction - 

It's a tight fit, so no danger of things flying off.
Once I got down to the smaller sized pictured frames it was easier and I didn't need to make chucks as I have various different sized jaws for my expanding chuck.

And when I'd finished making the frames I used a bit of dark oak wax (Liberon black bison, good stuff) it was on to figuring out how to make them hold a picture.

For the back of the picture frames I used some old hardboard that came as packing material in something we ordered, I cut circles out that fitted inside of the rebates on each frame, and fixed the hardboard into place with some small screws.

Backing cut out and small screws - 

Simple solution.
Backing fitted into one of the frames - 

One screw would do just as well.
And that's more or less it, apart from the glass for the front of the frame to protect the pictures.

Obviously you could make some of these and get small glass circles cut, not sure how much that would cost, some other options are thin perspex, one of our local diy type stores sells a large sheet of perspex for £16 and it would make a load of picture frame fronts.

For the time being however I've used a very basic solution, and that is a plastic laminator sheet, the sort of thing you would normally use to protect documents and such like, it turns out that if you run a sheet through a laminator a couple of times it makes a thin clear sheet of plastic, which is easy to cut into circles and works quite well in picture frames, you could also use the clear plastic that usually comes in the packaging for kids toys (I've used this to make stencils before - opens in new window)

Laminator sheet ready for cutting - 

Works surprisingly well.
I will probably, depending on how well this laminator sheet plastic lasts upgrade to clear perspex at some point, but for now my main problem is what to put in the picture frames, I'm thinking I might make some cyanotypes for them using the light reactive paper I have.

I ended up with eight in all, some are small enough that with a magnet glued onto the back they would stick well to metal notice boards, or even fridges, do people still have fridge magnets? and I need to come up with a way to hang the frames from walls and such like.

The finished frames - 

Not bad for an old stool.
So when is a stool not a stool? when it's eight turned picture frames, and making this has given me another idea, kind of a variation on this so look out for that at some point.

Thanks for reading.


Tuesday, 14 February 2012

Don't be tight, spend a little time ... ...

I know that Valentines day (like a lot of other days) has been hijacked by consumerism, but that doesn't mean you have to buy into it, instead of spending a load of cash on a card and a gift for your better half, why not spend a little time making something instead ?

These days all I seem to hear is I don't think I could make this or that, and I'm no expert in making stuff, but that's no reason to not try.

If I can make it you can -

Simples.

So with that in mind I've made my wife a present for Valentines day and it cost... ... nothing, apart from a little time, and you don't need any special skills either, just a few tools, and to be honest I'm not that old (unless you listen to my kids) and I learnt how to do most of this kind of thing in school, so most people around my age really should have the ability to make things of all kinds.

This isn't a new idea, it's something I've played around with before, but this time I have some new toys, in the shape of some embossing pens, which cost £3 for a set (peanuts) but you can use anything with a rounded end, I was using the end of a crochet hook.

The embossing pens -

They work very well on tin.

A close up of one of the ends, they are like little balls - 

This is the largest one.

These aren't technically for using on metal, more paper, but they work well and make drawing on metal much easier as they run smoother than a crochet hook.

Okay so I've spent a few quid on some embossing pens, but I would have got them anyway ;-) as for the other materials, well tin is easy to come by, in fact if you have a beer or 2 in the fridge you have a load of tin, it just needs a little preparation, you'll need to rub the printing off the can, wire wool works well for this, it's also best to cut the can so you have a flat sheet of tin to work with.

When drawing on the tin I've found it best to put a couple of sheets of paper underneath it, makes all the difference, you can print something out and trace it onto the tin, or do something free hand or draw round something, doesn't have to be complicated.

This is what I ended up with - 

Took about 10 minutes in all.

And that's about it really, all I did then was to stick the sheet of embossed tin onto a bit of hard board using glue, thin plywood works just as well, then I used some Buddleja sticks to make a frame, this is where some basic tools and basic wood working skills come in handy, as you'll need to cut the sticks to make a frame.

Here's mine to give you an idea - 

I used copper wire for the hanging loop.

 The wire hanging loop is made by winding some thin copper wire together, but you could use string, or ribbon, or just drill a small hole in the middle at the top to hang it on the wall, I got the wire from and old pc power supply, top tip, transformers are wrapped with copper wire, you just need to extract it, so any old electrical equipment (and old radio for example) should have some useful copper wire in it.

To make the loop I took 4 equal lengths and wound them together, and what you get should look like the picture below.

The wire loop - 

I used a drill to wind it, it's quicker.

 It's simple to make and comes from the heart, and all it takes is a little time and effort, you'll be re-cycling and did I mention it's cheap (virtually free) which means you can always use the money you saved to replenish the beer supply so you have some tin for next Valentines or for when ever you feel like making something for your better half.

Thanks for reading.

Inspire Me Beautiful

Tuesday, 28 June 2011

String art anniversay gift & some artistic recycling ... ...

It has been two years since me and my wife got married (our anniversary was on the 24th of June) and we decided last year that we would try and stick to the traditional gifts, so for our first anniversary we gave each other handmade gifts made from paper, and this year it was cotton.

I must admit I found it quite difficult to find something I could make from cotton, I wasn't even sure I should, but thanks to twitter and the mention of string art I thought I was onto a winner, so instead of string I used cotton :-)

This is the gift I made for my wife -

I made the frame from bits of wood and the edging is buddleja.
It turned out pretty good, although I did a lot of swearing trying to get the pattern right, I also did a little swearing trying to find the right sort of pins to use, I wanted copper pins / nails and eventually I found them, after looking in 4 different places.

Here's a picture of the lovely photo frame my wife made for me -

Much modge podge was used :-)
So there's the string art, I'm sure people will remember doing similar things when they were kids ? today I sat here pondering what about using wire to do the same thing ? so I gave it ago.

I've used the same heart pattern, but this time I've used fine copper wire instead of string (I'll include a like to the website where I got the templates from) so I started the wire version in the same way as I did the cotton one, although this time I glued a piece of black card to the wood as I figured this would make the copper stand out more.

Here's the template I used - 

It's easy to follow.

After fixing the template to the wood I marked out where each pin needed to go, then I removed the template and started putting the pins in, I used to same copper pins as with the cotton one.

Putting the pins in -

Nearly done, there's only 80.
Once that was done it was time to start adding the wire,it's just a matter of repeating a sequence all the way round the circle, until it looks like the picture in the template.

First section done -

So much easier the second time round.

 One thing with using wire is that it can cut your fingers if you pull it too hard, so be careful, I'd also recommend wrapping the wire around the odd pin now and then to keep it tight, and to  stop it un-wrapping.

And here is the finished article, the picture doesn't really show it off very well, it catches the light in a way that seems to make it move almost, and as it's copper it will eventually start to go green, which adds another dimension to it, and you can hang it up outside, although I wouldn't use card as a backing, maybe paint the wood black before putting it outside, this will make it go green faster.

The finished article -

I still need to add a frame of some sort.
Now copper wire like this can be quite expensive, this uses a couple of metres of wire, which could cost a few quid, but there is a way you can get free copper wire to use for all sorts of craft type projects, including jewellery making.

The wire I used for this came out of an old computer power supply, it was an old one that had recently decided it wasn't going to work any more, so as we do with a lot of things we took it apart to see if we could use any on it for other things.

Most electrical items will have some kind of copper wire in them, especially things that have a motor, like a hoover for example, or old stereo and other things as well, like old tv's (not the flat panel type) it's always worth taking broken electrical items apart as there are some very useful bits and bobs inside them.

Before you get to work with a screwdriver it's a good idea to let whatever you intend to take apart sit for a few days, just to make sure all the electricity has discharged.

This is what you're after - 

There is usually loads of wire on these.

Here's how to take an old computer power supply apart to find one.

It's pretty easy, just a few screws and if all you want is the copper wire then a hammer is an effective extraction tool :-)

Power supply - 

I have quite a few of these lying about.


All you need to do is undo 4 screws on the casing and then 4 more on the inside, then you should be able to get at the coil.

Case screws -

Screws already removed :-)


Once you have it open you'll need to remove the other 4 screws I mentioned, these just hold the circuit board down.

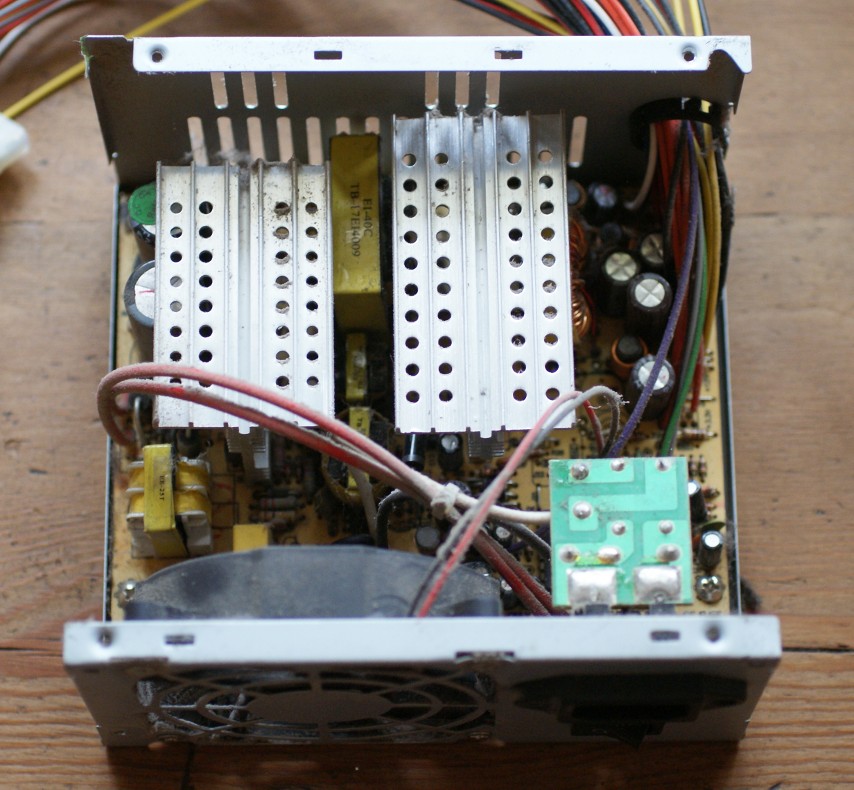
Case open -

The coil is just under the 2 silver plates with holes in.

The coil -

They are usually covered in plastic, and there's only 1.

And that's about it, the wire may vary in gauge (thickness) and there maybe some other bits of copper wire as well, so it's worth having a good look, here's the link to the website where I found my template, they have some free ones, and some you have to pay for.

Sting Art Fun ---> http://www.stringartfun.com/

Thanks for reading.

Inspire Me Beautiful