Showing posts with label knitting. Show all posts

Thursday, 26 January 2012

Homemade French knitting doll ... ...

Me again, I've been knitting (again)


For Christmas one of the things my daughter got as a stocking filler was a little knitting doll (French knitting doll) I've seen these before, as I'm sure most people have, but in all honesty I've never actually attempted to use one, so the other day I had ago.

My daughters knitting doll -

She likes it a lot by the way.

It's not as difficult as I thought it might be, apart from the wool sticking to the inside of the doll it's pretty easy to use, although I'm not entirely sure what we'll do with all the knitted tubes, I guess we'll find a use, I've thought I might be able to use them in the garden some how.

I have found a use for the smaller tubes made with the actual knitting doll, it would seem they make good snakes :-) it's just a shame I'm not that good at this kind of thing.

Aaarrrhhhh snake ! -

Sort of snake like (ish)

My daughter is currently using it as a draft excluder for her dolls house.

Now as usual after using the knitting doll, I started to wonder how easy it would be to make my own, so that I can make larger tubes, this normally happens with a lot of things, I play about with them and then I start thinking I wonder if I can make one of these ?

As it turns out they are very easy to make, and you can use more or less anything tube like, I roughly turned a piece of scrap plywood into a circle shape on my lathe, then I cut the middle out, for the pegs I used some thick garden wire, so the pegs wouldn't bend very easily, and I pre-drilled holes all round the plywood circle them glued the pegs in.

This is what I ended up with -

Complete with knitting.

Not sure why I spaced the pegs in the way I did.

Pretty simple really, the principle is the same as the actual knitting doll, the main reason I made this one is that I intend to try knitting with string and thin wires, and I didn't want to break my daughters one.

I mentioned earlier that you can easily make one of these with more or less anything tube like, and so I thought I'd make another just to prove it.

For this one you'll need an old plastic bottle, some plastic plant labels and some sticky tape. Basically you just need to cut the top and bottom off the bottle, and then stick the plant labels round one edge, the more labels the more stitches.

Ingredients -

Ooops I forgot a picture of the sticky tape.

I decided I wanted 8 stitches so I cut my 4 labels in half, then taped them round one edge of the tube I'd made out of the bottle.

Like so -

Easy :-)

And that's it, one homemade (in about 10 minutes) and it works just as well.

I thought I'd try it out -

Kind of like a spiders web.


You don't have to sacrifice any pant labels either, just use some pencils or tape a few bits of dowel around the bottle, or what ever you use as a tube, the point is that you don't always need expensive equipment to have a go at some crafts, you can more often than not make some of the equipment yourself, you don't actually need anything to knit with, you can just use your fingers ;-)

Thanks for reading.

Monday, 20 June 2011

Knitted back scrubber ... ...

It seems there is some kind of singularity or some other anomaly that eats random objects from our house, least that's my theory. The latest thing to be eaten is the back scrubber we had in the bathroom, we have no idea where it went it's just vanished, although I suspect it'll turn up in years to come in a very strange place for a back scrubber.

I have to say I was a little annoyed at it's disappearance, as back scrubbers go it was a good one, nothing special, just plastic with plastic bristles, but it did the job :-)
So I decided I would make one, although not out of plastic and it's not a brush either, it's just not satisfying to get out of the shower without giving your back a good scrub.

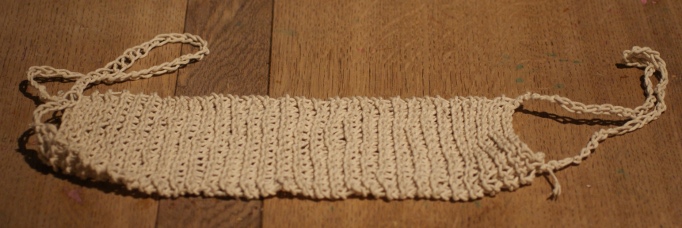
Here it is -

Yes it's knitted, and yes it is made of string :-)
Yes I've been knitting again ;-) it may seem odd to use string in this way, but we noticed when I made the dish cloths that the string was similar to the fancy exfoliating cloths you can get, so I though that string would make a good back scrubbing material, it works well, and cost less than a new back scrubber (under £2) it's washable, not sure this matters considering it's for use in the bath or shower ? and it will start to break down eventually and you can just chuck it on the compost heap when it's reached the end of it's life, so it's biodegradable unlike those nylon shower scrubber things.

Knitting one is easy, even for someone with limited knitting skills such as myself, all you need to do is a basic stitch and knit a strip about 5 or 6 inches (15cm) wide and about 12 inches (30cm) long.
Then you need a couple of straps / handles to hold onto so you can actually use it, to do this I just crocheted 2 chains of string about 12 inches (30cm) long, you can knit them as well, once you have your 2 straps it's just a case of tying them to each corner of the larger strip, a few knots should do the trick.

Here's a picture of each end -

One end with the strap attached.

And the other end, which oddly enough looks very similar ;-)

All finished, ready to scrub :-)
 And there you have it, one fancy recyclable back scrubber for very little money, a ball of parcel string costs about £2 but you can get them from poundland type shops, so if you need a back scrubber because yours has been sucked into another dimension why not knit one from string ?

Thanks for reading.


Thursday, 2 December 2010

Knitted hanging basket... ...

This is kind of a follow up post to the one I wrote about my recent adventures in knitting, which I quit enjoyed.

As the title suggests this post is about a knitted hanging basket, not as original as you might think, it turns out I'm not the only one to try this, people have been knitting pot hangers and such like for years.

We are trying to be more self sufficient (you may be wondering what that's got to do with knitting) and as part of that we have started to make our own equipment as well (I recently turned an old fence post into a plant pot making tool ---> plant pot maker (opens in new window) it's not just wooden tools, we grow our own veg and space is a problem to be solved, we are lucky in that our garden is quite large, but most of it is for the kids to play in, they wouldn't be happy if I turned the whole lot into a veggy patch (I've considered it on occasion) but even with the space we have we don't always have room for lots of large plants so hanging baskets is a good answer, and they don't often get walked through by the kids.

In post I wrote about knitting I mentioned experimenting with different materials, one of those was string, which as it turned out wasn't easy to knit with using small needles, so I made some large ones (and guess what ? I wrote a post about them ---> chunky knitting needle post (opens in new window) the large needles where great for the string I intended to use, they did take a little getting used to being the best part of 3 feet long, but once I figured out a good way to hold them I was off.

And this is what I ended up with -

On reflection a square would have been better.
As you can see I haven't counted my stitches very well as I ended up with a rectangle, a square would be neater for the purpose I made it for, but it does work, and it's quite large so will hold a good few plants, in this case tomatoes, least that's what I want to put in it, what actually goes in it may be something entirely different.

The stitches are quite big so obviously it will need some kind of lining, I figured general hanging basket liners would do, or as my wife (link opens in new window) pointed out we could make paper ones, using a bowl as a mould, we've done this before when the kids have done craft type things, even better as we often have newspapers spare.

I also had to figure out a good way to hang the things, I decided a chain was best, so I used a basic crochet chain stitch to make.... well chains out of string.

Crochet string chains -

They are very strong and will work well.
My crochet isn't the best (some of the stitches baffle me) but a simple chain stitch is easy to do (I won't post a link about the chunky crochet hook I made, it's on here somewhere ;-)) attaching the chains was easy enough, I basically tied them to each corner of the basket using a couple of tight knots, they seem secure, although I did test it to see if it would work and hold a little weight.

The finished article - 

Not the best picture, but you can see the idea.
Like I said it works and will hold weight (to test it I filled a mixing bowl with stuff) it will be quite large when full of compost and plants, the next ones I make will be smaller and squarer ;-) I think they look quite good, and more attractive than the metal ones, this one isn't as tidy as it could be, but I'm happy enough with it, and it will also break down eventually, at which point it can be composted as it's made from natural string, you can't do that with the metal ones, hopefully I'll get a few years out of it before that happens, why not have a go yourself ? I found it quite enjoyable.

Thanks for reading.


Tuesday, 16 November 2010

Make your own chunky knitting needles... ...

If you've read the last post I did you'll know I have been adventuring into the realm of knitting, with pretty good results (I'm happy at least) We now make our own floor and dish cloths, mainly because ours our better than bought ones, and last longer, and when finished with they can be composted, sounds like a winner to me.

Anyway I mentioned in the post about other applications for knitting, and I came up with the idea for knitting hanging baskets, admittedly this isn't a new idea, but I decided to ponder it a little, and after trying to knit with some fairly thick string I figured I'd need bigger needles to actually have a proper go, either that or some thinner string, I was feeling creative so I went for making the needles in the end, and here's how I did it.

Okay so I've kind of cheated a little, mainly because I bought two lengths of 12mm dowel for the needle shafts, at a cost of 68p each, so £1.36 for the pair, I could have turned the shafts on my lathe, but if I'm honest it was the last qualifying session of the 2010 formula 1 season and I didn't want to miss it, and in my defence I didn't actually have any wood as long as this, or that I wanted to turn down to 12mm, I have plenty of wood, it's just marked for other projects and such like.

So with my two lengths of dowel I trundled down to the mole cave and set about putting a point on the end of each needle.

Picture time -

Starting the point.
I started the point off by clamping the dowel in a vice and using a small block plane to shave the ends down, again this was done as it's less time consuming than sanding, again had I turned them I could have made the point at the same time.

Once I'd got a rough point I then sanded the ends using the sanding disc I made for my lathe, and with a fine grade sanding disc on it I was able to get a nice smooth point on each needle.

Finishing the points - 

I should have removed the bar code sticker first.
Both ends done - 

Pretty much equal, ish :-)
After I'd finished the ends it occurred to me that I would need some kind of stopper on the opposite ends, so that anything I was knitting wouldn't just slide of the end, I had some rough turned pieces of wood lying about so I measured a couple until I found a bit that I felt was big enough to fit on the end of each needle.

For the needle ends I got two sections of wood from the roughly turned piece I chose, and then marked the centres of each part, by drawing lines across each bit to find the centre, the same way you would find the centre of a circle on a bit of paper.

Then using a spade bit I made a hole in the centre of the needles end, and as it turned out the dowels were a little larger than 12mm, either that or the spade bit is wrong, a large drill bit would do just as well.

Needle end and spade bit - 

Spade bit and needle end.
The dowel turned out to be closer to 13mm according to my vernier which was okay as it meant I could get a nice tight fit on the needles ends, and with a spot of wood glue they wouldn't come off easily.

I did however have to sand the ends of the needles so they would actually go into the holes I'd made.

Sanded needle end and end - 

Needle and end.
Once that was done it was just a matter of finishing the ends, I did this using the sanding disc on the lathe, and then I gave each needle a good sanding with a finishing pad to make them nice and smooth, and below is what I ended up with, which is a set of knitting needles that are more or less 3feet long.

Knitting needles - 

Not the best picture, but you get the idea.
I think they turned out okay, and for about £2 and 45minutes work they are pretty good, and they work, they are a little strange at first because of the length of them, but after a while you get used to holding them, and just to prove they can be used I did a quick few rows of string.

String knitting - 

Much easier to use this type of string.
Of course you can use chunky wool as well, but I made these for the purpose of knitting hanging baskets, and yes you did read that right, I have already made a prototype which I will post about eventually, it actually looks quite good as it goes, but I'll let you be the judge of that when I get round to writing the post.

You can easily make something like this yourself even with out the lathe and such like, all you need is a drill a spade bit and some wood and sand paper, or you could just use a large drill bit, 10mm would be about right, of course with out the lathe sander it may take a little longer to make them, but there is a lot of satisfaction to be had in making your own tools.

I will get round to doing the hanging basket post as soon as possible, so stay tuned.

Thanks for reading.


Saturday, 13 November 2010

I can knit ! ... ...

Yes you heard it right, I'm a bloke and I can knit (sort of) so what you going to do about it grrrr ?

Seriously though there is a reason for me attempting to knit for the first time in about 20 years (I learned to knit in school) the reason is that I vaguely remember my nan I think making her own dish cloths and floor cloths, although I think she actually used to crochet them, I tried crochet and failed (I will have another go)

Why bother ? well it goes back to the same thing I've said in a lot of posts, no one makes anything any more, least that's how it seems to me, we tend to just buy it, and usually for as cheap as possible.
I think this attitude (and I'm just a guilty ) is actually harmful, our kids don't know what it's like to pick up a bit of wood and make a tool out of it, why should they ? when they can buy it ? and this mentality means our kids are loosing touch with certain skills, like wood working and such like, and not only that they aren't encouraged to think, to be creative and inventive, this I find is quite a sad situation, I'm not pointing any fingers as to who is to blame, I don't think any one person or group of people are to blame, perhaps it's society as a whole that needs to change ?

Anyway here's a picture of the first bit of knitting I've done in 20 odd years -

I think it turned out okay, after 3 attempts :-)
Okay so it's not perfect, but in all fairness it's a cloth and not a sunday best jumper, it's knitted from parcel string, I had loads of it lying around, I got it cheap from some place or other, and I think you can pick it up by the ball for under a pound most of the time, and for a pretty large ball.

It was easy enough material to knit with (even for me) and the end result is quite pleasing, and not as coarse as you might think, in fact I've seen fancy ex-foliating wash cloths made of rougher material.

As cloths go it works as expected, it's actually better at picking up dirt and grime than any of the bought cloths we have, and I'm not just saying that because I knitted the thing :-) and it can be washed and re-used, unlike some cloths which after a couple of days have to be thrown away, if it gets stained a little soak in bleach will sort it out (if you use it, other wise a very hot wash will do) and when you have finished with it, because of the nature of the string it will degrade, so chuck it into your compost bin and it'll break down pretty fast.

So what about time ? most people these days seem to not have time to do anything (even cook a real meal) well I managed to make the cloths (I ended up with 3 from one ball of string) while watching tv, and a more accomplished knitter would probably have managed this in a few minutes, so time isn't really an issue, even I managed to keep up with the program whilst knitting.

Once I'd finished the cloths I got to thinking about other applications for knitted stuff, apart from clothing, so I started messing around with other materials, here's a picture of some knitted garden string -

Natural garden string.
Now I have to say that this wasn't as easy as I thought it was going to be, I think the problem is that the string wasn't quite as flexible as I thought, and I was using small needles, but it was possible, and after a quick bit of research on line I found that some people have tried similar and knitted hanging baskets and such like, only they have used much bigger needles, so I made a set, which I will dedicate a post to, along with a post about my first knitted hanging basket ;-)

I don't think we have any excuses for allowing the loss of skills like this in our children, it's up to us as parents to teach them things like this where we can, and if not find some one who can, I'm lucky I have quite an array of tools which I will show both my kids (son and daughter) how to use, and I will show him and her how to go about making things, I feel I owe it to them as a parent, and lets face it in this day and age certain institutions don't put the effort in, this is probably the reason why skills are being lost.

All in all I enjoyed making the cloths, there's something very pleasing about linking a length of string / wool together in this way, but then I enjoy using my hands for making things, that's what they are designed for, not just picking something off a shelf and paying at a counter, we were given hands and brains for a reason, I think it's about time we started using both a lot more than we do.

Thanks for reading.