Friday, 10 May 2013

Home made dribble bar ...

I can hear you saying what on earth is a dribble bar ?

Well it's basically a bar shaped attachment for a watering can, farmers use tractor mounted ones, but they are more or less the same thing, as to what one might use a dribble bar for, well I've been reading a lot of books lately, gardening books,books about growing food on allotments and other plant related books, and most of them mention dribble bars for either applying weed killers or applying liquid plant feeds.

Seeing as we don't use any type of weed killer on our garden, but we do use feeds, natural ones made from nettles and such like I figured I'd make one, and because I failed to find one in any of our local gardening centers.


Here it is, it cost £2 (for a pack of plastic T's, couldn't find them in singles) -


It couldn't be simpler.

Using a bit of old 22mm plastic over flow pipe I had and a 22mm plastic T, it took about 20 minutes to make.


Ingredients - 


It's a basic plumbing job.

I took two bits of the plastic pipe, one short length for the spout of the watering can, and a 16inch piece to make the bar with, the two small bits of wood are to block each end of the bar, you could use stop ends, but I would have had to buy them, which would have put the price of the whole thing up.

To get the short bit of pipe to fit onto the watering can spout, I just heated it up with my mini blow torch, a lighter or a candle will do just as well, you want to just warm up one end of the pipe so it's a bit more flexible, then work it onto the spout of the watering can, the watering can I'm making this for is metal, for a plastic watering can you can either use something to stretch the end of the pipe, like a pair of pliers, or maybe the T fitting will fit the spout already.


The short pipe fitted on the watering can - 


About an inch should be plenty.

Once the plastic pipe cools down again it will contract slightly making a nice tight fit.

Next the bar section, for this I took the 16inch piece of pipe and cut it in half, then stuck each bit in either side of the T section, the fit is pretty tight so I won't need any glue.


Like so - 


Simple, now to block up the ends.

On to blocking the ends, I've just used a couple of bits of a small branch, I sanded them down a touch so they just fit into each end of the pipe with a little tap from a hammer, again as it's a tight fit I won't need glue.


The stop ends - 


Now just needs a little tap with a hammer.

After a bit of gentle persuasion - 


Sorted, no leaks here.

Nearly done - 


Now for some holes.

All you need to make the holes is a drill, with a 3mm drill bit, if you find the holes are a bit small then try a 4mm, it's easier to make a small hole bigger than it is to make a big hole smaller.

I used my mortise gauge to score a line roughly along the length of the bar, then measured out where I was going to put the holes, I made them an inch apart.


Mortise gauge (in case you were wondering) - 


Very cheap, and handy to have.

Ready for drilling - 


More or less in line (honest)

Once I'd drilled the holes I had to clear some of them out as they had bits of plastic in them, I just used a small screw driver, but any pointy type tool would do.


Holes cleared, ready for testing - 


Done, could easily be made from copper as well.

Here it is in action, it's not very easy to see, but it does work well - 


It was a bit windy.


It cost very little, the cheapest I could find online was £4.99 for a plastic one, admittedly I had the pipe already, but you could always see if anyone is having any plumbing done in your area and ask them if they have a spare bit of pipe, or just make one for the hell of saying I made that.


Thanks for reading.

Wednesday, 1 May 2013

How to make a Trebuchet ... ...

Recently we paid a visit to our local museum (well one of them anyway) and as it's a castle of course it has a siege engine (all be it a small one) so we decided we'd have a go at making our own, you can read about our recent visit on my wife's blog - here (opens in new window)

For a rough guide on how to build a small Trebuchet read on.

All you really need to make a Trebuchet is a bit of wood working / diy skill as it involves sawing wood and such like and some tools and a bit of wood.


With a bit of luck you should end up with something like this -


We're very proud of our baby siege engine.

It's not complicated to make, and as to how big you go, well it's up to you, but remember this is designed to fling objects over large(ish) distances, and the bigger you go the further it'll throw (see what I did there ?) I've added a short video at the end of this post so you can see it in action.

Basically I've taken an off cut of an old pine sheet and fixed to it some battens to make a frame, it's a simple triangle shape, with one upright that holds the pivot for the throwing beam, and two supports on either side, clicking on the pictures should bring up a larger version.


The basic framework and base -


You can see that four bits of wood make up the main frame.

From the picture above you can see that the upright ('B') is fixed into the middle of the base, and fixed from underneath and then fixed to part 'A' parts 'C' and 'D' are then cut with 45 degree angles at each end and then fixed to part 'B' and part 'A'

I used screws and wood glue to fix it altogether, and obviously you need to make two sides that are identical.

If you're not too good with cutting wood at angles or the kids are having a go at building something like this, then I'd suggest getting a mitre saw, these can be picked up for about £20 from diy shops, and they come in handy for picture frames and such like, it also means you can do small jobs in the house, I normally use my electric mitre saw, but it's not allowed in the house.


Here's mine, which the kids are getting pretty good at using -


Really easy to use bit of kit.

We added wheels to our trebuchet, but again this is up to you, I added some extra bits of wood to the base so that I could add axles to the back and front, for the wheels I used my largest hole saw, which also leaves an 8mm hole, which is good as I was using bits of 8mm dowel for axles.


Hole saw -


This one needs a sharpen.

Hole saws are great for making wooden wheels, although they do need a bit of sanding to remove any bits of wood that might cause splinters.
In the next picture you can see the wheels, and the extra bits of wood I added to the base.


Wheels (well a wheel anyway) -


We even used small skewers to make pegs.

If you decided to go with wheels you should now have something that looks a little like the next picture, a basic frame on wheels, we'll get to the business parts in a minute.


Basic framework done -


There's really not that much to it.

Originally I was going to use just one piece of wood on each upright, but as the wood I was using was quite thin I decided to go with two bits of wood for each upright.


Like so - 

I could have left it as one piece, but two seemed better.

You can see from the picture I just butted the extra piece up to the framework, rather than adjust everything.

For the the throwing beam and the counter weight pivots I used 12mm dowel, now whilst you need to take care to get everything in line the throwing beam setup needs to be quite accurate, if the holes don't line up and aren't level then it won't throw very well, if you have a post drill then all the better for drilling nice straight holes, but if you don't you can still get things in line by taking your time and using a bit of masking tape (other tapes will do)


Taping two bits of wood to get the holes in line -


A bit of tape works wonders

 You can see in the picture above that I've already drilled one hole, but because I decided to add extra bits of wood I then had to drill holes through them, the masking tape helps to keep everything in line.


Ready for drilling -


Post drills make this kind of thing easier.

 You don't need a post drill, taking care with a normal drill should keep everything in line, and you can buy guides for drills that allow you to drill straight holes.

Once you have the main frame built, you can then move onto the throwing beam and counter weight, these are simple to make, but once again you'll need to keep the pivot holes nice and straight.

For our throwing beam I've used two bits of the batten fixed together, again this is because I felt one piece was a bit too thin, so all I did was fixed the two bits together with screws and some glue, then I drilled two 12mm holes, one almost at the end of the beam, and one 4 1/2  inches (about 11.5cm) further along the beam, you don't want the main pivot hole in the middle of the beam as it'll work more like a seesaw than a Trebuchet.

Our throwing beam ended up being  19 1/2 inches long (about 49.5 cm) with the hole for the counter weight  box 1 1/2 inches (about 3.5cm) in from the end, then the hole for the main pivot 4 1/2 inches (about 11.5cm) further along the beam.


You can see the distance between the two pivot points in the next picture -


It's all down to leverage.

The counter weight box is, well a box, not hard to make, the only difference is that you want to make two sides come to a point (roughly) where the pivot point is, this will allow for more clearance when the Trebuchet is loaded, I miscalculated a little and had to cut a notch out of the counter weight box.


The counter weight box -


Think along the lines of a simple house shape.

Here's the notch I had to cut out of our counter weight box - 


I may rebuild the counter weight box


Again take care when drilling the holes for the pivot, they need to be in line and straight, or the counter weight will sit at an angle, and it'll affect the stability of the Trebuchet, again using tape to hold the two sides when drilling will help keep things straight and in line.


Finishing the two sides of the counter weight - 


We went with a curved design in the end.

We chose a curved design for the counter weight, I'm just finishing it with my homemade spindle sander in the picture, but a simple house shape would do, or even a triangle, but remember to make the box big enough to hold plenty of weight, it's easier to have a box that's too big and have to take some weight out (we used sand,stones and clay) than it is to add weight to a box that's too small.

We used small wooden pegs (made from skewers) to keep everything in line, once we had things where we wanted them we used the pegs to keep things in place, like the counter weight box and the throwing beam, we just drilled (using a small drill bit) either side of the beam and counter weight, then used a small hammer to bang the pegs in, it kind of gives it a more authentic look (well we think it does)


The pegs (on the beam) - 


The pegs make it easy to take apart, should adjustments be needed.

The pegs (on the counter weight) - 


Again the pegs make things easier when it comes to adjusting the weight.

Here's the counter weight box, already weighted - 


We found 1.2kg to be heavy enough.

The clay on top helps stop things flying out of the counter weight box, we found 1.2kg to be about enough on our Trebuchet, but you can experiment with different amounts to see how it affects the range of what ever you use as ammunition.

If you do use screws I'd suggest counter sinking them, and then using some dowel to hide the holes, this is just a case of knocking a bit of dowel into the hole and then cutting it off.


Screw holes hidden - 


An old trick, but it still works.

Apparently these next bits were the most important, least that's what the kids said, I have no idea what they do.


Decoration maybe ? - 


Design features ?

Now comes the important question of the firing system, Trebuchets use a variety of methods, like a wooden basket or a sling, so we've used two different methods, we didn't go with a wooden basket, but we did make a sling (or rather my wife did) she crotched a net from string, which we used to fire the golf ball, the other projectile is a wooden ball on the end of a bit of string, so it works kind of like the hammer they use in athletics.


The projectiles - 


You could use a variety of things, see what works best.


The sling, expertly made by my wife - 


You could always make one out of a bit of material

The next part to the firing system is quite simple, it consists of three pegs, one of which is angled in a specific way, so that the net or the hammer don't release until the throwing beam is upright.


The pegs - 


The one on top at an angle is the important one.

The pegs on either side are where the net fixes to, they aren't used with the hammer, that only needs the angled peg, which is angled in such a way that the net and the hammer won't come off the peg until the beam is upright, otherwise the projectiles would end up go either straight up or actually behind the Trebuchet.


This is how the net fixes onto the pegs - 


A simple sling shot basically.

Hopefully this rather long winded post will go some way in helping you to build your very own baby siege engine.

Here's a short video of it in action, using both the net and the hammer, not the best video in the world, note to self, hold phone other way next time (I may re-do the video)


I'm happy to answer any questions about the Trebuchet, thanks for reading.


Friday, 22 March 2013

How to build a condenser box for a tumble dryer ...

First post of the year, bit later than I'd intended, but sometimes that's just the way it is.

Anyway while I'm twiddling my thumbs waiting for spring to make an appearance I thought I'd attempt to solve a small problem we have with condensation from our tumble dryer, we've used it more than we would have liked this winter, mainly because it's not really been the best weather for drying stuff on the washing line, obviously where possible you should try and vent to the outside, but if you can't then this is an easy and low cost option, it might not be the most effective, but it does work.

If you have a tumble dryer without a built in condenser you'll know it can put out a fair bit of condensation, which can lead to things getting damp (like walls) and that can then lead to mold growing, so how to solve it ? well there are ways, of course, the easiest is probably putting the dryer hose out of a window, or a cat flap, in some cases you can have vents put through the walls of your house, which basically means a four inch hole in the wall, or you could buy a condenser box, they range from £5 to around £30, but it's pretty easy to build one using a plastic tub, which you can pick up for as little as £1.


Here's the one I built -


For some odd reason it reminds me of the teletubbies.

As you can see it's a plastic tub with the dryer hose stuck in it, and that's all the ones you can buy are, although some do require the use of ice, but I'll get to that in a bit.

I built this using a tub (cost £2) the rest of the stuff I had, I used an off cut of plywood to strengthen the lid as it was a little flimsy for my liking, but that's about it.


Ingredients - 


Not much to it really.

The idea is that the warm air from the dryer is blown into the box, where it condenses, the water collects in the tub and not on the walls.

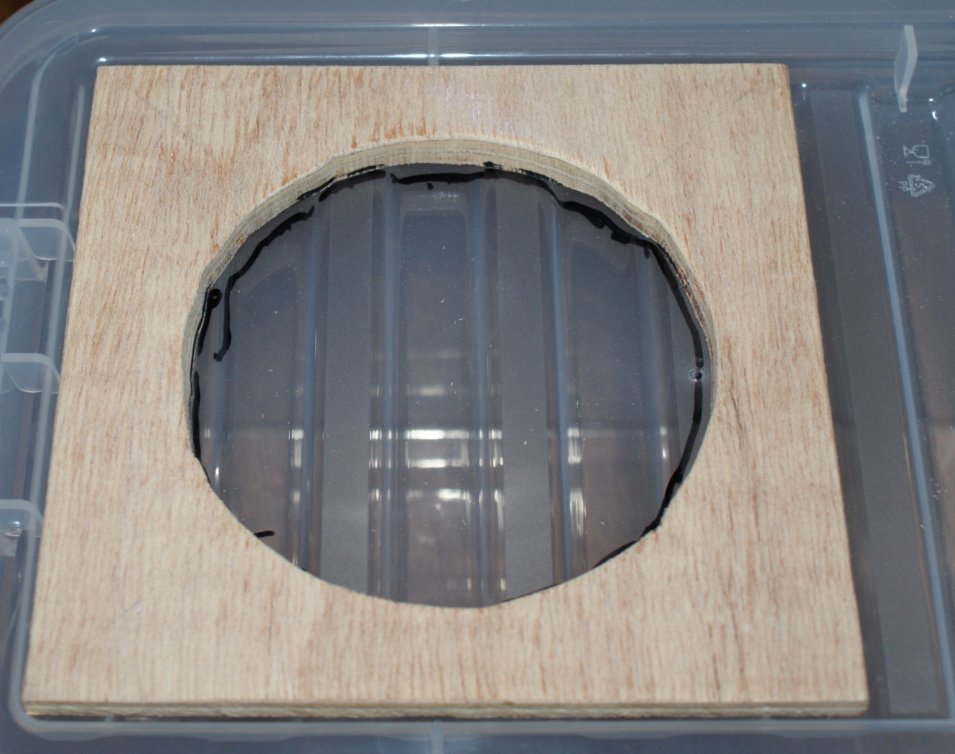
All I needed to do was get the hose to fit to the lid and it was ready for a test run, I marked the center of the plywood, and then drew round the hose fitting (which we already had) then I cut out the hole.


Wood ready for cutting - 


This wouldn't be needed with a stronger tub.

Once I'd cut the hole in the wood I used that as a template for the lid, then I cut out the hole in the lid.


Marking the lid - 


Probably should have gone for a flat lid.

Then I just had to push the hose fitting through the wood and the lid, and then fix the wood in place, which I did with a few small screws.


Here's the fitting in place - 


Under side of the lid.

Top of the lid.

You can see in the picture above the thread for the dryer hose to screw into, turns out this fitting came with the dryer, probably in case you already had some kind of vent system in place.


The two hose fittings - 


One end for the dryer, and the other for the condenser.


You could use either fitting for the condenser box, as long as the hole is a snug fit it won't come out.

The last thing to do was make some small holes in the lid for the air to escape, otherwise it would have just blown the lid open once the pressure had built up a little.


Vent holes - 


I just used an 8mm drill bit.

And that's it basically, the idea is simple, you're just using the box to collect the moisture from the warm air, rather than the walls.

Now I mentioned that some of the shop bought condensers use ice, the idea of that is that it keeps the temperature in the box down and thus helps the water vapour to condense, it's basically the same process that causes your windows to steam up when it's colder outside than the temperature inside.


Here's how much water the box collected after about an hour of use - 


Not a huge amount, but it means it works.

The picture above was from just using the box as is (no ice) I did also try it with a tub of ice cubes in it, and didn't really notice a massive difference in the amount of water that collected, which we use to water the house plants, mainly the Gardenia as it doesn't like tap water.

Obviously this will only be used when the weather is too wet or cold for drying clothes outside, but it did make a difference to our utility room, it wasn't as damp after using the box, and I'm still tweaking it, I've recently made the lid seal better, so not so much air escapes out of the sides of the tub, of course a more expensive tub would have a better seal, but it would also cost more, but for £2 this works just as well as a bought one, if the reviews I read are anything to go by.

PS - The fluff that collects in the vent on a tumble dryer is great for starting fires with a fire steel, goes up like a treat.


Thanks for reading.

Tuesday, 11 December 2012

Festive turning ... ...

To be honest I haven't had much time of late for blogging or much else, other than Christmas related stuff (where does the time go ?) seems it was just about summer last time I looked, now it's two weeks until Christmas day !

But I've tried to carry on the family tradition of making stuff for the festive season, so I managed to make a couple of things on my lathe in the way of decorations.

First up, not very elaborate, but quite pleasing none the less -


It kind of resembles a Christmas tree.

I made two - 

Not quite the same as the last one, but similar.

As wood turning goes these are pretty basic, more or less tree shaped (as in Christmas tree) with a twisted loop of copper wire as a means to hang them on the tree, I made them from bits of scrap wood (Pear in this case) and just gave them a bit of a polish with beeswax.

The next item, and most likely the last thing I'll make this year (unless I suddenly find myself with free time) is a snow man, and I made all the parts on my lathe, even the tiny nose, I used copper pins for the eyes and buttons.


Meet Frosty - 


My wife's handy work in the background, this years Yule log.

I decided making a snowman would be a fun thing to do, although I have to say I'm not sure I've quite got the dimensions right, but it does resemble a snowman, sort of.


Here's a picture of the components - 


All made from Pine and on my lathe.

And as you may have noticed from the picture he is also a storage box, perfect for hiding a few sweets in.

The only thing I didn't make was the copper pins I used for it's eyes and buttons, and the lacquer I used to coat it with, I could have gone the whole hog and painted it white and then used different colours for it's nose,eyes and buttons, but I quite like the way it looks in plain wood, I could have spent more time on the finish and used some of the polishes I normally use on other stuff, but figured it would get a lot of attention from the kids, so I didn't go too mad on the finish, and besides I can always paint it next year and it'll be new all over again.


I think he cuts quite a dashing profile myself - 


Might have to make the body segments a little more rounded next time.

There are loads of things you can make for Christmas, and a variety of materials you can use, and it doesn't have to cost a load of money either, I'm lucky in that I have a lathe and various other tools which allow me to make stuff like this, but it could just as easily have been made from clay, or paper, or even knitted.

Merry Christmas and all the best for the new year.

Thanks for reading.

Thursday, 15 November 2012

Casting with sand ...

We've often wanted to make different things using Plaster of Paris, and although we have lots of different types of moulds there are times when these just won't do, and that's when a tub full of sand comes in handy.

Sand casting isn't a new idea, in fact it's been around for thousands of years, and is normally used for casting things from various metals.

The oldest known casting in existence, is a cast of a frog in Copper, found in  Mesopotamia from around 3200bc

The Victorians used sand to cast iron, well I say sand it wasn't quite the same as normal beach sand, it had some other stuff in it as well, but the principle is the same, you use the sand to hold the shape of what ever it is you want to make a cast of.


Like this -


It's about a 'foot' long ...

The tub is just a normal storage tub, but you could do this in a sand pit, or make a wooden box, the sand is the kind you use in a kids sand pit, the main reason I used this type of sand over say building sand is the grains, the play sand is quite fine, where as some building sands are coarser, and the finer the grains the less detail will be lost in the casting process.

The plaster is just bog standard Plaster of Paris, which you can buy from model shops, Ebay, Amazon and numerous other places, you don't need to add anything to it (apart from water obviously) and you can also use this method to cast animal foot prints when you're out and about, just take a bag of plaster and a bottle of water, it will take about 20 - 30 minutes to set, so you may have to wait a bit, or just walk about looking at other stuff for a bit.


The plaster - 


Not much left, I'll have to get some more.

 This stuff came from a mosaic tile making kit, you can also add paint to the plaster while you mix it for more interesting colours, or you can leave it white.


Mixing - 


Don't tell my wife I used a spoon to mix it.

You want to keep it to be pourable, but not too runny or too thick other wise it won't work very well, something like batter/pancake mix consistency should be okay, please bear in mind that plaster dust is very fine, so don't go breathing it in, wearing a mask is a good idea.


Ready to go - 

Let pouring commence.

 Into the mould it goes - 


Will it work ?

The trick to this is having the sand damp enough so that when you press your shape into it, it holds the shape and stays there while you pour in the plaster, you do lose some definition, but not much and I've found that simple things come out quite well, like feet for example, you can also use a bowl to make a hole in the sand and then pour the plaster in the hole, and just as it starts to set you could push your shape into it then, you can also do this to make baby hand prints, and it's cheaper than buying one of those kits online.


It's set ! - 

Vaguely foot shaped.

Once your cast has set you'll need to brush the sand off it, and remember that even though it only takes 20 - 30 minutes to set it will be 24 hours before it's fully hardened, so be careful with it, you won't get all the sand of it, but having that sandy texture is quite nice, and if you wanted to make something look like stone this would help.

You can speed up the drying a bit by using a hair dryer or warm oven, be careful not to burn yourself, I would go easy with the heat though, you don't want it to crack.


Here are the sand removal tools - 


Please use an old toothbrush.

Brush the sand gently from the cast using the paint brush, the toothbrush is for later on to get any stubborn bits of sand out.


Most of the sand cleared now - 


Yep it's a foot.

I've found it's best to leave it for an hour or so before going at it with the toothbrush, but once you've got the sand off it it you should be left with a slightly textured plaster cast of what ever you chose to cast.


The foot all done - 


Definitely my daughters foot, only cleaner.

Of course there are loads of things you can mould, here are a few others we've done, hands are a good one, we also used an Ammonite as a mould, a skull (plastic one, but a real skull should work) and I have plans to make some Christmas decorations as well, which should be fun, basically anything you can push into the sand, but somethings will turn out better than others.


Some of our casts - 


I think they turned out quite well.

The Ammonite actually looks quite fossil like, as it has some sand stuck to it, makes it look more like rock, my wife is planning on using it to decorate a box she's making for our sons fossil collection.


I had to try a skull, this will come in handy for next Halloween - 


Creepy.

And if you do go out and try to make some plaster casts of animal foot prints I'd recommend making a frame to hold the plaster, this can be done with thick card, or plastic, kind of like the frames they use in criminal investigations, which is what is good about this kind of thing, not only is it fun, but it's informative you can show how footprints are taken from crime scenes, and you could also go into how this type of technique was (and still is) used in engineering, even for things like bridge building (all be it a slightly more complicated version)


Here's the moulding frame (this one is cardboard) - 


Simple to make and use.

It's just four bits of card with cuts about half way down on each end - 


Four sides all done.

Then you just slot them together and away you go, you can always make one out of plastic, or even easier would be to cut one of those 4 pint plastic milk bottle in half and then cut the bottom of it, although this will limit the size of the things you can cast.


The Ammonite again - 


Probably the one that came out the best.

 Thanks for reading.