Thursday, 23 December 2010

Mini sack for wine bottles ... ...

I have finally completed a present for a family member, you'd think it would have been quick to sort out a bottle of wine, but not in this house.
Apart from spending the best part of 6 months actually brewing the wine (which is blackberry) I have made a metal label to hang round it (yes I wrote a post about it) I also spent some time designing a paper labels for the front and back of the bottle, and lastly I have made a mini sack for it.

I used an off cut of red velvet left over from the christmas stockings my wife has made for our kids (here's the blog post she wrote about them ---> velvet christmas sacks (opens in new window)

Here's the finished article -

A mini santa sack :-)
It was easy to make, even for me with my limited sewing machine skills, I had a rectangle of fabric, which I made into a little bag by sewing up the sides, I also made a tube ? (not up on sewing terminology) for the ribbon to run through.
And that's about it, took me a while to do, but I was taking it easy so as not to mess it up, I did add some little star shaped sequins for a little decoration (sewed them on by hand)

It's a nice thing (I would say that, I made it) but it will serve as a reminder, like the metal label and it can be reused for something else, maybe a small stocking for next year ? or some other use, either way it will be around for a while, long after the wine has been drunk and the bottle recycled.

Yes but it's a lot of effort for a bottle of wine, why not just shove it in a box ? well yes I could have, but making a little extra effort will make it more special, it is after all a bottle of wine to be drunk, but that doesn't mean it doesn't deserve a little effort.

Thanks for reading, and I hope you have a great christmas, and all the best for 2011.


Tuesday, 21 December 2010

Spinning star tree decoration ... ... (rough draft)

I just thought I'd write a quick post to carry on from the one I did about the spinning tree decoration.
This is more or less the same thing, only it's a star and instead of slicing it up I've cut out smaller star shapes, which spin within each other.

Here's a picture (it's a prototype)

Cardboard wasn't the best material to spray with paint.
Okay so it's not neat and tidy, but it'll do as a model to see if the idea works well, and also to work out the best way to make it. In this case something harder than cardboard will be better, especially if you intend to spray it silver or gold for example.
The problem was that the cardboard soaked up the paint and became very floppy, it's okay now it's dried but for a moment I thought it might fall apart.

Next time I'll use wood (maybe thin plywood) ;-)

It's easy to make, basically you find a shape, I used a star seeing as it's nearly christmas, but a circle or other shape would work just as well. You can see that it's a star within a star within a star, they all turn independently. 
You cut out the shape from your chosen material, then you draw a smaller shape inside it, and then another until you get to the middle, I left a fairly large shape in the middle, if I'd have used wood I could have gone smaller.

Now you want to remove some of the sections you've drawn so that there's a gap between each shape, like the picture below (which you can copy if you want to use a star, just print it out and use it as a template) I've marked parts in red, these are the parts you want to remove, you should be left with 3 sections.

Star template - 

You may want to make it smaller, or larger. Note the red sections.
You should get the idea from the template, once you've removed the red sections you can then assemble the decoration, I used a needle and thread to join the pieces, with beads separating each part so that they can spin without catching each other.
If you use wood you will need to use a drill bit to make the holes for the thread or wire if you prefer and what you should end up with is something like the first pictures (only some what neater) I will update this post with pictures of a wooden one if I get round to making it before christmas day ;-) if not have fun making your own ones, you can get the kids to decorate them with glitter and what ever else you feel like, have fun.

Thanks for reading.


Monday, 20 December 2010

Spinning christmas tree ornament ... ...

Just a short post on another of our christmas creations, at this rate we will have more or less refitted the tree in handmade decorations.

Here it is.
My wife had mentioned making tree decorations like the one above out of some foam sheet we have, but after looking at the thickness of the foam we decided it wouldn't work very well.
So this afternoon I set about making one out of wood.

They are simple enough to make, you need a few tools though, mainly a saw of some kind (a small hacksaw, or coping saw will do) and a thin drill bit and drill (a 2mm drill bit) all you have to do is mark out your shape on some wood (I used a scrap piece of 10mm tongue and grove) I've chosen a tree shape, but you could do a snowman, or a circular decoration, you could also use a star shape and instead of slicing it like I have you could cut a series of stars out of the main one, so that they all spin inside each other (I'll most likely write a post about it at some point)

Once you have marked your shape out you need to divide it into equal sections, I made my sections about 10mm (1cm) thick, then mark the centre of your shape, this makes it easier to align the holes you will drill through each section.

A closer up picture - 

It's not really wonky, it's the camera angle ;-)
Use the saw to slice up your shape, try and keep the pieces in the order your saw them (although with a simple shape it's easy to figure out where the bits go) then take each piece and drill a hole in the middle (use the centre line you made as a guide) do this for all the parts, if you use wood you may want to give each part a sand after you've cut and drilled them for a smoother look.

Then the fun bit, you can use thin gauge wire,string,wool or cotton thread for this part, you'll need some small beads or something to put between each section as well.
I used a larger bead at the bottom of the tree, but one the same size as the others would do, you could also use a small bell for extra jingle. Thread your chosen material through each part, you can use the first bead/bell to tie the string or wire to, so it doesn't all slide off.
After each section add a bead, then another section, then a bead and so on, until you get to the top, at this point you can either use the last section, or use a large bead, or bell or maybe if you have some star shaped beads you could use them, that's the beauty of crafts, you can do what ever you feel like, it's about imagination. Then just leave a loop to hang it on the tree with.

Here it is again, in case you missed it at the start of the post ;-)


It doesn't take long to do, and you can get the kids involved, although you may want to do the sawing or cutting, then you can decorate them however you want, I've used some silver spray and a little glitter spray, you can use glue and glitter or anything else you have.

You don't need to use wood either, some thick cardboard would work just as well, and if you don't have a saw this may be a better option, it should work in the same way.
And there you have it, a spinning christmas tree decoration.

Thanks for reading.


Thursday, 16 December 2010

The kindness of strangers ... ...

This is another freecycle tale, of sorts (should probably find something else to write about) people who know me well will tell you I'm some what cynical about things (lots of things) one of which is human nature, I've been through a lot in my 35 years, perhaps more than a person ever should and if I'm brutally honest I don't have much faith in people, I'm not talking individual people (although I could probably name a few) just the human race in general, there's a lot wrong with the way we run our world.

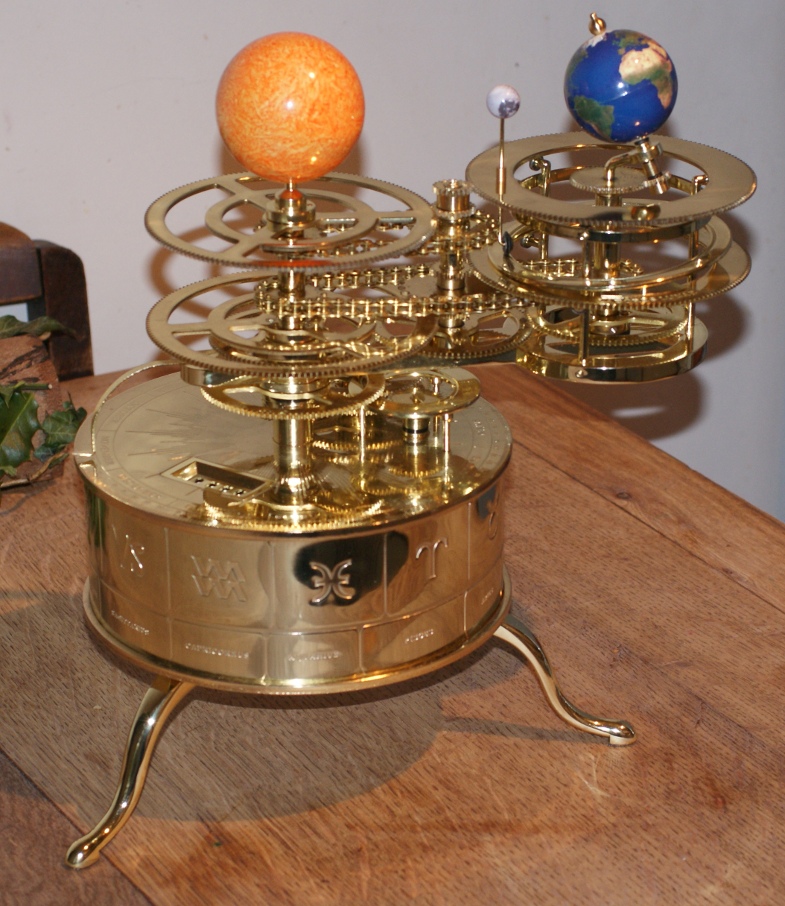
But every now and then even a cynic like me gets a surprise, in this instance it's because of freecycling, a few months ago I wrote a post about freecycling, and it's benefits for all who use the network (here's the post - opens in new window) in the post I mentioned a telescope we asked about (and where lucky enough to receive) we didn't know at the time what the telescope was like, it didn't matter as it's used for home educating our son, and ourselves in all things celestial. It seems that the kind lady who let us have the telescope kept my wife's e-mail address, and the other day she e-mailed asking if we would be interested in an orrery, we said yes figuring that having one would help even more with educating our son, he would be able to see how the planets relate to each other and such like, and then came the surprise.

This is why we were surprised, and feel very grateful and lucky -

How awesome is this ! ?
It turns out it was one of those kits you can get with a magazine subscription, the ones that have a different part every week, it didn't come completed, the parts where in their respective packages, this was also good because now not only did we get a fantastic thing, we had to build it, so we got a lesson in mechanics as well as continued lessons in how the earth,moon and sun interact, it is great educational tool.

More pictures - 

It's very detailed.
You can see it shows the orbit of the earth around the  moon and the orbit of both around the sun, it's made of brass, and I had a blast putting the thing together. You can use it to predict eclipses, both lunar and solar, it's marked with the months of the year, and zodiac signs as well.

Months.
Zodiac signs.
Even the little chains that drive the respective gears are made from brass -

Brass chains.
Some other parts - 

It has some of the smallest bearings I've seen.
Year counter.


It also has a counter for years (as you can see in the picture above) so you can set it for the current year and set it of working, and you can then see when eclipses will occur and such like, it also came with every issue of the magazine, so we are learning a whole host of other astronomical facts, as well as how to use the tellurion or earth moon sun orbiter, it's an educational tool that we probably wouldn't have had access to, had it not been for the kindness of one person and freecycle, so if you happen to read this, many thanks from the whole family.

Thanks for reading.


Tuesday, 14 December 2010

Wine bottle labels ... ...

This is an extension of my recent experiments in using the metal from drinks cans to make things, things like the wall hangings below.

Results of a recent experiment with metal from a drinks can -

An interesting use for an old can, if I do say so myself.
The first bottle label (it's not the finished item, more of a prototype)

I made the chain as well.


I started to think about other things you could make using a similar method. So as it's coming up to christmas we decided to give away a bottle of our homemade blackberry wine as a gift, now I do intend to make an amusing paper label for the bottle, but as I was playing around with bits of metal I decided to make a label for the bottle, similar to the old decanter labels that are now collectables (google decanter labels and you'll see what I mean) they are basically a fancy metal label that sits round the neck of the decanter, or in this case bottle, connected to a small chain, with writing on it, usually stating what's in the bottle, they are sometimes made of silver for example, they are nice little things.

This I thought was a good way of making a wine bottle a little more interesting as a gift, so I set about messing around in the back room, which has recently become an extension to my workshop (alright it's a shed) 
Basically I used the same method as I used for the wall hangings, I used wire wool to get the printing off the can and then made a simple design on the pc and printed it out to use as a template, and then I drew round the template using a ball point pen, and this is what I ended up with.

The first draft - 

It's not perfect, but the idea worked.
Over all I was happy enough with the result, the chain I made myself by bending bits of wire round a small drill bit I clamped into a vice, not as hard as you might think, although it does depend on the gauge of wire you use.

At this point I was starting to feel quite pleased with myself, until my lovely wife pointed out that as it's a gift I should use the pewter sheet we have (I had forgotten about it) and as ever she is right, it does look better, I still used the chain I made (I may do a quick how to for that)

Here's the finished pewter bottle label - 

It does look better.
This label was made the same way as the other one, but this one I changed the wording a little ;-) (thanks again to my wife for the choice of words) I have since used a small file to remove any sharp edges and tidy it up a little. The good thing about pewter sheet is that it's quit soft, you can cut it with scissors (same goes for the drinks cans) I think it's a great idea to make a plain bottle look a little nicer, and the label can be kept for other bottles, so hopefully it will serve as a reminder of the gift once it's gone.

Here's another picture - 

Ta da !
As you can see I've given the label a raised effect by placing the template on the metal the wrong way round, so that when you look at the front of it you get a raised look, you can just place the label on the right way round and when you're finished it will have an engraved look about it.

So why not have a go and make your wine bottles or decanters a label, or do as I have and include one with any bottled type gifts, you don't have to stick to wine or spirits either, you could add a similar label to a perfume bottle or even a jar of jam and if you don't feel like making a chain you can get lengths of chain from most diy type places (b&q have some nice ones) or if you want to get really posh you could get a real silver necklace and use that, it's up to you.

Thanks for reading.


Monday, 13 December 2010

A star is born ... ...

Instead of buying a load of new christmas decorations this year we have been making our own, we have made them out of paper,pine cones,card and for the stars below wire and string, much more fun than fighting through shops looking for decorations that probably won't last half as long, it's good for the kids to do some christmas crafts as well.

Here's the stars -

They may not be to every one's taste.
The colour of the silver spray didn't really come out in the picture, they are easy enough to make, all you need is some wire (I used gardening wire) and some string, any string will do, or wool. You can also make them from string instead of wire, but it's a little harder to keep it altogether, you can spray them what ever colour you like, we used silver and some glitter spray, you can use gold as well.

Making them doesn't take long, although if you spray them you will need to wait a short while for the paint to dry. If you use wire you will need a jig (no fiddles involved) to make the basic star shape, unless of course you feel like making them free hand.

To make the jig you'll need some nails, a piece of wood, a hammer and a template, which you can either print out from your pc or draw on a bit of paper, then all you do is place the paper onto the wood and hammer nails into it at all the angles of your shape.

The jig with nails already hammered in - 

It should look something like this.
It makes it a lot easier to bend the wire into shape using a jig. Next take a piece of string and wind it round all the nails to make a star, basically you use the string to measure how much wire you will need, you want to leave a little extra wire so you can twist it together.

Using the string to measure - 

Measuring done.
Time to get some wire, you can see that I've used slightly more string than is needed, this will make it easier to fix the wire together. Next get your wire and use the string to measure out a length of it, then cut it (I should have mentioned that you may need wire cutters, or pliers) then all you need to do is wind the wire around the nails in the same way you did the string, thinner wire will bend easier, I got ours from the garden section at b&q.

Once that's done twist the wire together where the two ends join, again pliers will do the job, depending on how thick the wire is, then all that's left is to wind your string of choice around the wire frame, when you are happy with it, either tie the string to the frame and cut off any extra, or you can use a spot of glue to fix it. 

You don't have to spray them, you could use paints from a pot, get the kids to do it or you could just cover them in glue and glitter or anything else that you feel like really, it's up to you.

A close up - 

Still didn't manage to get the glitter to show, it's there I promise.
And that's it, they may not be flashy shiny plastic type shop bought ones, but to be honest I think they look better, and they'll last for a while, and even if you don't want to hang them on your tree if you got the kids to decorate them they will have had a great time, and that's what it's all about, and you don't have to make stars, why not try different shapes ? like snowmen or christmas trees ?

Thanks for reading.


Homemade quilling tool ... ...

What is quilling ? well you can read a little about it here and here (links open in new window)
Basically it's curling paper to make nice things, you should get the idea from the links above, but for a great example of quilling have a look here ( a shameless plug for my lovely wife's blog)

Quilling tool -

Does what it says on the tin.

Now you don't need a tool to do it, you can use a large needle (large enough to get the paper through the eye) my wife used some card, which makes the finished item stronger, but  tool will make it easier.

You can buy a tool, but they can be a few quid, you can also buy starter kits that contain paper and the tool as well, but for the sake of 5 minutes work it was easier and cheaper to make a tool, Warning ! you will need a sacrificial needle ;-)

To make the tool you will need a needle, some pliers (with a wire cutting section) or some wire cutters, and a stick that feels comfortable to hold, you could instead of a stick use a pencil perhaps.

Here's how to make the tool.

Once you have your stick sorted out, you can decorate it, or carve it or just leave it plain like the one above, you need to fix the needle to the stick, the easiest way I've found is to put the stick in a vice, if you don't have a vice you can manage without, then lightly hammer the needle into the end of the stick (pointed end first of course) it's best to do this before you cut the end off the needle.

Don't hit the needle too hard, you don't want to break it, once it's secure you can then cut the end off the needle.

You can use pliers or wire cutters -

Pliers are good, as long as they have the wire cutting part.
Then carefully snip the end of the needle, try to cut it as close to the top as you can, and it's best to keep your hand over it when you cut as the end will fly off, watch your eyes as well ;-)

Snip carefully - 

Watch your eyes ;-)
And that's pretty much it, when you have cut the end off the needle you should have something that looks like the first picture, below is a close up of the end of the needle after I cut it.

Nearly done - 

Not quite level, but it will work just the same.
All that needs to be done is to smooth the prongs, you can use some fine sand paper, a nail file, or emery cloth, but be careful because you can break the prongs if you are too rough with them, and that's it your very own quilling tool made in just a few minutes and for next to nothing, unless you had to buy some needles ;-)

Here's a nice example of a handmade quilling tool ---> handmade quilling tool

Thanks for reading.