Showing posts with label freecycling. Show all posts

Monday, 6 August 2012

Free-cycled storage boxes ... ...

There's a lot to be said for free-cycling, and indeed buying from charity shops, especially at the moment, seems the whole planet is skint, so we were pleased to be offered a load of wooden storage boxes.

Now it has to be said they weren't perfect,but they are a good size, they had been drawn on with felt tip pens, and other assorted pen types, but apart from that they were in good order, so how to get a load of pen marks of wood.


Here's one of the boxes before I attacked it -


Lots of pen to deal with.

Apart from the pen and the colour of the panels all 6 (yes there are six of them) were in good shape, just in need of some sprucing up.


From another angle - 

We've changed the coloured panels as well.

There was some pen on the sides of the boxes as well, but after a sand with a belt sander, the lids (which had the bulk of the pen on) looked as good as new.


After a good sanding - 

Lid looks as good as new now.

The next thing to do after sanding the lids was to take the boxes apart, well it was more a case of round all the parts up, as there are six I had to take them apart to get them into to my bike trailer, and it would appear I should have been a little more careful when riding home as I lost two bits, but luckily after retracing my steps I found both missing bits, and after sanding those parts as well it was on to varnishing and painting.


Some of the parts already sanded and varnished, just drying in the sun - 


I just used a clear varnish for the wooden parts.

Now onto the panels, the kids weren't keen on the red and yellow, so we painted each panel a colour that matched their rooms, we used emulsion on each side and then gave each panel a coat of pva on each side as well, this will make the panels washable, which is good as mucky hand prints can get everywhere.


Painting in progress - 


A small gloss roller works well for this type of job, and gives a nice finish.

I had to give each panel two coats of paint on each side to cover up the original colours, I very nearly got sick of painting, and after the paint was dried I just applied a thin coat f pva glue with a brush, you can buy a 5 litre tub of pva from B&Q for about ten quid, and you can use it for loads of other stuff as well, kids crafts, gluing wood together and just about anything else you can think of in terms of uses for glue.

And that as they say is that, for the price of, well nothing as we had the paint and the glue, just cost a bike ride or two, we now have 6 pretty sturdy storage boxes for the kids to put some of their endless supply of toys in.


The finished boxes - 

Three pink for my daughter.

And the other three for my sons room - 


Just need to decorate his room to match the boxes now.


I'm not sure how much these boxes would have cost brand new, but I'm betting it wouldn't have been as cheap as we got them for.


So if you get felt tip on wood you may not have to throw it away, try giving it a sand first, I wouldn't recommend trying to clean it off with anything that might make the wood wet as the pen will just soak in more, and if it won't sand out try painting it, saves having to throw it out and it'll save money.


Thanks for reading.


Me and My Shadow

Thursday, 3 March 2011

A new use for our dehydrator ... ...

This is just a quick post about yogurt of all things.

We had been thinking about making our own yogurt and had been thinking about getting a yogurt maker of some sort, and as is the case more often than not some one on our local free-cycle group offered one, which we were lucky enough to get.

Here it is -

Nothing special, just a standard yogurt maker.
 As you can see it's an old one, the date on the back is 1990, but it works, which is the main thing and of course being free-cycled it didn't cost anything, it came with everything needed, and although the person who gave it to us couldn't find the booklet that was originally with, she took the time to write down the basic yogurt recipe, bonus.

We tested it out the day after we got it, and sure enough we made some yogurt, which got eaten pretty quickly, the kids loved it, although we did add some stuff to it, like a little vanilla, it's quite nice plain as well.

Then I got to thinking about the device itself, which is basically an incubator, that's what it does, it allows you to incubate the cultures that make yogurt, so despite the fancy " yogurt maker " label it's basically a regulated heat source, which we already had, only we didn't think about it until we got the yogurt maker.

So the other day I decided to experiment with our regulated heat source, or if your prefer the dehydrator I modified from an old glass drying cabinet (which you can read about here - opens in new window ) and using the little glass pots that came with the yogurt maker I set about making some yogurt in the dehydrator, which may sound odd, but on it's lowest setting it's just about the right temperature (around 45°C)  to make yogurt, I'll admit I did have to leave one of the doors open a fraction just to stop too much heat building up.

The little glass pots that came with the yogurt maker -

Just about the right size for one person.
 It took a little less time to make the yogurt in the dehydrator than it did the yogurt maker, so in theory cost a little less in electricity, and as the dehydrator is a lot bigger than the yogurt maker we can make loads more at a time, providing we have the containers to make it in. So that's the plan for making yogurt, we will still use the yogurt maker, until it stops working, but either way we have learned how to make yogurt.

I would post pictures of the yogurt we've made so far, but er we kind of ate it :-) we mixed various things into it, blackberries,strawberries and vanilla, we have plans to make frozen yogurt type things as well, and on top of all that it's an interesting lesson for our kids, this is how you make yogurt and this is how it works type of thing, we've also tried making cheese this week as well, which has been interesting, I'm planning on making more, so I'll post the results no doubt.

And if you've wanted to make yogurt, but didn't want to buy a yogurt maker you may already have the means to make it, if you have a dehydrator and you can also make it in a flask, why not have a go ? if you do a search for making yogurt in your search engine of choice you'll get loads of results.

Thanks for reading.

Thursday, 16 December 2010

The kindness of strangers ... ...

This is another freecycle tale, of sorts (should probably find something else to write about) people who know me well will tell you I'm some what cynical about things (lots of things) one of which is human nature, I've been through a lot in my 35 years, perhaps more than a person ever should and if I'm brutally honest I don't have much faith in people, I'm not talking individual people (although I could probably name a few) just the human race in general, there's a lot wrong with the way we run our world.

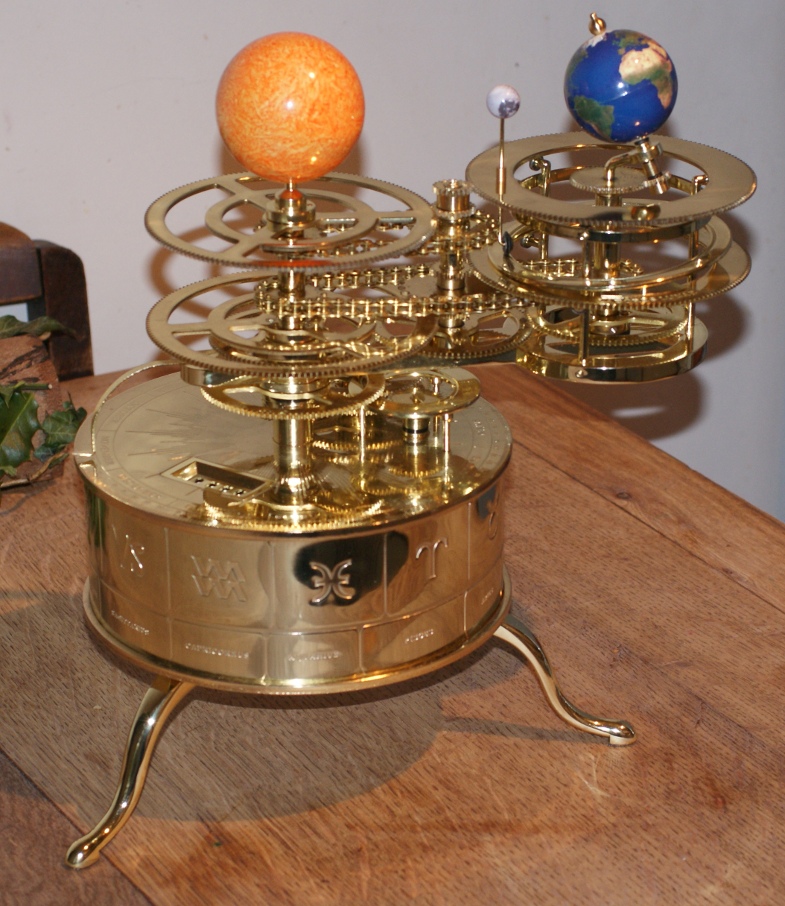
But every now and then even a cynic like me gets a surprise, in this instance it's because of freecycling, a few months ago I wrote a post about freecycling, and it's benefits for all who use the network (here's the post - opens in new window) in the post I mentioned a telescope we asked about (and where lucky enough to receive) we didn't know at the time what the telescope was like, it didn't matter as it's used for home educating our son, and ourselves in all things celestial. It seems that the kind lady who let us have the telescope kept my wife's e-mail address, and the other day she e-mailed asking if we would be interested in an orrery, we said yes figuring that having one would help even more with educating our son, he would be able to see how the planets relate to each other and such like, and then came the surprise.

This is why we were surprised, and feel very grateful and lucky -

How awesome is this ! ?
It turns out it was one of those kits you can get with a magazine subscription, the ones that have a different part every week, it didn't come completed, the parts where in their respective packages, this was also good because now not only did we get a fantastic thing, we had to build it, so we got a lesson in mechanics as well as continued lessons in how the earth,moon and sun interact, it is great educational tool.

More pictures - 

It's very detailed.
You can see it shows the orbit of the earth around the  moon and the orbit of both around the sun, it's made of brass, and I had a blast putting the thing together. You can use it to predict eclipses, both lunar and solar, it's marked with the months of the year, and zodiac signs as well.

Months.
Zodiac signs.
Even the little chains that drive the respective gears are made from brass -

Brass chains.
Some other parts - 

It has some of the smallest bearings I've seen.
Year counter.


It also has a counter for years (as you can see in the picture above) so you can set it for the current year and set it of working, and you can then see when eclipses will occur and such like, it also came with every issue of the magazine, so we are learning a whole host of other astronomical facts, as well as how to use the tellurion or earth moon sun orbiter, it's an educational tool that we probably wouldn't have had access to, had it not been for the kindness of one person and freecycle, so if you happen to read this, many thanks from the whole family.

Thanks for reading.


Friday, 24 September 2010

Woo hoo wine, and an ode to free-cycling ... ...

As part of our ongoing effort in being more self sufficient we have ventured into wine making, and so far we have made 2 batches of wine, with things we foraged for, we have one lot of blackberry wine and one lot of wild plum wine.
Last night I filtered the plum wine to get rid of the sediment using a filter we got as part of a load of wine making equipment from a very nice chap on free-cycle, in fact we got pretty much everything you need, apart from the ingredients (yeasts,fruit and stuff) we had bought a couple of demi johns from our local charity shop, but that's about it, we were looking in to what to do with the piles of fruit we had form our trips, and that's when the free-cycle e-mail came through offering all the wine making equipment.

The filter (even came with filter papers) -

Filtering the wine.
We did have to buy some sterilizer and some nutrients and we got some campden tablets in case we need them for future wines, which we will be making if the ones we have turn out okay, and so far they seem pretty good.

Here's a picture of the wine after I'd filtered it, it's in 2 demi johns because there's just a little too much to get it all in one, it doesn't seem to be affecting it.

The wine (this ones wild plum) -

I took the picture at night, under the kitchen lights, which doesn't do justice to the colour.
It tastes great, and luckily in amongst the wine making stuff was a hydrometer as well, so we can work out what percentage it is and other things, pretty handy really.
As it turns out there was an interesting looking air lock in with some of the equipment, on closer inspection it turns out it was a glass one, it's cool and makes a really nice sound as the gas goes through it.

Here it is - 
Glass airlock.
Here's a picture of the blackberry wine, which should be ready for bottling up soon.

Blackberry wine - 

This was taken before the plum wine (in the tub) was put into demi johns.
I can't really describe the colour of the wines, the plum wine is like a redish colour, and the blackberry wine is really dark red, almost purple, I will have to add a couple more pictures of the wines in glasses so you can see the colour, it has been a good experience and from what I've learned so far it isn't that difficult to make your own wine, there are plenty of good articles on the web about wine making,recipes and the like, google is your friend.

And now for free cycle, see with out getting the wine making stuff from free cycle we would have had to find other uses for our foraged goods as we probably wouldn't have been able to afford buying what we got in one big buy, so that's why I think free cycle is great, we have been lucky with the things we've found, for example the glass drying cabinet I turned into a dehydrator was from free cycle.

There are some other things we got, and perhaps the most unexpected was this - 

yes we really did get it for free.
As you can see it's a Newtonian telescope, and it has all the bits you need to start star gazing (we put it together to see if it was all there) I have since used it to look at the moon, it shows a very clear image, and I'm now working on a camera mount for it, so we can use dslr to take pictures.

The main reason we asked about the telescope when it came up on free-cycle was for our son, he has started to express an interest in planets and the moon and such like, so we figured if we were lucky enough to be offered the telescope it would be a bonus, we had no idea what sort of telescope it was as the lady who offered it didn't say, so I was quite surprised when she showed it to me, and I had to ask if she was sure she wanted to give it away, and to my surprise again she said she had been trying to give it to schools in the area, but can you believe none would take it ? I can't think why.
She also gave use some other things, like knitting needles and other knitting/sewing equipment and an un-opened chemistry kit, which again she had tried to give away to schools, but none would take it, so we will be using both the telescope and chemistry set for my sons education, and just for fun really.

I would like to say though that we only e-mail about things we can make use of, I actually managed to get enough parts to build a file server as well, but as I said unless we need it we don't ask, which seems fair to me ? I have heard stories of people who use free cycling to make money (one chap managed to make £700 from doing it) I think this is not in the spirit of it though, but I guess it's not illegal ? it just seems a little mean to take things under the pretence your going to use them and then sell them on, I can see why people do it, but I don't think they should.
Anyway enough of that, here's a link (opens in new window) to free cycles site - freecycle you should be able to find a group near to you, so why not join ? you might find something useful or you can use it to free cycle some of your un-wanted items.

Thanks for reading.


Tuesday, 14 September 2010

A productive few weeks ... ...

I've been meaning to update this blog for a while, finally got round to it, so I thought I'd ramble on about how we have been getting on with things.
You may have read about our exploits foraging for things, and the comments we've had from people, we haven't received any more thankfully, and I still feel quite sad about it, mainly because the children of these people will miss out on a wealth of knowledge and experience, but not only that there's the heritage, will they ever learn that foraging for food in this country has been going on for many many years ? for example when Julius Caesar landed in Britain he and his troops had to forage for food, so if they hadn't known what to look for they might have not survived, but enough about that.

As the title suggests it's been a productive few weeks, and to be honest this has been our most productive year in terms of actually putting the things we wanted to into practice, of course we have had to get set up for various things, but we have been lucky and found a lot of the things we needed on free cycle, or for a low price, we like being thrifty, makes things more fun.

So where to start ? well for the second year we have had a bumper crop of black currants, this resulted in making a couple of batches of fantastic ice cream.

We do have white and red currants, but haven't had anything from them this year, hopefully next year we will have 3 different types of currant, all home grown.

Our blackcurrants.

We have grown our own veg for a couple of years, since we've had a larger garden really, but this year we have tried to grow more, extra pea plants for example, although this is more so that we can actually get some peas before the kids eat them all :-) and next year we are planning to grow even more.
Our kids enjoy being able to go into the garden and pick raspberries, or pull up a carrot or 2 (my son takes great delight in this) it's not all about the food though, kids can learn a great deal from growing your own veg, you don't even need a big garden, you can grow things in plastic tubs if you don't have much space, what's stopping you ?

My lovely wife has been busy too, she has made some great courgette relish, there was 2 medium jars of it, but it seems I may have eaten rather a lot, well it's very tasty, if you're interested in the recipe you can find it here - courgette relish (link opens in a new window)

The relish before I started to chow down on it.

This is something else we have started to experiment with, it's all well and good growing your own food, but what do you do with it ? well anything you want really, if you need a recipe for tomato sauce,or some kind of relish, or jam then you can find a wealth of information on line, google is your friend :-)
Jam is something else we have made this year, our first time, my granddad used to make jam all the time, and out of all sorts of odd things, we haven't been that adventurous, but we have a good stock of nice jam for over winter, blackberry jam is great, we also have apple and plum jam (the plums and apples were foraged for, as were the blackberries) we also made crab apple jelly (which is like jam without the bits) it's really good on toast :-)

Making your own jams and other foods is a great experience, and you know what goes into it, you don't need to grow your own stuff either, just go out and check the hedgerows for berries, you can make jams from all sorts of things, blackberries, rowan berries (these need to be cooked before you eat them) and other things, it maybe worth while investing in a good book that shows what plants are what, and how they can be used, this one is a good one to add to your collection, there are other books along this line as well.

Blackberry jam,plum and apple jam and crab apple jelly.

Left to right - Crab apple jelly,plum & apple jam, blackberry jam.

We did have our own plums this year, which was a nice surprise as we have only had the tree for a few months (about 6 months I think) we got it for a pound (yes just a quid) and it's only just over 2 feet tall, it was in a garden centre reject section (where they sell of the half dead plants) and it looked well, half dead, but it soon perked up after we gave it some tlc, this is a good tip by the way, just because a plant looks half dead doesn't always mean it is, so have a good look in the bargain plant section before shelling out a load on a plant that looks healthy (it may not be)

Our plums from our baby plum tree.

Home grown plums, should get more next year.


Our wine making facility.

Blackberry wine, we've since added wild plum wine as well.

You can make other stuff as well, for example one thing we have tried using our foraged produce is fruit leathers, which is basically a sweet hard fruit jelly kind of thing, they are great for kids, and as natural as you can get, they consist of fruit and a little sugar to taste, and that's it, then all you do is turn them into a purée and dry them out for a few hours, you can do this in a oven or a dehydrator.

Fruit leathers.

Left to right - Apple,blackberry.

I have to say that even though we have had derogatory remarks while blackberry picking, and even though I got scratched,stung and covered in mud getting apples it has been great fun, we have experimented and next year we will do things on a larger scale, and try and forage more and make more from what we have. We have found that there is a great deal of satisfaction to be had, knowing that you did everything from start to finish, you found the food, or grew it, you made the jam, or wine, and strangely it makes everything taste even better.

And not only that all through the various things we have done our kids have been by our sides, watching and helping, asking questions about things, looking at how we do things, they have had great fun helping to collect berries, and seen some interesting wildlife, the best being lizards, yes we do get lizards in England, and you might be surprised to know that not a lot of people know that you can find lizards in this country, which is a shame, and shows that kids and adults are loosing touch with nature.

My son was extremely pleased to have seen lizards while we were out on one of our foraging trips, and I even managed to carefully catch a baby one so he could see it close up, seeing the look of wonder on his face was priceless, my daughter was equally excited by it.

Here's the picture of a baby common lizard I caught for my son to look at, we let it go again, where we found it.

Isn't it fantastic !

Well enough of my rambling, but before I go I have to say get out there, look for berries, look for wildlife, teach your kids, and hey you might learn something as well, take books with you for identifying things (you can find reference books in most libraries) and may your travels be as productive as ours.

Thanks for reading.


Saturday, 4 September 2010

Dehydrator adapted from an old glass dryer... ...

Well I finally got round to finishing off one of the many projects I seen to have on the go at any given time.
 It was a stroke of luck really, we had been thinking about ways in which we could store things we grow, herbs mainly, but lately other stuff as well, after looking into it we decided the best way to go was to dry things out, this is all well and good, but we weren't sure how to go about it, we knew we could hang herbs up to dry them out, but we don't really have any where we could leave bunches of herbs and stuff drying for days or weeks.

After much considering we decided on the dehydrating method, which is just a kind of accelerated version of leaving stuff hanging for ages, how ever after looking into the prices of some dehydrators we figured it may be some time before we could afford one, so in my usual fashion I declared "I will make one" which is perfectly reasonable, and not really that difficult.

I set about looking for ways to make a dehydrator, I found many interesting ways in which people had made their own dehydrators, from custom built wooden boxes with custom built heating systems to foil lined cardboard  boxes with 100watt light bulbs in.
Then by a stroke of luck some one advertised on freecycle (do you freecycle ? you should) that they had an old glass drying cabinet that they needed to get rid of, we answered the e-mail and luckily the chap agreed to let us have it. It was an old drying cabinet for a school science lab, and was used to dry the scientific kit after being washed, as it turns out this was perfect for our needs.

Here it is -
Yes it does look a little worn.

Now I know what your thinking, something along the lines of "Hells teeth man you can't put food in that !" well no, but I did plan to make it safe to put food in, and it didn't really take much. The cabinet itself was ideal for this project because it had the heating element already fitted, along with a thermostat, which means we could regulate the heat, and as most thermostats have a built in fail safe we could be pretty sure it was going to get too hot and burn the house down.

The first thing to be done was to give it a good clean, and make a repair, although it's not in this picture the cabinet should have had 2 glass doors, it only came with one, and some kind of plastic make shift door, which wasn't very good, so I had to make a replacement.

Stickers and labels needed to be removed - 

Stickers put on by lab.

It had been safety tested, which was a bonus.

And as is often the case when you remove any kind of sticker or label you get a sticky residue, I have used the same method to remove this residue for years, and basically it involves either white spirit, or lighter fluid (the stuff you put in zippo type lighters)

The sticky stuff - 

This stuff is a pain to remove.
Same goes for this.

Here's what I used to get rid of it - 

Lighter fluid and a scourer.

Top tip, this also works on labels on glass jars as well, after soaking the label off, if there's any sticky stuff left get a little white spirit or lighter fluid on some kitchen roll, or a scourer and give it a little scrub, it should come off easily, then just was off with hot water and washing up liquid.

I made the new door from what I had round the house, which was some thin tongue and groove, so I cut 4 pieces to roughly the size of the glass door, and then glued them together, added to extra strips of wood to add a little more strength to it, and to stop it warping, and lastly I put a small wooden handle on it.

So with the door done I then had to set about cleaning the inside and the wire racks, the inside wasn't that bad, just needed a wipe over, the racks how ever were a little harder to sort out because they were quite rusty, so I got a wire brush and cleaned them all up so I could spray them.

The rusty racks - 

Rusty racks.

I also discovered that there was a wire support missing, so I improvised using the old steel rod from our old pedal bin.

Making a new support for the racks - 

New support in construction.

After that it was really just a case of spraying the whole thing to make it look a little neater, not that it will be on display, we have a space for it out in our back room. As the racks had quite large spaces between each part I bought some baking sheet things from a pound shop, and as it turned out the 4 I bought were enough to cover each rack, although I did have to cut them to size and the left over parts I stitched together to make new ones, other wise I would have needed 6 in all, I got 4.

The baking sheets - 

Baking sheets

Stitching the cut offs to make new sheets -

Stitching the parts of baking sheet together.

And here is the finished article -

The finished article.

There's no handle on the door in this picture because I took it before I remembered where I'd put the little wooden handle I'd reserved for it.
It won't win any design awards, but it's more for function than form, and it works a treat, we have already dried a load of sage and parsley, and we have loads more to do, and the other day we used it to dry out some fruit leathers, it didn't take as long as we thought it would for the leathers or the herbs, it took just an hour on half heat to dry the herbs, I could have turned it up and dried the herbs faster, but I didn't want to disintegrate them.

I'm pretty happy with the results, the wooden door helps insulate the cabinet and it keeps loads of heat in, and even stays pretty warm for a good while after, not bad for a total cost of 10 quid, and surprisingly it doesn't use that much electric, less than a kettle, and a lot less than our oven, so drying stuff in the cabinet is more cost effective.

Here's a picture of our energy meter while the cabinet was running - 

Our energy meter.

Thanks for reading.


Saturday, 31 July 2010

A cheap mono pod for your camera...
Like a lot of people we like taking photo's of stuff, the kids,wildlife,odd insects we find in the garden (we do that a lot) photography can be expensive, depending on what sort of equipment you buy.

For christmas a year or two ago I got my wife a digital slr camera, it came with a lens, and since then we have added to it, new lenses etc. We have been lucky and managed to get some good deals on some of the kit we've bought, filters and such like, we even found a brand new tripod in a charity shop for the princely sum of £1:75p, which wasn't bad considering it would have cost £20 new, bargain.

As I said it can be expensive so finding tripods in a charity shop is handy, I made a bag for the macro lens we got, and what's more we got a free camera bag for all the stuff from our local free cycle group. While I was looking through some photography related articles I saw a monopod which is basically a one legged er.. tripod, handy for using with larger lenses, and for when a tripod would take too much time to set up, a nifty idea I thought, and since seeing that I have noticed that people photographing sports events use them a fair bit, so I decided I'd see if I could make one, I mean how hard could it be ? as it turns out, not that hard at all.

Basically it's an extendible pole that you can fix your camera to, by way of a thread that screws into the bottom of the camera, so with that in mind I started plotting as to how I might construct such a thing, as it happens I found the main components in a pound shop.

I bought a decorators pole, the sort of thing you attach a paint roller to, and a mini tripod, then all I needed was a longer screw to attach one section of the mini tripod to the end of the decorators pole.

Kind of like this -
Extendible decorators pole.

Top section of a mini tripod -

Mini tripod head.

I've seen two types of mini tripos, one has a section like the picture above, and the other doesn't (for want of a better way to put it) one that has and end like the one above is best for this, it is held onto the legs by way of a small screw, undo it and keep the legs, you never know what they might be useful for, the screw that holds the two parts together is too short for attaching it to the pole, so save that as well.

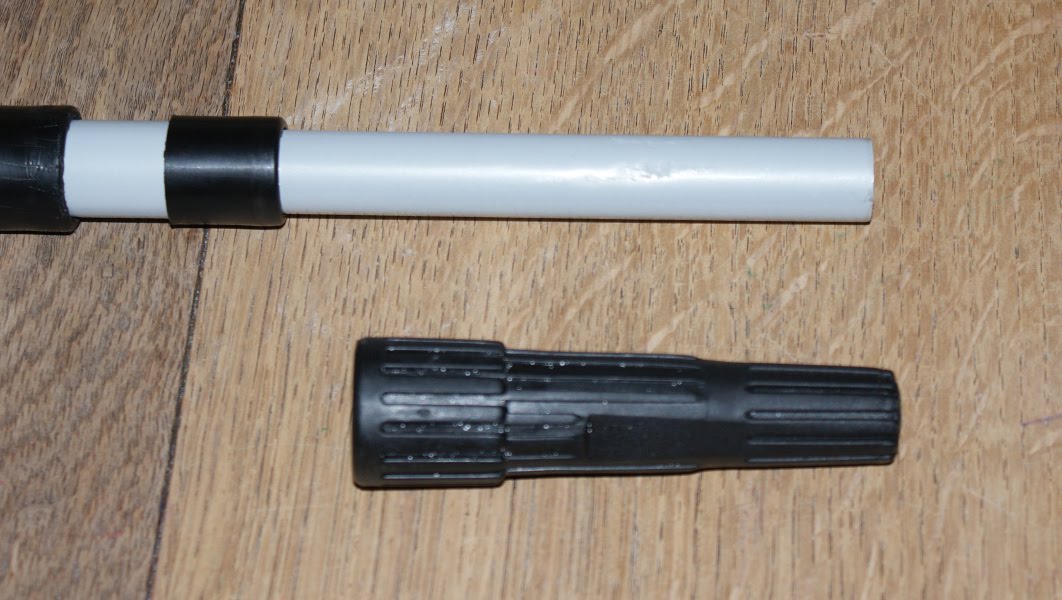
Next you need to remove the end from the pole, this might require a couple of taps with something, but should come off quite easily.

The end of the pole - 

Pole with end removed.

Attaching the camera mount to the pole is easy really, it's just a case of finding a screw that will go through the end of the pole and into the end of the mini tripod.
I found that I had to add a small nut and washer to attach the end to the pole, just to act as a couple of spacers, I also used a spring washer to make sure it kept nice and secure.

The parts -
The bits n bobs.

As it turns out the end of the pole fitted into the section of the mini tripod, but you might have to cut some plastic to get yours to fit.
Here's a picture of the end of the decorators pole, it had a hole in the end, so I had to use a slightly larger washer, otherwise it wouldn't have worked.

The end of the pole - 

Why the parts were needed.
Here's the tripod end attached - 

Nearly done.
Finished article -

All done.

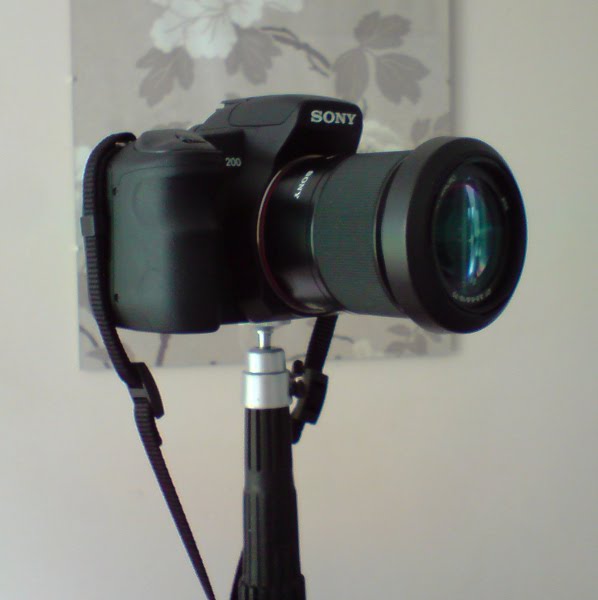
The good thing about this mono pod is that it's light,cheap and using the type of mini tripod I used I can change the orientation of the camera for portrait type shots.

Here's a picture with the camera we use attached, I didn't take a picture of it in portrait mode, but you get the idea, and you can always use a bit of spray paint to change the colour.

With camera -
Ta da !
Thanks for reading.