Monday, 7 April 2014

Handheld ballista ... ...

Last year me and the kids built a couple of siege engines out of wood,we made a Trebuchet and an Onager,ever since then I've been wanting to have a go at making a Ballista,I've had to scale things down a bit,I'd really like to have a go at making a large siege engine at some point,but our garden is a bit small for such a device,so I built a hand held Ballista,like a crossbow ... sort of.


Here it is -


I'm quite pleased with it.

It's made from lengths of tile batten and has a working trigger mechanism,which whilst it works quite well it's proved to be the weak point of the weapon.

To be honest I mainly made this to test out the trigger,it works but there's room for improvement as always.

The basic body of it is made from three lengths of tile batten fixed together which I shaped so that I could fit the trigger gubbins in.

The frame work that holds both torsion bars is also made from tile batten,and again I used copper tube to strengthen the wood a little as I did with the Onager.


Here's the section that holds the trigger mechanism - 


It's all held in place with wooden pegs.

I left the middle piece of batten slightly longer so that the latch (the part that holds the string and bolt) doesn't go all the way down,otherwise it would have been tricky to get the latch back up again,I also made a groove down the entire length of the middle piece of batten,this acts as a guide for the bolt to slide down.

The trigger mechanism consists of three parts,the latch that the string hooks onto,the release lever (the bit you squeeze to fire it) and a block with two springs in it.


Here are the parts - 


Simple,but quite effective.

Basically when it's loaded the latch,which has a groove in the bottom is forced onto the end of the release lever, there's a plate on the bottom that stops the lever being forced too far down and firing the Ballista.

The block with the springs is to make it easier to load,basically to load it you pull the string back and push the latch back at the same time,the springs help keep it from firing accidentally,a kind of safety feature if you will.


Here's a picture of it set up and loaded - 


The two pins in the latch help with loading.

As I said it's held together with pegs,the pegs run all the way through the body of the Ballista,and smaller pegs stop them from coming out,this means that the trigger mechanism can be removed in pieces easily should any part fail.

The two torsion arms are what provide the power to actually fire a bolt,they are basically the same as the version I made for our Onager,all be it it slightly smaller and obviously there's two of them,one on either side with a string between the two.


Like so - 


Another simple system.

Front view - 


Like a double sided Onager.

Here are some more pictures of the torsion arms,as I mentioned earlier I've used copper to give a bit more strength to the wood,I've used steel pins to stop the torsion bundles from unwinding and because of the amount of tension in each bundle the pins stopping the bundles from unwinding won't fall out.


Reinforcements - 


The copper stops the wood from getting crushed.

Another picture - 


Each torsion bundle can take more twists.
The arms are made from two bits of batten glued (and screwed) together,then rounded off on my lathe,in all honesty I could have left them square,then I wrapped them in string to stop them getting damaged,and to make the thing a little quieter when it fires.


And another - 


A simple knot holds the string in place in each arm.

It's not perfect,and should I make another there are things I'll change,for a start the amount of power I can get it to generate,I can add more twists to each torsion bundle quite easily,the problem is the trigger mechanism won't hold it,so I need to refine that.

I've already started roughing out a crossbow type weapon,that will use elastic rather than torsion bundles,and I'm working on different triggers,I'm looking to use something similar to the crossbows found on the terracotta warriors,but I need to find a way to fabricate them as I don't have a forge.

The bolts were made from a short length of dowel that I attached a thin piece of plywood to to act as fletchings (flights) they aren't the best thought out bolts but they work well enough,I added a bit of metal bar to each one to give them a bit more weight which helps them go a bit further.


The bolts - 


Crude,but they do the job.

I did have to add a nock to each bolt, so that I could get them to fit on the string.


End of one of the bolts - 


Okay,very crude,but they do work.

And to prove it works here's a short video,it's not great as I was holding the Ballista with one hand and my phone with the other, luckily it only weighs in at 1kg so it's actually quite easy to hold one handed,there is a slow motion part,which is not that good,mainly because I'm still experimenting with the software that helped me make the slow motion video.


Firing - 


You can find details on the Trebuchet we made - here (opens in new window)
And the Onager we made - here (opens in new window)

Thanks for reading.

Thursday, 3 April 2014

My inner womble strikes again ...

I'm always trying to find new uses for things,like using old windows to make cold frames,or plastic piping to make covers for various plants,I like making things from something else,and not just because it saves money.

This is one of those occasions,our house is on a hill,and at the back of it is a bank that's around 25 feet high from the road below,it runs along the whole street and is covered in a variety of plants and trees,at one end of this bank is a block of flats and it would seem that people often use the patch of waste ground to dump things.

I happened to find myself exploring this waste ground the other day (looking for one of our cats who has gone awol) and I came across what I first thought were planters,turns out they weren't,they're actually some kind of packing crate for either roof tiles or some kind of floor tile or paving stones.


Here they are -


Only 5 in this picture,but I ended up with 6 in all.

Like I said my first thought was that they were planters,it wasn't until I looked at them more closely I found out that they had been dumped and that they were packing crates,so I figured I'd make use of them,and this is kind of how my brain works,I tend to see what a thing could be,not what it was and someone evidently thought these crates were rubbish.

After dragging all 6 of these crates back to my house,which wasn't that easy I figured I'd turn them into what I had originally thought they were,that being planters,they're a good size for planters each one is just over 5 feet long and about a foot wide and about 8inches deep.

To turn them into planters I first got rid of the bits of cardboard and the staples that were dotted around the edges,then I lined each crate with some plastic sheet.


All clean and ready for the liner - 


They got lighter as they dried out,which was good.

Liner fitted,ready for the next stage - 


I used some plastic sheeting I had lying around.

I just stapled the plastic sheeting to the inside of each crate,I could have left them,but the plastic will help retain more moisture,I've found in the past that wooden planters dry out quite quickly in the summer.

Next thing to do was add some canes for supporting whatever plants end up in these,for that I used a 10mm spade bit to make holes down each side of each crate,making sure that the holes on each side were (more or less) opposite each other.


Like so - 


Bit hard to see from this picture,but there are holes there somewhere.

The idea is to push a length of bamboo cane into each hole and then put a piece across as a horizontal support,having the cane fitted into the holes makes things more stable.


The canes are just thin bamboo ones that can be bought for a few pounds from most diy / garden type shops,I used 2.4 metre canes and cut them in half.


Canes ready for cutting - 


Nothing special,just standard bamboo canes.

Here are the canes in place - 


You get the general idea.

Once I'd got the vertical canes in place the next step was to put a longer cane across the top and then tie it all together,to tie the canes I've used a plastic coated wire,it's quite basic,but does the job.


Canes all tied up - 


Simple frame work.

And that's about it really,we now have 6 planters all the same,which will do for growing tomatoes,beans or cucumbers,they can be moved about,although that would take two of us now they have soil in them,we have room to almost double the amount of tomato plants we grew last year,and these look nicer than the black plastic tubs we used,they are solid as well as they all still have the steel banding to reinforce them.

Here's one completed - 


Just needs some plants.

These ones we used round our patio, it gets very warm - 


I think they look nice,kind of rustic.

In all these planters cost about £10 once you consider the canes and the plastic,I would have used sticks to make the frames,but I didn't have any long enough,but even so £10 is quite a saving when you consider that some places are selling planters that aren't as big as this for about £30 a go,so it proves that it's worth looking at things before you bin them,use a little imagination and you may well find a use for something that was destined for the bin,unleash your inner womble.

Thanks for reading.


Wednesday, 2 April 2014

Dolls house charity shop find ...

I've finally got round to finishing off some things I was working on,one of which was renovating a dolls house I found in a charity shop for the grand price of £2, the original plan was to fix it up and sell it, however it got claimed by my daughter and it's now living in her bedroom,You'd think she'd be happy with the one I made her for Christmas a few years ago,but this one is apparently now a beach house for her dolls.

Here's the dolls house before I started on it -


A bit tired, or well loved if you prefer.

As you can see it's had a bit of use,my first thought was to take the thing apart completely,but as it turned out that wasn't possible because I'd have ended up breaking some of the joins,so I just took it apart as far as it would go.


Some damage,easily fixed with a bit of wood glue -


Despite it being quite badly split this was fixed easily.

The paper used for the roof tile effect was torn in places,and there was a fair amount of pen and pencil drawing all over it,along with some stains,so I figured I'd just strip all of the paper off and see what I was left with.


Taken apart waiting for paper to be removed and then sanded - 


Ready for it's make over.

And here it is fully sanded and awaiting a lick of paint - 


Looks better already.

I had hoped that I could leave it as bare wood once it was sanded,but I was unable to get into all the little gaps,even with a detail sander,so I went for a paint job instead.

After pondering the colour scheme for a while I decided on what could be described as a traditional look,but it reminds me of a cottage,white walls,black roof and green doors,personally I think it's turned out well,but then I would.


Here's the finished house - 


A bit plain maybe?


From the sides - 


Has to be better than it was.

It's painted in white gloss (after 2 coats of undercoat and primer) the roof is black emulsion and the doors are painted with a green water based enamel paint,so it can be cleaned easily,and yes it's perhaps a bit on the plain side,but it looks great with some of the furniture I made for my daughters other dolls house,so now I guess I'll have to make a load more for his one.

All in all despite having spent a few ours doing it up I'm happy and so is my daughter,we had the paint already and for £2 it's not to be sniffed at,it proves that trawling through charity shops often yields interesting results.

Thanks for reading.


Wednesday, 26 March 2014

Headband holder ... ...

My daughter is always losing her things,specifically her headbands,she has quite a few of them,and she often gets annoyed that she can't find the right one for that particular day.

I always say to her that she should put them some where in her room,where she'll be able to find them again,but she doesn't always remember,so I made her a place for her headbands to live when they aren't on her head.


Here it is -


Not much to it really.

I did look online at various headband holder type things,they mostly seemed to be made from round things,like cardboard tubes,and I didn't have anything that would do,so I made this,it's basically a bit of wood with a rail on it that she can hook the headbands onto.

I also put a peg on so that she can hang her necklaces and bracelets on,as she often loses those as well (despite having numerous jewellery boxes) It's all made from a piece of match board (thin tongue and groove) apart from the peg,that's just a bit of 9mm dowel.

The flower was cut from a scrap bit of wood,and then I painted it to make it look a little nicer,and it adds a bit of colour to the whole thing,once the paint was dry I stuck it to the holder with a bit of glue.


Flower - 

Vaguely flower like.

The peg was also glued into place,I drilled a hole into the wood at and angle so the peg will point upwards,this helps stop things from sliding off.


Peg - 


Just enough room for a few trinkets.

The part that holds the headbands is made by sticking a couple of small squares of wood to a thin strip,which creates a kind of 'c' shape this is then fixed with of a few small nails and a bit of glue to the holder.

Here's a picture that shows how the rail sits away from the back board to create a gap that the ends of the headbands can fit into.


The rail - 


Simple really.
 

To hang the holder on the door I used four small hooks,two I fixed into the holder at each end,the other two I fixed into the door where the holder now hangs,it's light and doesn't need strong fixings.


And here it is hanging in it's new home - 


It works,and it's out of the way,so it shouldn't get knocked.

The whole thing cost no more than about £2, and now my daughter knows where her headbands are when she needs them.


Thanks for reading.


Thursday, 20 March 2014

Hoover cannon ...

For some time I've wanted to make a hoover cannon, and show the kids on some level at least a little bit about air pressure, a hoover cannon is great for this because they're fun and easy to make.

We actually made three different cannons, from stuff we had lying about the house, two are made from various bits of plastic pipe, and the third we made out of cardboard, which I have to be honest I didn't think was going to work.


Here they are -


Easy enough to make, especially the large white one.

They are all built the same way, a large tube for the projectile and a smaller tube to connect the hoover to, the bit on the end is basically a valve (it needs some tweaking as you'll see from the video) you don't need to make a valve, a bit of paper on the end is enough to achieve the same result.

As you can see the largest cannon is made from plastic pipe, with a fitting, it's all push together, so there's no gluing needed, I had the pipe already, and the fitting cost me about £2.00, the other two cannons are held together with black insulation tape, all I did was to cut a hole in the main tube to allow the air to flow, and that's about it.


Plenty of tape is best - 


The tape helps stop leaks as well as hold it all together.

The valve (burst disc) is a piece of thin plastic taped to a bit of thin plywood, which I cut a hole in and then glued to the end of each cannon, obviously there are three different sized ones, but they all work the same way, that being to seal the hole and then move when the projectile hits them.


The valve (burst disc) - 


The clear plastic is from the front of a box a toy came in.

We made a few different projectiles to fit the various cannons we also tried making them heavier to see if that affected how far they went, you can use various different things, tin foil screwed into a ball, old film cases, the plastic things from kinder eggs, wood, basically anything that will fit down the tube without getting stuck.


Some of our projectiles - 


I wrote on them so we could remember what weights we had.

Here's a simple diagram of how it all works, but there are numerous articles online on how to make these, and how they work, and there is a supersonic version of this that fires a ping pong ball at mach 1.2 (about 912 mph)


Diagram - 


A simple diagram.

Plastic tube is best, but you can use cardboard tubes as long as they are very strong ones, the sort that tin foil or cling film comes on, or the tubes you can get to post posters and the like, toilet rolls probably won't work. 


Here's a video of ours in action, you can see I need to work on the valve / burst disc set up, they weren't meant to fly off the ends of the cannons, and we should have really added some kind of trigger set up to make it easier to load and fire the cannons, we may make  changes to them at a later date.


Cannons in action - 


Thanks for watching.


Tuesday, 4 March 2014

Swing out tool holders ...

Spring is almost here, and in a bid to get more organised, and while I'm decorating and waiting for the weather to warm up a little so I can get some gardening done I decided to try and sort some of my tools into a more orderly fashion.

For some time I've had my small files amongst other things in old cups, which to be honest isn't the best way to keep them, especially when it comes to finding a specific thing, but I found a better solution on Pinterest of all places.


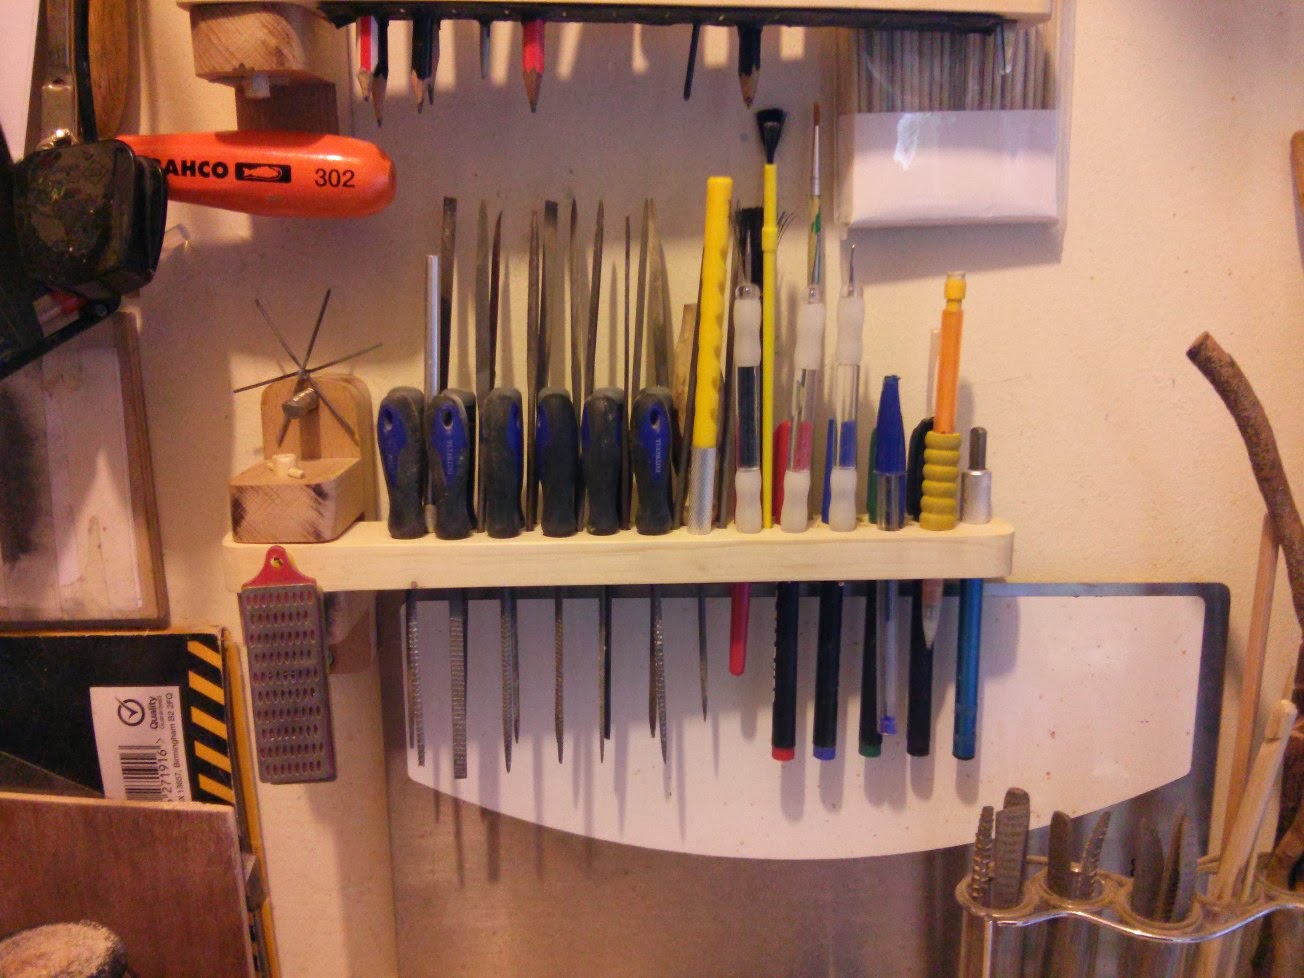
And here is the better solution -


Made from scrap bits of wood.


These are slightly different from the ones I saw on Pinterest, firstly the hinge is all wood, even the pivot, the others used a bolt, after having a quick look I couldn't find any that would do, so I just used a bit of 9mm dowel and put a couple of pegs in either end to stop it all falling apart, it's handy because I've been experimenting with wooden hinges of different designs, and these are kind of a prototype for another project I'm working on.


A close up of the hinge section - 


Pictures a bit fuzzy, but you get the idea.


And another picture - 


A simple hinge, using dowel and a peg.


The other change I made is the holes for my various tools, as an example some of the small files I use from time to time don't have handles, and as such they would fall through some of the larger holes, and the same can be said for pencils and pens and other things, so I came up with a way to hold items of different sizes, using a piece of old inner tube.


All I did was to drill a series of holes all the same size in one of the holders, and on the under side of it I stapled a bit of inner tube, then I just made a series of small holes in the inner tube that correspond to the holes in the wood.


Like so - 


I could have made a neater job of it to be honest.


The idea is that when I stick a pencil or pen (or other item) into the holder the inner tube grips it and stops it from falling through the holder, and because the inner tube is rubber it will stretch to different sizes meaning I can put different sized things into the holder with out having to worry about it falling out.


Kind of like this - 


You can see where the inner tube has stretched around the pencil.

And that's about it, I now have more organised tools, and because the holders are hinged I can just move them around to get at the tools at the back, I'm also thinking of adding a small lamp to one of them so I can get better lighting when I'm doing small jobs, fixing them to the wall is easy enough, a couple of screws does the job.


Here they are all ready in use -


Makes for a more productive work space.


Here's a quick look at a small wooden box I made that has wooden hinges on the lid, making the hinges out of wood allows for some creativity because lets face it sometimes hinges can be a bit boring, not that these are exciting, but as I said I'm still experimenting.


Wooden box with wooden hinges - 


Not much to say really, it's a box.

Thanks for reading.


Wednesday, 5 February 2014

Recovering office chair arms ...

I've recently acquired a new office chair, not that I needed one, basically my daughter was after an office chair for her new place, so she'd been looking on freecycle, and she found one that would do, only they had two on offer, so she had to take both of them.

They were both a bit damaged, she has since recovered hers in a fabric she liked, which she got for £8, and she's got some fabric left over for other things, the only thing wrong with the chair I now have is the arm pads were a bit worn, which as it turns out was an easy fix.

The thing that struck me was how easy people throw things away these days, it seems that no one stops to consider if a thing can be fixed before they throw it out, maybe it's just a difference in thinking, but if something in our house breaks the first thing we do is work out if it can be fixed, and then if it can't we try to recycle it in some way, maybe that's part of it, perhaps people lack the confidence or the practical skills to try and fix things ? but you would think with everyone having to tighten their belts that more people would be trying to fix things and save a few pounds.

As an example a few months ago my sons nintendo 3ds started playing up, the left and right buttons wouldn't work properly, the cost of a new console is about £100, which was more than we had at the time, but as it turns out it's easy to replace those buttons, and it cost about £8.50 for new ones, I wonder how many people would have written it off before they thought about fixing it.

It cost nothing for me to fix the chairs arm pads, I found out that they un-screwed from the chair and it was easy to recover them, here's how.


One of the arm pads before covering -


Quite worn.

I found that the material was stapled onto the plastic arm, with a bit of foam padding, so I removed the staples and then took off the old material.


The staples - 


Easily removed.

Using a pair of snips I pulled out all the staples and then got rid of the worn material, but I kept the foam padding.

I used a magnet from a an old speaker to keep the old staples in one place, I do this when I'm taking things apart as well, saves trying to find dropped screws.


Staples all in one place -


Better here than stuck in some ones foot.


The arm with foam padding -


Not too bad.

On to the covering, the old covering was some kind of mock leather type stuff, I could have used just about anything to re-cover the arm pads, but as I had some old covers from a previous office chair I went with leather.


The old cover (complete with foam) - 


Some might call me a hoarder of objects that might come in handy.

After finding a bit of the old cover that was big enough to cover the arm pads I unpicked the stitches to remove it from the cover, mainly to make it easier to deal with, and because I wanted to save as much of it as possible.


Enough material to cover both arm pads - 


I kept the foam for extra padding.

Once I'd cut the material in half so that I had two bits, one for each arm pad I set about fixing it down, to do this I used a staple gun and basically just stapled it back down, I could have glued the material down, but stapling was quicker.


Fixing started - 


Few more staples and it's done.


I had to cut some bits of material to make way for the bolt holes that hold the arm pad to the arm, and just to make sure the staples were well into the plastic I gave them a tap with a pin hammer. I wasn't too careful with folding the corners in as the arm pad fits into the chair arm and the ends are covered.


Cut outs for the bolt holes - 


The bolts also help to hold the material down.


One arm pad done, just need to fix it back onto the chair - 


Simple really.

All done - 


Looks almost new.

And that's it really, it took me about 45 minutes to do both arm pads, and I'm really not that good with upholstering things, so If I can do it so can you, and if your office chair is starting to little worn, why not try to spruce it up a bit before you chuck it, this isn't the first time I've fixed an office chair, the arms on my last one broke, so I made some new ones from wood - Wooden office chair arms (opens in a new window)

Thanks for reading.