Showing posts with label homemade stocking filler. Show all posts

Sunday, 17 January 2016

Kids stocking fillers part 1 - 0's & X's

This is the first part of two makes I did for the kids stocking fillers for Christmas just gone, both makes are made from scrap wood I had lying about and they are both really easy to make, and obviously as I have two kids I made two lots of each thing.

The first is a small noughts and crosses game made from a piece of an old pine shelf and some cut up sections of a hardwood spindle.

Here's the finished article -

Quick and simple to make.
I marked out the game board using some squared paper, this is good way of making an easy to use template for simple things like this.

The game board template - 

Speeds things up a bit.

Once I'd made the template I laid it over the piece of wood I chose for the game board and using a scribe I marked the four corners of the board so I knew where to cut, and then the centres of the circles, these were to be drilled out so the game pieces fit into the board.

Using a forstner bit I drilled out the nine holes for the game pieces, then I cut nine slices from an old hardwood spindle, the combination of light and dark woods makes for a nice contrast.

Holes drilled out and game counters cut - 

Onto the x's & o's

To make the noughts (0's) I marked the centre of some of the hardwood slices, then drilled through them with a small forstner bit, for the crosses (x's) I made another template and pinned it to a piece of scrap wood I'd made a hole in, the hole was just big enough to hold one of the hardwood slices.

Template for the crosses (x') - 

Simple enough.

I then used the template to mark four points on some of the hardwood slices - 
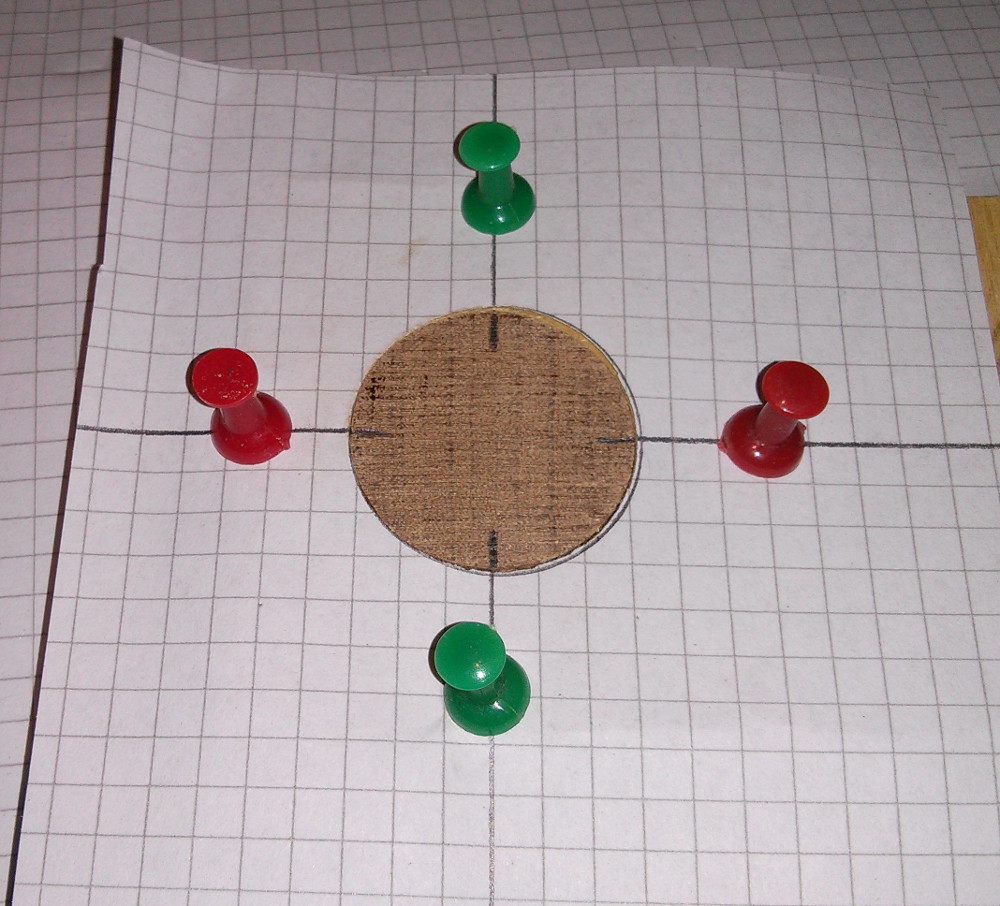

It's not that accurate, but it works.
Once I'd marked up some of the hardwood slices I then set about joining the marks up to make crosses in the wood, I used the scrap bit of wood to hold the slice in my bench vice, so as not to mark the wood on the sides, then using a small saw I cut a cross into the wood and made it bigger using a small needle rasp.

Like so - 

Not quite central, but it looks like a cross.

And that's about it, apart from sanding and then a couple of coats of Danish oil the noughts and crosses games were done, besides waiting for the oil to soak into the wood it didn't take very long to make the two game boards and their pieces.

All done, just need some oil - 


Almost ready for wrapping.
A simple and inexpensive stocking filler, even if you had to buy the materials you should be able to find a flat bit of pine and some thickish dowel for a few pounds (it's worth looking in off cut bins at the local diy shop) you could always make it a small project for the kids to make themselves.


They do look better with a bit of oil, paint would work just as well - 


All done.
And if wood work isn't your thing (or even if it is) why not try your hand at a bit of sewing, my wife made these soft toys for the kids stockings, I think they turned out great and the kids love them.


Thanks for reading.

Sunday, 22 December 2013

Stocking filler toys part 1 - Mini ring toss game ...

For a few years now my wife and I have tried to make a few things as stocking fillers for the kids, last year I made them three toys each on my lathe, I made two spinning tops that work differently and a cup and ball toy, part of making them was that we as home educators try to show the kids how things used to be, and to that end we watch a lot of history based programs.

Last year the kids had seen the sort of toys that Victorian children might have played with, and in making them some of their own they'd get a more hands on feel for what the toys of olden days would have been like, and besides some nice sturdy wooden toys have to better than some of the plastic stuff you can get these days.


Here are the things I made the kids last year -


All easy to make, and fun to play with.


This year I decided that it would be better to make something different, rather than just turn a load of spinning tops or something, so I took inspiration from the kids themselves for this particular toy, which is a mini ring toss game.

It came about as the kids were watching a program about Tudor farming, and in one of the episodes there was a celebration and amongst the various things going on there were some people playing a ring toss game, the next day the kids made their own ring toss game using some of my daughters bangles, and I though I'd make them a more permanent set.


Here they are (I made one each) - 


Really easy to make.

These are very easy to make, and in this case all I bought was some natural rope at a cost of £3 for three metres, you can use plastic tubing, or any other type of cord or rope, the wood I had lying about.

Basically what you need to do is make a cross from two bits of wood, then add some pegs (I used some dowel) for the rings to catch onto, the rings are made from rope and held together with a bit of plastic tube, which I then painted with quick drying enamel paint (great stuff)

To make the cross take two bits of wood (mine are about 8 inches long / 22cm or there about) and mark the centre on one, then measure the thickness of the second piece and then mark that measurement out on either side of the first piece of wood.


You should have something like this - 


Now to transfer the marks.

To transfer the marks onto the other piece of wood use a square - 


Both pieces marked out.


Next you need to mark the depth to which you need to cut out so that the two bits of wood will fit into each other, this is about half the thickness of each bit of wood.


Depth marked out - 


Depth marked out, just needs cutting.

Once you've marked out and cut the wood to the right depth both pieces should fit into each other, I made mine so they fix together using the centre peg, this means they can be packed away easily.


Cut outs, and pegs added - 


Almost done.

The pegs are just stuck into the holes I drilled into the wood, I was using 9mm dowel, and the holes I drilled are about 8.5mm so the dowels are nice and tight, no glue needed, the centre peg fixes the two halves together, I made each peg about 3 inches long (about 7cm) I measured in about 1 inch (2cm) from each end for the outside pegs, the middle peg is an equal distance between the other pegs.


Two halves with pegs added - 


Basic wood working really.


Assembly is just a case of slotting the two halves together -


Just needs some numbers for scoring.

The rings are made from lengths of rope joined with a bit of plastic tubing, now because I used natural rope I had some trouble with the ends fraying, so to get round this I used super glue on the rope before I cut it into lengths.

By adding some glue to the rope it kind of plasticises it, which makes it a little harder to cut, but a junior hacksaw makes short work of it.


End without glue - 


Makes things harder to control.

End with glue - 


Much neater end.


It's much easier to get the tubing onto the ends of the rope when it's not fraying and coming apart. I made four rings for each set, and the rings are about 9 inches (23cm) round, to join them I used some plastic tubing I had left over from another project, the tubing is a good way to hide where the two ends meet.

To join the rings it's just a case of stretching the tube enough to get it onto the ends of the rope, this is easy to do with some long nosed pliers and a bit of heat.

After I'd cut some bits of tube I used some pliers to stretch the tube, all you need to do is push the tube onto the pliers and open them, using a lighter (a candle would do) just apply a bit of heat to the tube, not too much or it'll burn, as the tube heats up you can feel it get easier to stretch.


Tube on pliers - 


Take your time with this.

A bit more and it'll go over the rope - 


Nearly there.

Once it's stretched just about enough put it onto one end of the rope, when the tube cools down it'll shrink a bit and hold the rope tightly.


Rope with tube on - 


Now to join them up.


To join the ends up and make a ring just repeat the steps again, gently heat the tube and stretch with the pliers and once it's just about big enough to get the rope in, push the end of the rope into the tube and you should have a nice rope ring.


Like this - 


Quite simple to do.


I decided to paint the bits of tube holding the rope together, one because I thought it looked better and two because then the kids will know which rings belong to who (not that it really matters) I used quick drying enamel paint, I really like this stuff, it gives a nice finish and dries in about 15 minutes, it's water based as well, which makes cleaning brushes easy.

You can use a bit of sand paper to rough up the tube a bit, this will help the paint stick.


Enamel paint (pink for my daughter) - 


She really loves pink.


One ring painted - 


A bit of colour is good.

The last thing to do was to add some numbers to the game for scoring, to do that I used a stencil to mark the wood with a pencil, then using my pyrography tool I burned the number in where the pencil marks where, and that's about it, they are easy to make, and even if you had to buy the wood and the dowel as well as the rope and tubing you should be able to make them for no more than about £5 for two, which isn't bad really for a handmade wooden toy, and this is another easy to do project for kids to have a go at themselves.


Mini ring toss games - 


Easy to make stocking filler.


Thanks for reading.