Sunday, 6 March 2016

Handmade row marker (with a lathe)

Whilst waiting for things to warm up weather wise (it's been quite cold here of late) I decided I'd have a go at making a row marker for the allotment, normally I use two sticks and a bit of string but thought I'd make an upgrade.

Not that there's anything wrong with two sticks and a bit of string.

So after a root around in my wood pile (which is quite large) I found an old pine bed leg and thought that will do nicely, basically my aim was to make a spike (kind of like a dibber) with a reel for the string on the end, easy enough if you have a lathe, but fear not if you don't have a lathe I have also made a row marker without a lathe, which I'll write another post about.

So here's the line marker -

Basic, but functional.
I cut the bed leg down into chunks, rather than put the whole thing on the lathe, using the first section which was already shaped as the spike for the reel.

Wood sorted -

I used this bit to save time.

I marked the centre of the wood -

As you can see it's actually two bits of wood glued together.

And after a short while on the lathe I had my spike, I turned a thin shaft for the reel to sit on, and also drilled out the end so that I could make a cap to hold the reel on with.

Basic shape done - 

Mini jousting anyone ?

Hole drilled for cap -

Probably not the best way to hold this in the lathe.

I used the waste wood from making the spike for the end cap, I made sure the fit was tight enough to hold the reel in place, but not too tight so that I could get it out if needed.

Wood for end cap -

Could have used a smaller bit.

End cap done and in place - 

The cap fits all the way into the spike.
And so onto the reel, using the other part of the bed leg I first cut it into two parts, one part for the reel and the other part to make the peg for the other end of the string.

Wood for reel and peg - 

Plenty big enough for what I need.
Reel almost done -

That knot will cause problems.
Reel spike done -

Not the prettiest thing ever made.
I figured the knot I found whilst making the reel would cause problems, and it did as I was left with a chunk missing from the bottom of it, but it still worked, so I cut a small groove into where the knot was for holding the string, rather than tying it on.

Knot problem sorted -

Similar to cotton reels that have the little slit in them for holding the cotton.

The other chunk of leg was turned into a peg, the idea being you stick the reel end in the ground and the other peg goes at the end of where ever your line finishes.

Wood for peg ready -

Soon to be peg like.
Peg done, I added an eye at the end for the string to attach to -

All done.

Ready for action -

I should have nice straight rows of veg this year.

And that's it, the reel is quite tight so that there's some tension in the line when marking out, this helps keep things straight, I didn't really work out what sizes things should, just worked from eye and made something I know I'll be able to use.

I have added an upholstery pin to the bottom of each peg / spike to protect the wood a little, but to be honest it probably doesn't need them, in my humble opinion it's a good use for and old bed leg, better than chucking it on the fire, I may at some point add a handle to make winding it up easier.

Thanks for reading.


Thursday, 3 March 2016

Burning your turnings...

It's not a post about what to do with stuff you've made that your not happy with, although I'd have to admit I've made things and thought 'There's another piece for the fire'

No this is about adding a bit of detail to turned wood using some wire and a bit of friction, sometimes having the contrast between light and dark is a nice addition to a piece and an easy way to make wood dark is to burn it.

I've dabbled with pyrography and sometimes it's worked and sometimes it hasn't, recently I made a book mark for my wife from a piece of Cherry root, it worked quite well, and I'm happy with how it looks, and my wife likes it as well.

Bookmark -

Not the most complex design.

The detail on the bookmark was made using a pyrography tool, a handy thing to have and they can be picked up quite cheaply, the one I have is useful as I can also use it for soldering just by changing a tip, saves having several tools lying about.

Pyrography kit -

I'm still experimenting with it.

However this is about turned wood as I said, now you can add some detail by holding a bit of wood to your turning whilst it's spinning, hardwood works best, but a burning wire is also good for adding a bit of detail, and they are easy to make, and it's fun experimenting with different types of wire.

It's not a garrotte - 

It's not for cutting cheese either, although it would work.
The idea is simple, with the wood spinning on the lathe (higher speeds are better) you hold the wire to the wood and friction does the rest, the result is a nice dark line in the wood, yes rings are what you'll get, but sometimes they are enough, a couple of dark rings on the head of a wooden mallet make it more than just a tool for bashing things.

Here's a couple of pots I made with the same kind of wood, I've added some rings to them using one of the burning wires I made.

Pot 1 - 

Not sure about this one to be honest.

Pot 2 - 

I prefer this one out of the two.

As you can see it does add a bit of extra interest, and it's something I plan on experimenting with more, but for now here's how I made the burning wires.

Choose you wire, I've used fairly thick copper wire, steel garden wire and the kind of wire you get in those picture hanging kits, the twisted steel stuff, this works really well.

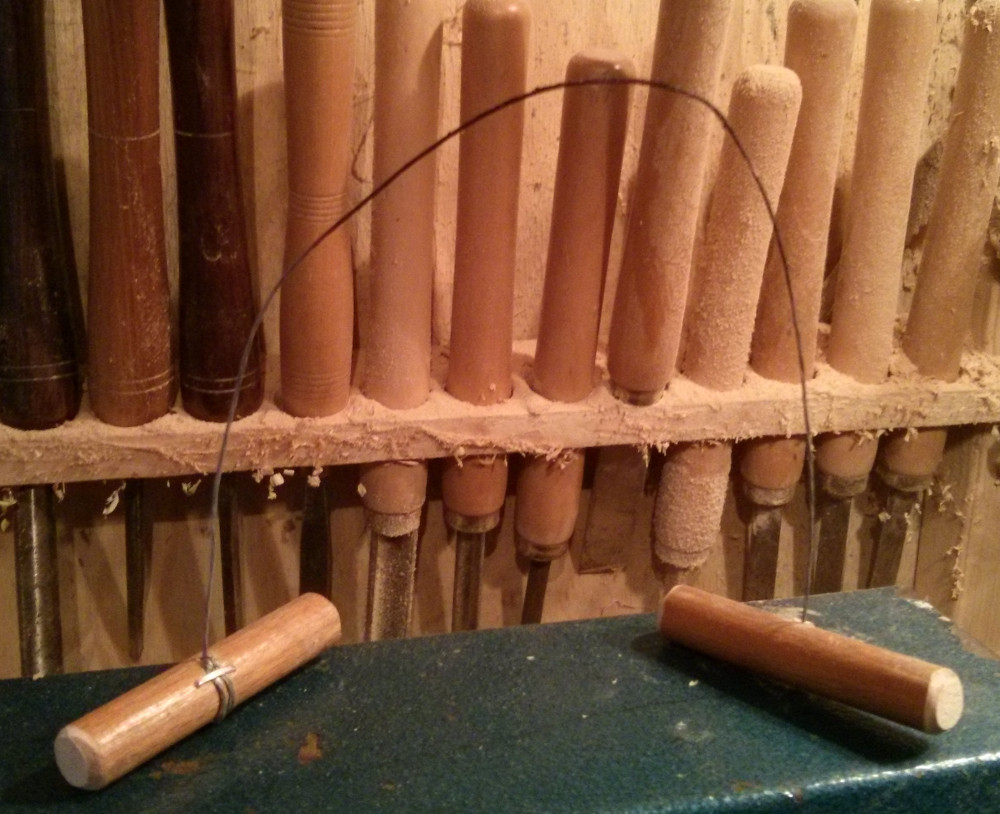
What do you need ? wire and a bit of wood, I used dowel -

easy ingredients.

Cut your wood in half, then find the centre of each bit and drill a hole, not too big, but big enough to get the wire through at least twice, that's the handles done.

Dowel cut and drilled - 

Easy enough.

Next take your wire and cut a length of it about 12 inches long and thread it through the holes in the wood, then loop it round and thread it back through the hole, try and leave at least 8 inches between each handle.

Like so - 

I find it stops the wire coming out of the wood.
If any wire is sticking out of the wood cut it off, I also used a staple to add a bit of extra security, you do have to apply a bit of pressure to the wire and you don't want it slipping out of the wood and wrapping round the lathe.

Staple for extra hold - 

Better safe than sorry.

And that's it really, not very complicated, I'm sure there are other ways of making something like this, this is just the way I do it, I haven't looked to see if you can buy purpose made burning wires, but I'm pretty sure you can make one for less money, I've made 3 now, all from scrap wood and wire.

All done, now to burn - 

Ready for burning.

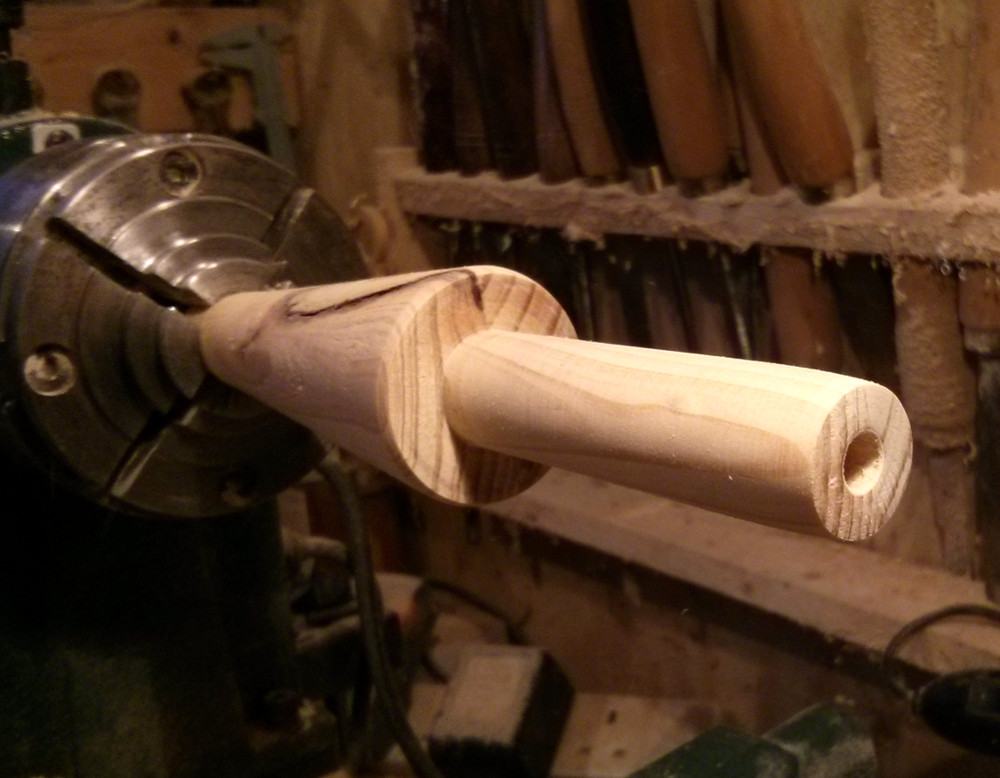
When it comes to using the wire I like to make a small groove in the wood, just a slight mark so that the wire will sit in it, I just find it helps to stop things slipping about especially if you're adding detail to a piece that has a curve to it.

Grooves marked - 

Higher speeds work better as the heat builds up quicker.

And that's it, I've found that after a couple of uses the wires blacken and this helps to add a nice even colour to the wood, I would also advise wearing a mask and eye protection as it can get very smoky, ventilation is also a good idea.

So far I've found that it's a nice a simple way to add a bit of interest to a piece, even if it is just a Pine tea light holder.

Slightly more interesting than a plain one - 

Better make another one.

Thanks for reading.


Sunday, 28 February 2016

Spring is springing...

Now there's a touch more light about in the mornings and evenings, and the weather is trying to warm up a bit it's time for us to get sorted for this years plant based adventures, but because it's a bit cold for starting some things off outside we got some of the other jobs out of the way, like sorting out the bird boxes.

Two of our bird boxes -

Ready for new tenants.

I built a new and slightly larger shed last year and as a result the bird boxes we have in the large Sycamore at the bottom of the garden were a bit low, and in range of our cat, so whilst I was relocating them I took the time to give them a clean out and repair any damage.

Nest boxes should be cleaned out regularly due to fleas and other bugs that can affect baby birds and the adults, but you have to make sure the box isn't being used, so clean them out around autumn time or in winter, it's also advisable to wear gloves and a mask, we have two nest boxes on the house, but they haven't been used yet, but maybe this year.

House nest boxes (odd picture angle due to patio full of plants) - 


Landlords are nice, rent is cheap.

And if that wasn't enough I decided to use some old scrap bits of wood and have ago at making a round bird house on my new lathe, it came out quite well, I just need to find a spot for it, it may be on the small side, but you never know something might use it, perhaps a Wren ?

Round house - 

I've got a nice spot in the Sycamore for it.

The kids received their spuds for this year from the Potato council, they've been growing their own spuds for a few years now, they enjoy seeing how big and how many spuds they get, one year they only got a single spud from one lot of seed spuds, but it was huge ! 

If you haven't had a go you can find info here (opens in new window) on what you need to do, if you sign up they send you a box with everything you need to get started, they even supply large plastic bags in the kit so all you need is some compost, and of course we've also started chitting our allotment spuds as well.

The kids spuds chitting nicely - 


They'll be ready for when the weather warms up a bit more.

I finally got round to sorting out the greenhouse, which took a lot longer than it should, but at least it's done and I now know how many spare pots we have, which is good as we have a load of plants to re-pot, all sorts from Black currants to Wisteria, Honey Suckle, Passion Flower, basically our back garden looks like a garden centre, it seems as each year goes by the amount of plants we propagate increases greatly, whether it be from seeds or cuttings.


Nice and tidy(ish) greenhouse - 


It's got a few plants in it, in various states.

Plants -


Few here, mostly for the garden.

More plants -


Looks like there's more tidying to be done.

You get the idea - 

Loads more at the bottom of the garden, and by the shed.

And the other day I put some seeds in to soak, ready for planting after a day or two, there's Bay (the herb) Everlasting sweet pea, Laburnum, Crab apple, Thorn apple (bit of an experiment) and some others, basically seeds we've collected from last year, and this is small amount of what we'll end up growing this year, just for fun, and for food.

Seeds having a bath - 


They'll be started of indoors.

As if that wasn't enough we've also started collecting cacti, and we also have some cacti seeds in our heated propagator, which cost £5 from a charity shop, it'll be interesting to see what happens, cacti are something my wife's grandfather was an avid collector of and she has decided to follow in his foot steps.

Not that you can see very well, but stuff is happening in there - 


An update on what's growing in here soon.

I've also started working on the allotment, trying to get that into order, so an update on the plot will appear soon, but for now happy growing.

Thanks for reading.


Thursday, 4 February 2016

Kids stocking fillers part 2 - Skittles.

I figured I'd better get this post done before the start of allotment season, so on to the second thing I made for the kids Christmas stockings (yes I know it's a bit late)

The finished article (again I made two of them) - 

All done.


I made the skittle sets in much the same way as the noughts and crosses boards, I used squared paper to work out where everything was going to go.


Marking out complete - 

I tried a few layouts before this one.

As with the noughts and crosses boards I laid the paper over the wood and marked the points with a scribe, once that was done it was onto cutting and drilling out holes, I used a forstner bit just slightly bigger than the dowel I planned to use for pins.


Holes drilled - 

Spot the mistake.
I ended up having to make another board because I drilled the holes too deep, so deep in fact that I couldn't knock the pins over with the ball, so remember not to drill the holes too deep if you make one, although it does add an extra level of difficulty to the game.

You can use any layout you like, and you can also add more pins or use less pins, I wasn't going for a traditional layout, just one that worked.

I had to add an extra piece of wood for the post the ball swings from, it didn't sit well in the hole I drilled, with the extra bit of wood it was more stable.


Extra support for the post - 

I used wood glue to fix it down.

The post that the ball swings on it just a piece of dowel, again you could use any size you see fit, I then drilled a hole through the dowel and fixed a thinner bit into the hole.


Posts done - 

Simple enough.

I used dowel for the pins as well, I just cut them with a 45 degree angle at the top, I had thought about turning a load of pins, but didn't really have the time, and besides this way is easier and doesn't require a lathe, I used a stencil to mark the numbers and then burned them into the wood so they don't rub off.


Pins - 

Obviously I made nine for each board.

I used a small eye screwed into the smaller piece of dowel for the string and ball to swing from, these can be bought for about 50 pence a pack, they're normally used with curtain wire, but they do well for things like this.


Eye eye - 

It works well.

For the balls I roughly turned a bit of scrap wood into sort of a ball shape, but you could just drill a hole through a bit of dowel, or use a bit of clay on some string.


Wrecking balls ? -

You could also use a drill press to make some balls.

And that's about it, I gave everything a good sand and then a generous coating of Danish oil, but you could just as easily paint them in what ever colours you like, I made the two sets from scrap wood I had laying about, but you should be able to buy everything to make at least two sets for under £5.

These like the noughts and crosses are an easy make, easy enough for kids to do as a project, and they are cheap as well as fun to play with, I do have plans to make a giant set for the kids to use in the garden in summer.


Skittles again - 

Fun for kids and adults.

Thanks for reading.


Sunday, 17 January 2016

Kids stocking fillers part 1 - 0's & X's

This is the first part of two makes I did for the kids stocking fillers for Christmas just gone, both makes are made from scrap wood I had lying about and they are both really easy to make, and obviously as I have two kids I made two lots of each thing.

The first is a small noughts and crosses game made from a piece of an old pine shelf and some cut up sections of a hardwood spindle.

Here's the finished article -

Quick and simple to make.
I marked out the game board using some squared paper, this is good way of making an easy to use template for simple things like this.

The game board template - 

Speeds things up a bit.

Once I'd made the template I laid it over the piece of wood I chose for the game board and using a scribe I marked the four corners of the board so I knew where to cut, and then the centres of the circles, these were to be drilled out so the game pieces fit into the board.

Using a forstner bit I drilled out the nine holes for the game pieces, then I cut nine slices from an old hardwood spindle, the combination of light and dark woods makes for a nice contrast.

Holes drilled out and game counters cut - 

Onto the x's & o's

To make the noughts (0's) I marked the centre of some of the hardwood slices, then drilled through them with a small forstner bit, for the crosses (x's) I made another template and pinned it to a piece of scrap wood I'd made a hole in, the hole was just big enough to hold one of the hardwood slices.

Template for the crosses (x') - 

Simple enough.

I then used the template to mark four points on some of the hardwood slices - 


It's not that accurate, but it works.
Once I'd marked up some of the hardwood slices I then set about joining the marks up to make crosses in the wood, I used the scrap bit of wood to hold the slice in my bench vice, so as not to mark the wood on the sides, then using a small saw I cut a cross into the wood and made it bigger using a small needle rasp.

Like so - 

Not quite central, but it looks like a cross.

And that's about it, apart from sanding and then a couple of coats of Danish oil the noughts and crosses games were done, besides waiting for the oil to soak into the wood it didn't take very long to make the two game boards and their pieces.

All done, just need some oil - 


Almost ready for wrapping.
A simple and inexpensive stocking filler, even if you had to buy the materials you should be able to find a flat bit of pine and some thickish dowel for a few pounds (it's worth looking in off cut bins at the local diy shop) you could always make it a small project for the kids to make themselves.


They do look better with a bit of oil, paint would work just as well - 


All done.
And if wood work isn't your thing (or even if it is) why not try your hand at a bit of sewing, my wife made these soft toys for the kids stockings, I think they turned out great and the kids love them.


Thanks for reading.