Saturday, 28 December 2013

Stocking filler toys part 2 - Tower of Hanoi puzzle ...

'I meant to get this post out before Christmas, but I ran out of time, where does it all go ?'

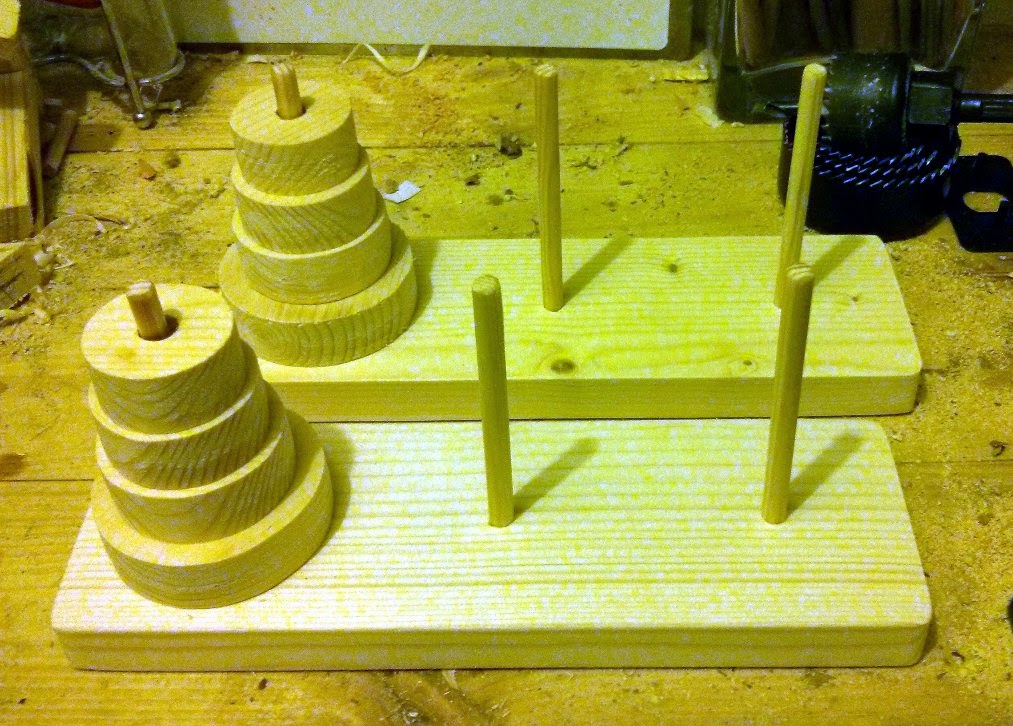
This is another of the stocking fillers I've made for the kids, they both seem to like puzzles, they found a version of this puzzle on a maths website they use, so I thought I'd make them a physical version of it.

The Tower of Hanoi is a mathematical puzzle, the idea is you move a series of different sized discs from one side of the board to another, you can only move one disc at a time and you can't place a larger disc on a smaller disc, they vary in complexity, basically the more discs there are the harder it is to solve.


Here are the finished games -


I stuck to four discs.

These are very easy to make, especially if you have a set of hole saws, but basically you'll need a piece of wood, mine is 7cm wide by 22cm long, some dowel, I've used 9mm dowel, and for the discs I just used offcuts I had lying about.

Divide the base into three parts, as mine was 22cm long this worked out at 7.3cm, and mark the wood at each point, you should now have three squares marked out.


Squares marked out - 


Next we need to find the centre of each square.

Next we need to mark where the three pegs will go, these will be in the centre of each square, now remember to leave enough room between the pegs for your largest disc, as mine was 6.4cm (64mm) and I'd divided the wood into three 7.3cm wide squares I had enough room.

To find the centre of each square is just a matter of drawing lines from corner to corner, this should give you the centre.


Centres marked - 


Needs drilling next.


For the pegs I cut 6 lengths of 9mm dowel to 10cm and then I drilled out the base to about half way through, the pegs are long enough to allow for the thickness of the discs and for about 5mm to be glued into the base.


The discs themselves I just cut out with my hole saws, hole saws are handy for this because most sets will have a variety of sizes, so it's easy to make a set of discs that start large and then get smaller.


Discs cut out - 


They need sanding.

All sanded up, just need a bit of colour - 

Apologies for the terrible picture.

And that's about it, not much else to this really, I painted the discs in different colours, again using the water based enamel paint I've used on various other projects, the total cost for both of these is no more than £4, although I made these from scrap bits of wood, so technically they cost nothing.


Finished Tower of Hanoi games - 


Puzzling.

I've also made them both a large wooden dice, this was just a bit of fence post I cut into a cube shape, sanded and then marked with the numbers a dice has on it, the bit of fence post I made them from cost 50 pence, they are always looking for dice to use in the games they make up, and these aren't so easy to lose as normal sized dice.


The dice - 


Not as hard to lose as normal dice.


I have also made the kids their own flat pack bird box kits, for them to assemble themselves, but that's for another post.


Thanks for reading.


Sunday, 22 December 2013

Stocking filler toys part 1 - Mini ring toss game ...

For a few years now my wife and I have tried to make a few things as stocking fillers for the kids, last year I made them three toys each on my lathe, I made two spinning tops that work differently and a cup and ball toy, part of making them was that we as home educators try to show the kids how things used to be, and to that end we watch a lot of history based programs.

Last year the kids had seen the sort of toys that Victorian children might have played with, and in making them some of their own they'd get a more hands on feel for what the toys of olden days would have been like, and besides some nice sturdy wooden toys have to better than some of the plastic stuff you can get these days.


Here are the things I made the kids last year -


All easy to make, and fun to play with.


This year I decided that it would be better to make something different, rather than just turn a load of spinning tops or something, so I took inspiration from the kids themselves for this particular toy, which is a mini ring toss game.

It came about as the kids were watching a program about Tudor farming, and in one of the episodes there was a celebration and amongst the various things going on there were some people playing a ring toss game, the next day the kids made their own ring toss game using some of my daughters bangles, and I though I'd make them a more permanent set.


Here they are (I made one each) - 


Really easy to make.

These are very easy to make, and in this case all I bought was some natural rope at a cost of £3 for three metres, you can use plastic tubing, or any other type of cord or rope, the wood I had lying about.

Basically what you need to do is make a cross from two bits of wood, then add some pegs (I used some dowel) for the rings to catch onto, the rings are made from rope and held together with a bit of plastic tube, which I then painted with quick drying enamel paint (great stuff)

To make the cross take two bits of wood (mine are about 8 inches long / 22cm or there about) and mark the centre on one, then measure the thickness of the second piece and then mark that measurement out on either side of the first piece of wood.


You should have something like this - 


Now to transfer the marks.

To transfer the marks onto the other piece of wood use a square - 


Both pieces marked out.


Next you need to mark the depth to which you need to cut out so that the two bits of wood will fit into each other, this is about half the thickness of each bit of wood.


Depth marked out - 


Depth marked out, just needs cutting.

Once you've marked out and cut the wood to the right depth both pieces should fit into each other, I made mine so they fix together using the centre peg, this means they can be packed away easily.


Cut outs, and pegs added - 


Almost done.

The pegs are just stuck into the holes I drilled into the wood, I was using 9mm dowel, and the holes I drilled are about 8.5mm so the dowels are nice and tight, no glue needed, the centre peg fixes the two halves together, I made each peg about 3 inches long (about 7cm) I measured in about 1 inch (2cm) from each end for the outside pegs, the middle peg is an equal distance between the other pegs.


Two halves with pegs added - 


Basic wood working really.


Assembly is just a case of slotting the two halves together -


Just needs some numbers for scoring.

The rings are made from lengths of rope joined with a bit of plastic tubing, now because I used natural rope I had some trouble with the ends fraying, so to get round this I used super glue on the rope before I cut it into lengths.

By adding some glue to the rope it kind of plasticises it, which makes it a little harder to cut, but a junior hacksaw makes short work of it.


End without glue - 


Makes things harder to control.

End with glue - 


Much neater end.


It's much easier to get the tubing onto the ends of the rope when it's not fraying and coming apart. I made four rings for each set, and the rings are about 9 inches (23cm) round, to join them I used some plastic tubing I had left over from another project, the tubing is a good way to hide where the two ends meet.

To join the rings it's just a case of stretching the tube enough to get it onto the ends of the rope, this is easy to do with some long nosed pliers and a bit of heat.

After I'd cut some bits of tube I used some pliers to stretch the tube, all you need to do is push the tube onto the pliers and open them, using a lighter (a candle would do) just apply a bit of heat to the tube, not too much or it'll burn, as the tube heats up you can feel it get easier to stretch.


Tube on pliers - 


Take your time with this.

A bit more and it'll go over the rope - 


Nearly there.

Once it's stretched just about enough put it onto one end of the rope, when the tube cools down it'll shrink a bit and hold the rope tightly.


Rope with tube on - 


Now to join them up.


To join the ends up and make a ring just repeat the steps again, gently heat the tube and stretch with the pliers and once it's just about big enough to get the rope in, push the end of the rope into the tube and you should have a nice rope ring.


Like this - 


Quite simple to do.


I decided to paint the bits of tube holding the rope together, one because I thought it looked better and two because then the kids will know which rings belong to who (not that it really matters) I used quick drying enamel paint, I really like this stuff, it gives a nice finish and dries in about 15 minutes, it's water based as well, which makes cleaning brushes easy.

You can use a bit of sand paper to rough up the tube a bit, this will help the paint stick.


Enamel paint (pink for my daughter) - 


She really loves pink.


One ring painted - 


A bit of colour is good.

The last thing to do was to add some numbers to the game for scoring, to do that I used a stencil to mark the wood with a pencil, then using my pyrography tool I burned the number in where the pencil marks where, and that's about it, they are easy to make, and even if you had to buy the wood and the dowel as well as the rope and tubing you should be able to make them for no more than about £5 for two, which isn't bad really for a handmade wooden toy, and this is another easy to do project for kids to have a go at themselves.


Mini ring toss games - 


Easy to make stocking filler.


Thanks for reading.


Thursday, 19 December 2013

Tree decorations made from copper tube ...

This year I've had a go at making some decorations for our Christmas tree from some old copper tube, it's not the first time I've used copper tube for a project, but it has to be said it's normally for siege engine parts, perhaps not all that festive, unless you intend to fire mince pies at the neighbours.


It has to be said I'm still not sure if I'm happy with them -


Polished and ready for the tree.

You might be thinking they don't look very tube like, well you'd be right, but an easy way to get small sheets of metal for crafting is to use old tubing, in this case copper, but you can do this with more or less any metal tube, as long as the tubing isn't very thick, trying this with a scaffolding pole won't work because of the thickness of the tubes walls, and some metals are easier to bend than others, you will need a hacksaw or a pipe cutting tool to do this, along with two sets of pliers and a hammer, and some metal cutters (tin snips) for cutting the metal once it's been flattened and a shape marked out, and lastly a drill for drilling a hole for hanging them.


It's not that hard to turn tube into decoration - 


From tube to decoration.

To turn a bit of copper tube into a small sheet is easy, firstly you need to measure round the tube to find out it's circumference, this is easy to do with a flexible tape measure.


Measuring the tube - 


In this case it's 7cm.

Once you have the measurement (for the tube I used it was 7cm) you then need to measure a length of tube that is the same, so for me 7cm in length, then cut the tube.


Next you need to cut the tube length ways - 


Cut the tube from one end to the other.
 Again a hacksaw is ideal for this, or you can use a metal cutting disc in a multi tool (like a dremel) once you've cut the tube you need to bend it out with the pliers.


Bending the tube - 


Bit of brute force required.

Use the pliers to bend the tube outwards, then once it's more or less flat use a hammer to flatten it out, and when you're finished you should have a more or less square sheet of metal.


My metal ready for marking - 


Simple shapes are easy to cut out.


For the shape I just used one of my wife's pastry cutters as a template, and using a scriber (a pointed tool for marking metal) I marked out the shape, you can also use a marker pen to mark out the metal.


Shape marked out - 


Ready for cutting.

Tin snips (metal cutters) ready - 


I've had these for ages.

You get a set of tin snips online for as little as £5 and they are very handy for cutting metal. 

Cutting out the shape is easy enough, it's like using scissors, but with a bit more effort involved.


Here's my shape cut out - 


Ready for stamping.

It's a good idea to use thick gloves when cutting out metal as it can be sharp, and once you've cut out a shape it's also a good idea to either smooth off any sharp edges with a file, or some sand paper to avoid cut fingers, you can also use sandpaper to clean the metal up a bit before polishing.


For the lettering I used some letter stamps I have, these can be picked up cheaply from places like Screwfix or online, and to use them is just a case of working out what you want to stamp out and then giving the end of the stamp a good smack with a hammer, thicker metal will require more of a smack to get the letters to come out.


One of the decorations with just lettering - 


You can stamp anything you like onto the metal.

The heart shapes on some of the decorations were made by drilling three holes into the metal, two side by side with one underneath.


Starting the heart shape - 


Holes drilled, now for some filing.

Once I'd drilled the three holes I just used a small file to make a heart shape, it doesn't take long, and softer metals will be easier to file.


Heart shape done - 


Sort of heart shaped.

To hang the decoration on the tree I drilled a small hole in the top and used some twisted copper wire to make a loop, but string would do just as well, or ribbon, and you don't have to hang them from the top, you could make the hole off centre so the shape sits at an angle on the tree.


I've polished my decorations, any metal polish will do for this, most supermarkets sell some kind of polish for metal, or you can use some fine sandpaper for a brushed look, or just leave them.


Here's a finished one on the tree - 


Shiny.

I'm hoping to get a couple of posts done before Christmas day on the wooden things I've made for the kids stockings this year, two of the projects can be done in next to no time, so stay tuned.


Thanks for reading.


Sunday, 15 December 2013

Stick Christmas tree ...

This isn't a new idea, I've seen a few different takes on Christmas trees made from sticks, but as it's so easy to do and it's also very cheap I thought I'd get in on the act, well why not ?

Here's my effort -


I'm thinking rustic.

As the title says, it's basically a Christmas tree made of sticks, in this case Buddleja, I've used eleven pieces in all, I usually keep any sticks I prune to make things out of, like frames and other things.

To make this one I used an off cut from my wood turning exploits, a piece of 6mm dowel (left over from another project) a bit of hot glue, and a small piece of copper wire and I made a star for it from some pewter sheet we got from freecycle ages ago, so the cost to make this is about 50 pence, that's taking into consideration the dowel and a couple of blobs of hot glue, everything else was free.


The base - 


It was a bit bigger than  I wanted, so I cut some off.

Next I drilled a hole into the centre, this is to hold the dowel, which I secured with a bit of hot glue.


The base with dowel fixed -


I used a 7mm drill bit for the hole.

The next step is to cut the lengths of stick that will make up the body of the tree, and this is as simple as it sounds, as I had a rough idea of what I wanted the tree to look like, I cut the stick out in pairs of equal length so that I could form the cross shapes, I started at 6 inches and decreased the length by 1 inch at a time.

Stick cut and the centres of each bit marked out for drilling -


It sort of looks like a Christmas tree already.

Next I drilled out a 7mm hole in the middle of each stick so that I could slide them onto the dowel, with the last bit of stick I only drilled into it half way, this is because it acts like a cap to stop the other bits being pulled off the tree, it also gave me some where to fix the star.


Sticks arranged on the dowel - 


Sort of tree like.

Once I had the sticks arranged in the right order I then marked the dowel so that I could cut of what I didn't need, I found it easier to do this way as I wasn't quite sure how tall it was going to end up.


Dowel marked ready for cutting - 


I marked it just above the last bit of stick.

And here it is with the last bit of stick in place - 


Now all it needs is a star.

I was going to leave it bare, but decided a small star for the top was needed, if I had left it bare the kids would have told me it was wrong and needed a star.

The star is just 2 bits of pewter sheet stuck onto a small bit of copper wire, the pewter we got from freecycle ages ago, and copper wire can be found in most electrical items, we get a lot of ours from dead electrical stuff, especially from transformers, which most things have, radios, pc power supplies etc.

Because the pewter is quite thin I was able to use one of those paper stamps, the ones that cut shapes out of paper to cut out the star, and then I just used a little glue to hold the two star shapes together with the wire in between them, to fix the star to the tree I just drilled a small hole in the top of the tree and pushed the wire into it.


The star - 


It does make the tree look better.

Not everyone will have a bit of pewter sheet lying about, so cardboard painted silver would be just as good, or a small bit of wood cut into a star shape, you could even use an old tin can to cut out the star shape, if I'm honest I didn't want to mess about with paints and such like, so I just went for the pewter as I knew it would be quicker, which is a bit lazy I know.


And here's the finished tree with it's new family - 


The newest member of my wife's tree collection.

I did fix each section of the tree into place with a bit of hot glue, but my wife said it might have been better to leave them, that way the kids could move it about and mess about organising the sticks into different patterns and such like, you could even make a game of it, it's actually a good and easy project for kids to try themselves, so why not have a go ?


Thanks for reading.