Tuesday, 30 October 2012

Día de los Muertos (day of the dead) ... ...

As a home educating family we like to look at other cultures and their festivals, and as it happens just after Halloween we thought we'd try some Día de los Muertos (day of the dead) related crafts.

The Day of the dead is a Mexican festival, it's origins go back some 2500 - 3000 years and it's a festival celebrating those family members and loved ones who have passed on, the celebration normally takes place on November the 1st and is a national holiday, one of the major features about this festival is the decorating of skulls, normally sugar skulls, so we thought we'd have a go at decorating some skulls as well, although we didn't use sugar skulls.

We made some large ones and some small ones, the large ones have been made from some cheap plastic skulls I got for 50p each, and the small ones are made using a skeleton casting kit we got from a charity shop a while a go.


The skulls - 


Ready for decorating.

Both sets of skulls have been painted with white emulsion to act as a good base for drawing on, the larger skulls were painted an odd yellow colour, and because the little skulls are made of plaster they need a coat of something to act as a sealer.

To decorate the skulls we've used some permanent markers, and some fine liner type pens (the sort I use for doodling) but normal felt pens would probably do just as well.


Pens - 


Very colourful.


He's a picture of all the skulls once decorated - 


Very colourful.

It has to be said that the kids did go a little crazy, but they did enjoy it a lot, and they did also take in what the festival is about, which is good.

Here's the ones I did, I didn't go quite as mad, but oddly enough I found it very pleasing to do.


Large skull - 

Swirly.

Small skull -


This one is a plaster cast.


 I have to be honest it seems a nice way of honouring the dead, seems to me to be more a way of celebrating the lives that people have lead, and the ones that people will lead, but the ultimate lesson is that everyone does things in a different way, and that's what makes this planet such a great place.

You can read up on the Day of the dead on Wikipedia - here (opens in new window) the kids also decided to paint some skeletons as well, although this seemed to turn into a 'what colours can you make by mixing in other colours' exercise, not that, that's a bad thing, oddly they both managed to make various shades of purple.


The skeletons - 


Dem bones.
*Update*

As the kids really wanted some sugar skulls, we decided to make some, although we did cheat a little, we used icing instead of the traditional mixture, which involve (amongst other things) meringue powder, and to make the skull shape we used the plaster casting kit (after cleaning it of course) and basically pushed the icing into the mould, then the kids decorated the skulls with icing pens, then we decided to use them as cup cake decorations.


The sugar skulls - 


We did make more, but they got eaten.


And lastly we carved our pumpkins, which for the second year in a row are 100% home grown, and from seeds we saved from last years pumpkins.


A trio of terrors (or not) - 


Happy Halloween.


Thanks for reading.

Friday, 26 October 2012

Copper wire spider and web ... ...

For Halloween I thought I'd try re-cycling a few bits and bobs to make something interesting (ish) so I made a spiders web, complete with a spider (I know, not very exciting) but it's turned out quite well, and I guess it has interest in that it cost nothing, and in the current financial climate 'free' is always good.

And if I'm honest I'm a little annoyed with the whole commercialisation of these sorts of things, it's only October and some of our local shops have had Christmas stuff in for the last week or two, and anyway I think it's much more fun to make things, never hurts to use a little imagination now and then, which is why I'll be making a few small items for the kids stockings this Christmas.


So here's what I came up with (the web) -


Spider to follow shortly.

I made the web from copper wire of various gauges, thicker for the spokes and thinner for the bits in between, all the wire has come from various old and broken electrical things, the black ring is a bit of plywood that I turned on my lathe to make it round, then I sprayed it black, the black helps to bring out the colour of the wire a little more.

To fit the spokes I drilled small holes (roughly the same size as the wire) around the inside of the wooden ring.


Like so - 

I used a 2.5mm drill bit for this.

I did use a little glue to hold the wire into the holes, super glue to be precise, mainly because it sets quickly.


The wire for the spokes - 


4 bits of wire will give your web 8 segments.

Spokes in - 

On to the next step.

I used a small bit of wire in the centre to hold the spokes in place, then I started to add the thinner wire to make up the shape of the web, but you could always use wool or string to make the web, although you may need something a little more rigid to make up the spokes, maybe long sticks or such like, or garden wire if you don't have copper wire.

Originally I had planned to use a thicker gauge of wire to make up the shape of the web, but I couldn't get it to look how I wanted, truth be told I'm still not that happy with the way the web looks.


And what I ended up with was this - 


I used a bit of wire as a hook as well.
 
Next the spider, now I did ponder how to do this for a while, and in the end I took the small coils off an old motherboard to make up the head and body of the spider, and using four lengths of the thicker wire I made up the legs, by wrapping the wire around a bit of dowel and then sticking the two coils on either end.

Like so (kind of looks spider like) - 


It even has little fangs.

Again I used a bit of super glue here and there to keep things together while I bent the legs about, I added a coiled bit of wire on the back of the spider to hide the dowel end, and in the other end of the spider I used two little bent bits of wire to make it's fangs, then I bent the ends of each leg slightly to serve as a way to hook the spider onto it's web.


And here it is all done - 


Copper critter.

Okay, so I might be stretching the imagination a little, but I think it looks like a spider, and hopefully the web will give people a clue as to what it is as well, although I've used super glue this could be a nice little project for kids (maybe older kids) but you might need to help them out a little with the glue and bending of the wire, and if you don't have a lathe to make a round frame you could always use a square one, or cut out a circle using a jigsaw.

There's not really any set way of making something like this, it's all about what you can find (in my case copper wire) and trying to make something out of it, you could use clay, play dough (if you don't mind it drying out) or wood, the only thing it costs is a little time, and perhaps some head scratching trying to figure out how to make it work.


Enjoy Halloween -


What tangled webs we weave.

Now I just need to make a copper fly.

Thanks for reading.


“Far away, in the meadow, shadows flickered in the Mirror's Maze, as if parts of some one's life, yet unborn, were trapped there, waiting to be lived.” - Ray Bradbury, Something Wicked This Way Comes

Tuesday, 23 October 2012

Adding a twist to my turning ... ...

For some time now I've been getting, well I guess the word I'm looking for is bored, with the stuff I've been turning on my lathe, it's kind of become the norm, and I figured it was time I experimented a little more.

So I have been playing about with adding a slightly different type of design to my turned pieces, it's nothing special but it does seem to add an extra element of interest, well I think it does.


You may have seen the staff I've made for Halloween ? -


I did this quickly.

The twist design is easy to do, and although when it comes to turned wood you can buy special turning chisels, but they can be well over £150 in price, which to be honest is a little more than I want to spend, and besides doing that kind of design by hand adds a more personal touch to an item.

Here's a short video (not very clear) of me adding twist designs to a piece I made for the shop, it's a hardwood case, for storing large pins,needles or indeed things like hair pins.


Adding the twist with a small rasp file to start with (no sound) -


Adding the twist does take a bit of time, and you do have to be careful in order to get even spacing, but it does look good, I'm using a small rasp file to rough out the twist (spiral) and as you can see I've already done one spiral, which is basically a case of going over the roughed out lines with a larger rasp (if you want a wide twist that is) then use a normal file to smooth things out a bit, then it's good old sand paper in different grades to get a nice finish on it.


The rasp files I use -

Nothing special, bog standard rasp files.
 

The piece I'm working on in the video is mounted in a chuck on the lathe, which does make the whole process a lot easier to do, but you can do things by hand, it just takes a little more effort and time.


And if you're lucky it might turn out like this (or better, not that this is great) -


The finished article, which is for sale as it happens.

Another picture with a different view -


I've been experimenting with making it look more fluid.

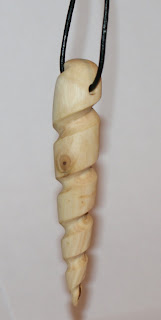
Since I made the case in the pictures above I've been experimenting a bit, I've made two more case like the one above, but with different spiral designs, over all I'm quite pleased with them, so much so I plan to play about with it more to see what I can come up with, I've also made some wooden pendants by hand and also added a spiral design to them, again using the rasp files, but completely by hand.


Here's a couple of pictures of some of the pendants -


Eucalyptus.

Pear with a copper twist.

Again I'm pleased with how they came out, it's perhaps not as uniform as the cases, but I think that adds to the over all look of them.

I'm glad I tried this out, and it's simple to do, and doesn't require any special tools, well apart from a lathe, I am now starting to rough out the design of a large single candle stick that incorporates a large twisted section.

Thanks for reading.

'I reverted easily to my wild state, that is experimentation.' - Jack Steinberger


Saturday, 20 October 2012

How to make a dolls crib ... ...

If you have a daughter like mine, you will no doubt have a load of dolls lying about the house, my daughter has loads of the creepy little things (why is it the ones that make noises always do it when no ones near them ?)

Although she has a couple of cribs for her dolls, I decided to make another one out of scrap bits of wood, it's a simple enough project, only uses 5 bits of wood and a few tools, like a tape measure, a hand saw, few nails & a hammer.


What you should end up with is something like this -


Perhaps yours will be a tad neater.

Now it has to be said that using some kind of sheet material would be best for a project like this, I however used bits of pallet and some left over pine, it doesn't matter that I've used different types of wood as I've painted it white, but you can leave it bare wood, with maybe a bit of varnish or wax, or if you use something like plywood or indeed mdf (horrible stuff, but handy for things like this) you can paint it what ever colour suits.


The five pieces of wood - 


Bit like a simple jigsaw.

Now I have to admit I made a slight mistake with one of the pieces, that being I cut it to the wrong size, which brings weight to the old adage of 'Measure twice, cut once' but hey we all have off days.

You can see that I've cut the end parts with a slight curve to each end, this gives the crib a nice overall look (well I think it does) but it also means that it will rock as well, but you can just cut the end sections straight so that it sits flat on the floor.


All put together - 

I used nails to fix it together, but screws would do as well.

And here's where I show you the mistake, fixing things together is just a matter of nailing two of the sections between each end, so you get a side view like the picture above (again these can be what ever size you decide) the last piece then fits in between the sides and ends to make the base (so the dolls don't fall out) however in my haste to make this I cut the wood first, only to find it wasn't big enough and didn't fit into the bottom of the crib, so I had to cut another piece of wood - Remember - 'Measure twice, cut once' 


The new base - 

The small gaps will be filled.

The gaps you can see around the edges of the base are caused by the angled sides, I could have planed each side to a slight angle to fit better, but as I had to fill in where the nails are I figured I'd just fill these gaps as well.
And that's about it really, it's a simple job that requires basic skills, and design wise you can go as crazy as you want.

I would suggest making one end slightly bigger than the other as this will give a better idea of which end is which, but it doesn't matter, if you do use nails, or screws I'd also suggest counter sinking them, as this will make it easier to hide where the fixings are, and you can make a wood filler from fine saw dust and pva glue, I use the dust out of my power sanders dust collection bags, makes for a great wood filler.

And once it's all put together and sanded you can give it a coat of paint, or if your wood was good quality you can always leave it and just give it a coat of varnish.

This is a great project for kids (and adults) alike, and teaches basic wood working skills, which always come in handy, if not now in they will in the future, just imagine when the kids have grown up and moved out, who are they going to call if they need shelves putting up ? if they know how to do it themselves you'll be free to read that book in peace ;-)


The crib ready for dolls - 


Ready for one of the myriad of dolls my daughter has.

Thanks for reading.


Monday, 15 October 2012

How to fix a lampshade ... ...

Like a lot of people we have a large lamp in the front room, and up until recently all was well with said lamp (which reminds me, must get round to making that 'Beware ! low flying toys' sign)

Whilst the lamp itself is fine it appears the shade bore the brunt of the impact, so I figured well, might as well see if I can't do something with it, rater than bin it.


The shade -

Missing some important bits.

It dawned on me that making a way for the shade to fit onto the lamp wasn't going to be that much of a problem, I had already tried to weld the bits back on, but failed, but figured something else might work.

So I took a slightly different route, using a bit of hardboard, now I should point out that the lamp uses one of those energy saving bulbs, and as such it doesn't get very warm, I could get away with a bigger wattage bulb, but it would make things too bright, and perhaps a bit too warm, I'd rather not start a fire if I can possibly avoid it.

So here's what I did, firstly I marked out a square of hardboard, and then put the shade on it, then drew round the outside of the shade, the idea being that the hardboard would then be a bit bigger than the inside of the shade, and would make a nice tight fit.


Firstly I removed the remaining bits - 


Blank canvass, so to speak.
 
Then I marked out a square onto my hardboard and found the centre, then I put the shade onto the hardboard, getting it as near to the centre as possible.


All marked up - 


Onto the next phase.


Now at this point you may be thinking "You've made a mistake" how are you going to fit that onto the lamp ? the answer is simple, I cut out a hole roughly the size of the fixing on the lamp (I used the old fixing to work out the size) then using one of my many hole saws I cut out a hole in the centre of the hardboard.


Fixing hole cut - 

It's a bit bigger to allow for aligning.

The next job was to cut out the circle I had marked out on the board, but then I thought it might be a little boring, so I decided to try a little experiment.


I drew stars on the board - 


Might have over done it a tad.

I used a transfer type method to get the stars onto the board, I basically printed out some star shapes of varying sizes onto a bit of paper, then went over the outlines in pencil, turned the paper over and using the pencil I transferred the star shapes onto the board, by scribbling over each shape.


Stars being outlined - 


I used LibreOffice Draw (like OpenOffice Draw) for the shapes.


The next bit took what seemed like ages to do, but I cut out each star shape on my scroll saw, I was sick of cutting out the shapes after a while, not really, any excuse to mess about with power tools.


Stars all cut out and fitted to the shade - 


Catman approves.

You can see how the new part fits into the shade, it basically rests under the rim of the shade, which was the reason for making the new part slightly larger than it needed to be.


View from inside the shade - 


And it's done, saved having to buy a new one.


And here's what it looks like when the light is on - 


I quite like it.

Now, had this lamp been an up lighter it would project stars in light on the ceiling, but it's not, although I'd be lying if I said I wasn't now thinking of a way to turn it into an up lighter.


Here's what happens when you shine a light upwards - 


Pretty cool I think.

As it happens the lamp does actually project the stars when I use different bulbs, so now I'm wondering whether to make another shade that has bats or spider webs on it especially for Halloween.


Thanks for reading.


Wednesday, 10 October 2012

How to make a Besom Broom ...

It's that time of year when a broom comes in handy, and not just as a means for witches to get about, so why not have a go at making your own broom ? this one is more a prop for Halloween as the process of making a proper Besom broom takes about a year, as you have to wait for wood to dry out and such like.


The Besom broom (I have a better quality picture for the end of the post) -

It took about half an hour to make.

I'm pretty sure that if you look about the interweb you can find numerous how to's on broom making, so this is more a 'how I make a broom' type post.

As it goes this is pretty close to how these types of brooms have been made for years, the only difference is the materials, I've used different wood to the traditional Hazel and Birch, and I've used wire instead of the traditional split withy, or in some cases twine made from brambles or nettles (yes you can make twine from brambles and nettles)

So grab a bunch of small twigs, the ones I've used are from the branches of a tree that I'm looking to use for other things, they aren't dry enough really, but they'll do for this, seeing as it's more a Halloween prop than a broom.


The twigs & tools -

Not sure how many twigs I've used, but you want a good bunch.

What you want to do is get the twigs in a nice tight bundle, I've used garden wire, but you could use some natural fibre string or normal string, as long as you can get the bundle tight enough to hold the broom handle, don't worry too much about the length at this point, but do try and get the thinner ends of the twigs more or less level.


The bundle of twigs all tied up - 


Nice and secure, the ends of the wire are tucked into the bundle.

Next we need to trim up the end of the bundle where the thicker ends of the twigs are, I used my secateurs, if your sticks are thin enough you could use a sturdy pair of scissors.


Ends all trimmed - 

It doesn't have to be perfect.

Next the handle (you can see it at the bottom of the next picture) - 


A chicken is not needed for this, but it helps apparently.

For a proper broom you would really want a straight handle, which is why Hazel is normally used, as it grows nice and straight, I've gone for effect though and chosen a slightly crooked bit of wood for a handle, I also peeled the bark of it, but you can always leave it on, or maybe use a thick garden cane.

Now you need to make a point at one end of your handle, although if you use a garden cane you should be fine leaving it as it is, to fix the handle to the brush part of the broom is just a matter of finding the middle of your bundle and poking the handle into it, then turn it upside down and give is a few good bashes on the ground, the handle should work it's way into the bundle, and providing what ever you used to hold the bundle together holds, the handle should be nice and secure, no other fixing is needed, but you can always use a nail or two.


Fixing the brush to the handle - 


All done, the two bits should stay together.

Ta Da ! you've made your very own broom, and as I've said if you managed to get the twig bundle tight enough it should stay together, the broom I made has had extensive testing by my daughter and it's still in one piece.

So there you have it, an easy to make Halloween prop, mine cost nothing as I already had the stuff lying about, and if you want to make an actual broom for sweeping then I'd suggest gathering your materials (twigs for the brush and handle) this year, and  leaving them somewhere to dry and by the time next Halloween comes round they'll be ready to make a broom you can use for sweeping as well as riding about in your cape and pointy hat on all hallows eve.


The broom (after testing) - 


Looks speedy, better than a Nimbus 2000


Thanks for reading.


Tuesday, 9 October 2012

The Staff of Shed-a-roth ...

Imagine if you will an object of unspeakable power, crafted in the depths of hell (my wife's name for my shed) it wields so much energy it's very fibres are cracked and warped.


Behold ! The Staff of Shed-a-Roth -


Scared yet ? What do you mean no ?

Okay so it's not some kind of ancient artifact capable of levelling a small city, it was meant to be a handle for my digging hoe, I cut down a section of Eucalyptus, which I've been coppicing, however it started to crack and warp more or less straight away, so I wondered what to do with it, even though it's cracked and only slightly warped, so I figured I'd make a prop for Halloween.


Big cracks started to appear in various places -


It's still in one piece, despite the cracks.


All I've done is carve some stuff into it, and added a twist that runs from the bottom of it to almost the top, the idea being that the spiral will channel the energy from the earth up the staff and into the person holding it, see I've put some thought into it.


The twist -

It's quite easy to do this.

I haven't been too accurate with the detailing on the staff, it's only a bit of fun, but I have been experimenting with adding this kind of barley twist type design onto some wood working projects I've been doing.


Another twist, this time on the top of the staff - 


This is done the same way as the other twist detail.

The two different twist designs (I use the term designs loosely) are done with various sized rasp files, then different grades of sand paper.

The other little details I did using the various carving bits I have for my multi-tool (think dremel-ish) to be honest I haven't used the wood carving bits that much, manly because I kind of like doing things by hand where possible, and because I'm not that good at using the power tool method of carving (yet)


The other little details - 


Spirals - 

Could do with being neater.

The skulls - 

I definitely need more practice with the carving bits.

Initially I thought the length of wood was going to split into bits, but it has settled down now and is actually quite strong.


The cracks haven't got any bigger - 


They seem to fit in with the theme of it.
 
I like the way the cracks seem to fit into the theme of the staff, overall I'm quite pleased with it, seeing as it nearly ended up on the fire, and it's only a bit of fun. 

I especially like the twists, so much so that when I do get a length of wood for a hoe handle I'm going to carve a twist into it, for no other reason than I can, might do something similar to the other gardening tools I have.


Thanks for reading, and Beware The Staff of Shed-a-Roth.