Thursday, 31 March 2011

Recycled planter ... ...

I don't seem to have had much time to write posts of late, we've been having a mass spring clean, but I have managed to get some things done round the house, not least the new desk.

We were in need of new desks or something, the ones we had were too small for the amount of stuff we seem to have, and they were both falling apart, so I set about building a new desk, well it's more of a work station, it's built to house everything that we use pc wise, it also meant I had to sort out my stuff, which there seemed to be rather a lot of as I'm a bit of a squirrel (not so much stuff now)

Here's a picture of the desk in use -

Nothing special, built for function rather than form.
It didn't have the handles on the cupboard in this picture, I have since added them, handles make such a difference when you need to open a door :-)

I used two of these for the cupboard - 

I think they work well on the cupboard.
 Anyway I've digressed a little. Because we've been sorting things out we also went through the stuff we decided should go, to see if we could do other things with it, which you may think defeats the object of getting shot of it in the first place.

One thing we decided to modify were some shelves that were in our daughters room (she's been spring cleaning as well) instead of throwing them I made a mobile planter for the garden :-) I love recycling.

Here's the planter - 
I'm still not sure about the wheels...
It was easy to make, the way the shelves were made meant it was simple to take them apart and make them into a box, it took about an hour in all, I even re-used the nails and screws that held the shelves together, the wheels are off one of the old desks, and luckily were just about the right size to fit straight on with no messing around, although I'm not entirely sure they fit in terms of the look of the thing, maybe it'll grow on me, but as with a lot of the things I build I've gone for function rather than form, and I built it to keep plants in.

Okay so it may not be everyone’s cup of tea, but for an hours work (which is all it cost) I think it's pretty good, and the shelves would have gone to the skip as they weren't really good enough for free cycling. Once I built it I gave it a rough sand, just to refresh the wood a little and then gave it a very liberal coating of raw linseed oil to help protect it, the colour has faded a little since the picture was taken, seems the wood was quite dry.

I wondered how much weight it would take, as it turns out it will hold a fair bit, at present it has two large plastic bags full of earth and spuds, which probably weight about 20 kg each.

Testing the planter, I kept hold of the bags in case the wood started to give - 
Even the wheels took the weight, which was a bonus.
The wheels will come in handy because it makes the planter easy to shift about, saves a little back ache, it will most likely house the bags for some time (probably permanently to be honest) unless I find some other use for it.

The wheels do hold the weight, honest ;-) 

Stops the kids trying to ride it about :-)

I think it's always worth seeing if something can be used for some other purpose, and if not maybe some one else can find a use for it, in the case of these shelves even if I hadn't made the planter the wood could have been burned in a log burner, even that has to be better than land fill ?

Maybe you have an old set of shelves you could do this with ? why not have a go, you could also use a pallet, as it happens I've just got a load of pallets to turn into book shelves, and probably planters when they have outlived their usefulness ;-) and in case you were wondering the desk is built using floorboards of various types, it's not the first time I've used floor boards, I've also built a bookcase for my sons bedroom and a fire surround, I have plans to build more furniture using floorboards.

Thanks for reading.


Sunday, 20 March 2011

Wooden sketch book cover ... ...

This is a continuation of my scroll saw practice / experiments, after making the jigsaw puzzles I thought I'd try my hand at some more complicated, so I set about thinking what I might make, I decided for some odd reason to make a new cover for my sketch book (all will become clear)

Here's the sketch book -

Nothing special, although the paper is nice to draw on using pens.
 As you can see it already has a cover, it's a thin plastic of some sort, it has the same on the back along with a stiff piece of card so you can lean on it, which to be honest doesn't help that much, hence the wooden alternative.
I had some thin plywood (5mm) lying about and thought it would do the job, and because it's thin (I figured) it would be easier actually getting the cover onto the sketch book, turns out I had to wrestle with it a little to get both wooden covers on it, I made one for the front and one plain one for the back, this is much better for leaning on when you don't have a flat surface.

If I'm honest I spent a lot of time trying to think of what to put on the front cover, I came up with a variety of ideas, some more practical than others.

In the end I settled for this - 

It's made of the same plywood as the cover.
 Okay so it may not be to every one's taste, but it kind of suited what I was trying to do. The design is made of two parts, the wavy bits and then the pentacle on top of that, all of which I cut out using my scroll saw and then glued onto the front cover, there is a little glue that needs cleaning off, I'll get round to it at some point.

I decided the easiest way to fix the cover to the book was to copy the way the original covers attached, so I basically took one off the book and then drew round it to get the size right and then I also drew round each hole on the cover so I could then feed the wire binding through the wooden cover (this is where the wrestling came in)

The back cover -

I used a drill bit roughly the same size as the holes.
This is what the front cover looked like before the other bits got stuck on, I used the same basic draw round and then cut and drill method for both covers, which worked pretty well, although even though the ply is only 5mm it's a lot thicker than the original cover which is a little thicker than a sheet of paper, it still fitted though.

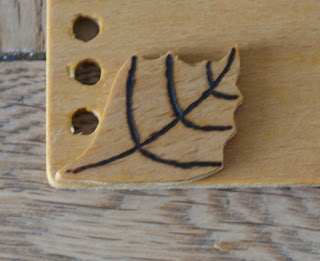
I wanted to add something to each corner, and in the end settled on a leaf type shape that I copied from one of our many house plants, I did also toy with the idea of using metal of some sort on each corner, but in the end went for wood.

The leaf design -

Again I used the scroll saw to cut these out, it's all practice.
As with the main design I used my pyrography tool to burn some detail on so it kind of resembles a leaf of sorts, I also used the same tool on the pentacle design in the middle of the cover.

I stuck it all down with normal wood glue and then gave it a light sanding, just to remove any sharp bits, then I coated the front and back covers with linseed oil, just to feed the wood a little and bring out a bit of the grain, plywood isn't the most exciting of things, I also thought that because the wood was a little warped it might help in straightening things out a little, the wood came from an off cut bin by the way.

The end result is quite pleasing, least I think it is, and it's an interesting way to make a plain old sketch book look a little more interesting, but you could do this with all sorts of books, you could use stiff cardboard instead of wood, and paint instead of oil. It might make a fun project for kids as well, I guess it's a different take on covering a book in wallpaper or other stuff, the sky is the limit really.

The finished book -

I had to make some modifications ;-)

All done ? well sort off, for a start the cover wouldn't stay shut as flat as I wanted, so I had to add a way of keeping it closed, so I drilled a hole in the front and back covers and then used a paper fastener on the front cover as a peg to wrap a piece of string round to keep the book closed.

The fastening solution -

The paper fastener.
Obviously I attached the string to the back cover.


This simple method of keeping the book closed seems to work, it might be better with a thin strip of leather or some other material, but string is what I had to hand.
Over all I am happy with what I have ended up with, not bad for an experiment, I'm now thinking about making more covers for my larger sketch book and perhaps the large book I intend to turn into a family photo album.


" Limitations live only in our minds. But if we use our imaginations, our possibilities become limitless." ---> Jamie Paolinetti

Thanks for reading.


Inspire Me Beautiful

Wednesday, 9 March 2011

Jigsaw puzzles ... ...

Some time ago I bought a scroll saw, I've always wanted one so I could make jigsaw puzzles and other things, you can make some amazing bits of artwork using a scroll saw.

Here's a picture of the one I went for (it's very good)

It takes both pin less & pined blades, and it has variable speed, both handy features.
I have used it a few times, but not for making jigsaws, the first thing I made with it was actually a cat flap (long story) 

So the other day I decided it was time to have a practice with it, and luckily I have a good book to help me with ideas and techniques (which my lovely wife got me) with book in hand I set about making a couple of test puzzles, they are both stand up puzzles, not very complex but enough to be going on with, I used an old piece of 18mm plywood I had left over from making new arms for my office chair.

Here's the book, it's old, but that's a good thing, shows how things should be done.

It's a vintage book, and very good.
It covers the basics and goes into such things as making your own scroll saw, and it also includes loads of templates which you can use as is, or customize, which it also shows and encourages.

A few pictures of some of the things you can make using the book as a guide.

Nice and colourful.
These pictures are a small sample of what can be done.
How cool are these ? :-)
Like I said this is just a small section of things, and it also shows more advanced pauzzles, like maps of America with the various states as pieces, and some mind bending type puzzles as well, so there's a wide range of things that would appeal to adults and kids a like.

You don't actually need a scroll saw to make a jigsaw puzzle, you could use a coping saw, but as it's hand powered your going to get sore arms, so a powered saw is better ;-)

A coping saw.

You can do a lot with one of these.
Okay so on to what I made, which were a couple of simple puzzles, learning to walk before I break out into a run ;-)
Using a sheet of printer paper I was able to use the templates in the book to make a transfer, which I then cut out and stuck to the wood I was going to use.

A picture of a template and a transfer.

I haven't made the elephant yet, next on the list :-)
In the end I went for a simple dinosaur and a pig for my test subjects, mainly because my son loves dinosaurs and my daughter loves pigs :-) I left them bare, just plain wood because I don't actually have any paint that would be okay on a kids toy, I will invest in some nice colourful paints for the next ones though (kid friendly of course)

Here's the pig, complete with template. 

Already cut out, but you can see the paper.
Cutting them out is pretty easy, you soon get into the swing of things, I wasn't actually expecting to get smooth cuts on either puzzle as I'm not that good with the saw yet, but I was pleased with how they came out, obviously they have both been sanded all over, even in the joints, splinters aren't good, I've round off the edges as well.

Here are the finished puzzles.

Just simple, but the kids like them.
And some more pictures.

The piggy, would look better painted pink.
The dinosaur, again would look better painted.
Although I've used templates the idea is to get used to how the saw behaves, then attempt some free hand puzzles, using just an out line of the basic shape, I'm a little way off that at present, but practice makes perfect, so I've heard :-)
One nice thing about the wood is that because it's plywood the puzles have a nice stripey edge to them, which has come out quite nicely with a little oil.

The edges.

Stripey :-)
Overall I'm happy with the results, and there is a certain satisfaction to be had when you see your kids eyes light up when they get a new toy, even simple ones like these, even more so when you've made it yourself.
I have plans to make all sorts of things for the kids and such like, and not just puzzles I'd like to try my hand at a piece of my own artwork, but I need a lot more practice first, either way it's good fun :-)

Another picture.

Pleasing puzzles :-)

Thanks for reading.


Inspire Me Beautiful

Thursday, 3 March 2011

A new use for our dehydrator ... ...

This is just a quick post about yogurt of all things.

We had been thinking about making our own yogurt and had been thinking about getting a yogurt maker of some sort, and as is the case more often than not some one on our local free-cycle group offered one, which we were lucky enough to get.

Here it is -

Nothing special, just a standard yogurt maker.
 As you can see it's an old one, the date on the back is 1990, but it works, which is the main thing and of course being free-cycled it didn't cost anything, it came with everything needed, and although the person who gave it to us couldn't find the booklet that was originally with, she took the time to write down the basic yogurt recipe, bonus.

We tested it out the day after we got it, and sure enough we made some yogurt, which got eaten pretty quickly, the kids loved it, although we did add some stuff to it, like a little vanilla, it's quite nice plain as well.

Then I got to thinking about the device itself, which is basically an incubator, that's what it does, it allows you to incubate the cultures that make yogurt, so despite the fancy " yogurt maker " label it's basically a regulated heat source, which we already had, only we didn't think about it until we got the yogurt maker.

So the other day I decided to experiment with our regulated heat source, or if your prefer the dehydrator I modified from an old glass drying cabinet (which you can read about here - opens in new window ) and using the little glass pots that came with the yogurt maker I set about making some yogurt in the dehydrator, which may sound odd, but on it's lowest setting it's just about the right temperature (around 45°C)  to make yogurt, I'll admit I did have to leave one of the doors open a fraction just to stop too much heat building up.

The little glass pots that came with the yogurt maker -

Just about the right size for one person.
 It took a little less time to make the yogurt in the dehydrator than it did the yogurt maker, so in theory cost a little less in electricity, and as the dehydrator is a lot bigger than the yogurt maker we can make loads more at a time, providing we have the containers to make it in. So that's the plan for making yogurt, we will still use the yogurt maker, until it stops working, but either way we have learned how to make yogurt.

I would post pictures of the yogurt we've made so far, but er we kind of ate it :-) we mixed various things into it, blackberries,strawberries and vanilla, we have plans to make frozen yogurt type things as well, and on top of all that it's an interesting lesson for our kids, this is how you make yogurt and this is how it works type of thing, we've also tried making cheese this week as well, which has been interesting, I'm planning on making more, so I'll post the results no doubt.

And if you've wanted to make yogurt, but didn't want to buy a yogurt maker you may already have the means to make it, if you have a dehydrator and you can also make it in a flask, why not have a go ? if you do a search for making yogurt in your search engine of choice you'll get loads of results.

Thanks for reading.