Sunday, 30 January 2011

Hand carved pen / pencil grips ... ...

I've been messing around with bits of wood again :-)

This time I've been making pencil or in my case pen grips, you know the type of things that you put onto a pen or pencil to help you ... well grip it better.

I used to draw (or doodle if you prefer) when I was younger and I've recently taken it up again, basically I spend time drawing abstract pieces of artwork with fine line pens.

Stuff like this -

May not be every one's cup of tea.


Now as is the case with most things it seems that pens have changed over the years (why wouldn't they ?) and they are thinner than I remember, at least the ones I have chosen to use, or maybe it's my fingers that have got bigger ? either way gripping the pens is problematic at times, I have had operations on my hands which has dulled the senses in my finger tips some what, this doesn't help.

So a quick and simple solution was a grip, yes I could of bought some, but if you read this blog on a regular basis you'll know I try to make things before I part with cash ;-)

So here they are, I made more than one.

This is the first one I made, it's kind of rough, but functional.

This one I made to fit a different type of pen that I use,
I've left 3/4mm of wood to make the walls of the tube.
They are pretty simple as it goes, just a wooden tube, making them is easy, I could have turned them on my lathe, but I kind of like the hand finished feel they have, as you can see they aren't perfectly round, the top one I made in a few minutes a while back, when I started to have issues gripping the pens.

Now these two are quite plain, not much design wise, but I've gone for function rather than form, however I did start to wonder if I couldn't improve them by making them fit the way I feel comfortable holding the pens, more ergonomic so to speak.

So I came up with this one - 

I've been using this one and it's pretty good.
As you can see it's a little more decorative, but I've also tried to make it usable, it actually feels comfortably, perhaps more so than the other ones.

Here are some more pictures - 

These are the basic ones.

The more ergonomic one ;-)

This picture was just for the hell of it ;-)
After doing a little searching online I've found that there are many different types of pen / pencil grip, some are made from different types of plastic, some are rubber, there's material ones, some that are a thread or string wrapped round the pen or pencil. 

You can also just wrap a rubber band round to help with any grip issues (I had teachers in school that did this) we also used bought pencil grips when my son first started to write, he found they helped him hold the pencils he used in a comfortable way, some maybe you and the kids could have a go ? you might want to do the tool related parts, but there's no reason the kids couldn't decorate them in some way.

If you feel like making one yourself it's pretty easy, you can go as mad as you like with the design.

I use a piece of tree branch (I used eucalyptus for all three) but you could use a piece of dowel, this would cut down on time spent making it round.

Cut your chosen wood to about an inch and a half (about 4 / 5 cm) or what ever you feel suits your needs, make sure it's thick enough to hold the pen / pencil with out cracking, you'll want a good 3 / 4mm thickness (see above pictures)

If you use branches like I have you can either leave the bark on, or shave it off, you can do this with a sharp knife (a stanley knife or craft type knife) 

Once that's done you'll need to drill a hole all the way through, I have a load of drill bits, so finding one a touch smaller than the thickness of the pens was easy, but I would suggest using a slightly smaller bit, and if the fit is too tight then roll up a little sand paper and sand the inside of it until it's a snug fit, you don't want it sliding about while your trying to use the pen, if you do make the hole too big a little tape wrapped round the pen will sort it out.

After that it's up to you, you can give it a sand as it is, or carve some kind of design into it, or shape it to fit your fingers better. I used a lavender wax on the ones I made, it feeds the wood and adds a little extra grip to it.

And that's that, pretty simple when you think about it, a few tools and some old tree branch (if you have it) what could be simpler ?

One thing I've found is that depending on the wood you grip may shrink a little around the pen / pencil this is okay, but may make it difficult to remove, so apply a little water to the wood, and if you can get some water into the inside of the grip this helps more, leave it for a few minutes or so and then try and remove it, the water should soak into the wood and make it expand a little.

Thanks for reading.


Wednesday, 26 January 2011

Chinese paper yo yo's ... ...

That's right folks it's my turn :-)

My wife has been writing various blog posts about our Chinese new years crafts, you can check them out here (opens in new window) the kids have been enjoying it loads, especially running around with their goldfish kites, which I have to say are weathering quite well, despite the vigorous usage.

So to compliment my wife's posts we have made some Chinese paper yoyo's.

Here they are -

Pink ones.

Spotty ones.

And orange, this was a prototype.
These are really easy to make and quick, you can make a couple in 10 minutes, and all you need is some dowel, or thin sticks (straighter the better) some paper, you can use wrapping paper,wall paper, or you can stick some strips of a4 together if you don't have rolls of paper lying about.

First get some supplies - 

This is about all you need.
To make the yoyo you will need a strip of paper about 20cm wide and a meter long, any colourful paper will do, if you don't have any long pieces folder a couple of sheets of a4 paper will do, fold them in half and then cut them into 2 strips, and stick them together in a line with sticky tape (this is how I made the orange yoyo)

The sticks were out of the garden cupboard, just little garden canes really, but anything stick like would do, some lengths of garden cane about half a meter long would be ideal.

Time to commence construction -

Sticky tape is quick and works well.
Take some sticky tape and place 2 or 3 strips onto the paper so the sticky side is pointing up, this is for attaching your stick of choice. Once that's done take you stick and place it onto the tape and roll it up, the tape should stick to it and start to roll with the stick.


Some extra tape here will help it stay together.

Keep rolling until the end of the paper.
You need to keep rolling the paper as tightly as you can, once you reach the end of the paper hold it for about a minute, or slightly longer to make sure the curl stays in the paper.


Holding... ... has it been a minute yet ?


You could just place a book on it to hold it down.
If the end starts to un-ravel you can always roll the end the other way to help keep it together.

Like so - 

Use another stick to help roll the paper.
And you should end up with something that looks like the first lot of pictures. The way they work is quite simple, the paper works kind of like a spring as you flick it about.

When they are extended they should look like this - 

See spring like :-)

This one had already been played with.
They should spring back by themselves, you might need to roll them up tightly now and then to keep them nice and springy.
If you don't have any coloured paper you could always decorate some plain white a4 before making it into strips, get the kids to draw Chinese related things on the paper ? like dragons maybe.

Thanks for reading.


Thursday, 20 January 2011

And so it begins ... ... gardening that is

Well it's more or less the end of January, so it's time to get ready for the years gardening and other garden related jobs.
I find this time of year a sort of limbo, there's loads to do, but the weather isn't yet right for a lot of things, mainly planting related.
Although it's been sunny here for the last few days it's by no means spring like, I'm willing to be that if I plant a load of things outside then the frost will come, and no doubt snow and everything in between.

The garden looks a bit sad at the moment -

poor garden looking a little sorry for itself.
So there it is, our back garden, well some of it anyway, I had the macro lens on the camera and didn't get most of the garden in, but you can see that it all looks a little sad, all our trees and fruit bushes are bare, the flower beds and vegetable beds are bare, I have been feeding the soil and digging it over in preparation for spring, or at least warmer weather and then I can get the cloches out and start planting.

There are still plenty of jobs to be done, pruning of things, tidying up of leaves, we end up with loads of sycamore leaves all over the place, you can't see the tree, but it's just behind the shed, and about 50 feet high, the leave make a nice feed for the soil, if you don't mind black bags of leaves hanging around while you wait for them to rot down, any branches and twigs we can't use for making things get shredded and used as mulch.

I do have a green house and a cold frame, but it's still a little cold to be risking plants outside, so I've decided to start some things off in the house, the back room (utility room) to be precise it's not very warm in there, but it's warmer than outside.

I've been putting my pot maker to good use - 

This is the second tray of seeds.
I've started potting up various seeds, things like herbs which we don't have due to loosing some plants, and other stuff like tomatoes, yes I know it's early for tomatoes but I think I'll get away with it. Having the pot maker is quite handy as it happens, it's easy enough to make the pots, and it recycles some of the news papers we have, I've managed to get about 24 pots to a tray, which is good, and all I need to do once they are ready for planting into the ground is dig a small hole and put them in, no need to disturb roots and such like, and no piles of small empty pots all over the place.

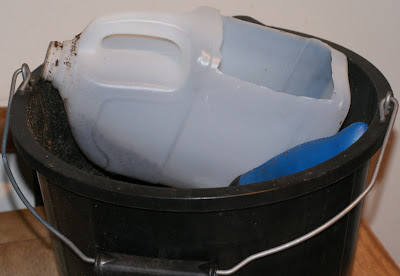
I even made a pot filling device, less messy than trying to fill the pots with a trowel or by hand, I give you the " Pot filler 500 " by techno-mole industries.

Okay so it's a milk carton with a hole in it ;-)
It's much easier using this, and less messy it works well with our home made compost, yes even our compost will be our own this year, no shop bought stuff, and by the looks of the compost bins we will have more next year, so I can really give the soil a good feed, not that it's bad, we seem to have pretty good soil here.

I will have to update you on the progress of the seeds, hopefully by the time they get their second leaves the weather will allow me to use the cold frame, we shall see.
Not much else going on as yet, most of it's planning on what's going to go where as we have moved the beds about.

 There are still some jobs to be done, the biggest of which is the pond, you can't really see it in the picture, but it's there, and it's about 6 feet square and 4 feet deep at the deepest point, we intend to get rid of our fish (no we aren't going to eat them, what does koi taste like anyway ?) once we have re-homed the fish the pond will be made smaller, with no fish so some of the wildlife has a better chance, our fish really love eating frog spawn, once we have done that we will hopefully be investing in some chickens, not many, but enough to get a good supply of eggs from (providing we do well looking after them) the kids are looking forward to having chickens, and it's an opportunity for them to learn as well, can't be bad.

Thanks for reading.


Monday, 10 January 2011

Homemade lathe tools ... ...

I actually made these tools in the run up to christmas, but I never got round to writing a post about them, christmas being it's usual hectic self.

So here it is ;-)

I've had my lathe for about a year now, I haven't used it as much as I might like, but I'm looking to change that this year. I started with a basic set of lathe chisels, which I bought at the same time (not much point having a lathe with no chisels) they aren't anything special, but they are enough to produce things, like small pots, bowls and other things, so in order to extend the range of what I can make I also purchased a new chuck ( a small screw chuck) and I have made a couple of collet chucks as well, but I found recently that I could do with a new chisel or two for making various things.

Now I could have bought something that would do the job perfectly well, but I decided to make some tools, figuring this would give a me a better understanding of lathe tools in general, and also allow me to make a tool specifically for set purposes.

This is what I ended up with -


They are Oland tools.

They will allow me to make a greater range of bowls and such like, and for less than the price of say a new bowl gouge, and from what I have read while researching they are more versatile tools.

I made them from various things I had lying around, I made two in the same way, but from different tubing to test which one works the best, the third tool is along the same lines, but meant for smaller stuff, and believe it or not the cutting bits will be made from masonry nails (yes masonry nails) which I will have to make into the required shape, and then sharpen, this isn't as difficult as it sounds.

Here is a picture of the respective cutting bits -

The top one is  a nail, yet to be shaped, the others are hss lathe bits.
Like the caption says the top one is a nail and I will have to mess around with it to make it usable for turning. The other 2 bits are high speed steel blanks for metal lathes, these need to be shaped a little to get the right sort of edge on them, but being high speed steel they are very hard and will keep a good sharp edge.
You may have noticed the slight notch out of one of the bits (the middle one) I ground it into the bit to help with holding it in one of the bars as the grub screws aren't as tight as I would like, I may have to make new ones.

I got the two steel bits from ebay for a grand total of 4 quid (plus 1.50 postage) not bad really, considering  a lathe chisel can be very expensive, all three together probably cost me about 15 quid in all, plus the time to make them, a good bowl gouge can cost 30 quid or more for one, I got three for half the price ;-)

To fix the bits into the holders I've drilled and threaded hole, which I then use homemade grub screws in to fix the bits.

Grubs screws - 

You can see I have already had to make a new screw and thread.
The screws are made from a length of threaded bar, which I cut a groove in so as I could use a screw driver to do them up, I then tapped out the holes I drilled in the holders. The cutting bits slide into the tubes and are a good fit, so I can get a pretty tight fixing.
I had some steel tubing in the shed which is what the bottom one in the picture (above) is made from, the top one in the picture is a piece of metal electrical conduit I had spare, both seem to work well. I still might grind the ends down a little more, as you can see I've already ground them a little to round them off.

The holder for the smaller bits (the ones I will make from masonry nails) is a piece of solid square bar, I had to first drill into the centre of the bar to make a hole to take the nails, then another hole was drilled at a right angle to the first hole so as I could use a grub screw to hold the nail in place.

Here is a picture - 

It still needs a little work.
You can see it's more or less the same as the other two tools, I still have to grind the end down some what to make it smaller and thus easier to get inside smaller bowls and vases and the like, but it'll only take a couple of minutes on my bench grinder, making the nails into a workable tool may take longer. You can make out the grub screw, which fits almost flush with the surrounding metal, but I will no doubt need to modify it a little once I've ground the end of the bar down more.

And that's pretty much it really, I have yet to test them out, but I'm confident they will perform well (fingers crossed)
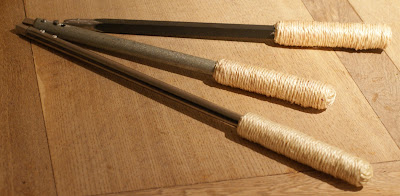
In the end I decided not to turn wooden handles for each of the bars, so instead I used natural string, which I wound tightly around the ends of the tools to make a nice handle, then I used mod podge to seal it all, this also helps to make sure the string doesn't unwind.

The handle - 

As handles go it's pretty good.
Here are all three again so you can see I used the same method for all of them.


Almost reading for a trial run turning something.
These are the first tools I've made from scratch for a specific job, I've modified plenty before to better suit a job.
I am quite proud of them to be honest, although I'll no doubt do a lot of swearing if they don't work ;-)

Here are some of the things I've made so far using my other chisels - 

A plant pot maker - 

I wrote a post about it ;-)
This was made from part of an old fence post, I try to recycle what I can, I recently acquired a 60 year old pear tree, which some one offered on freecycle, I had to cut it down as it had been hacked about to make room for a shed, if I hadn't taken it, it was destined for the bonfire, now it's in my shed waiting to be turned into interesting things, so in a way it will live on, still a shame it had to be cut down.

Here are a couple of things I made last year, a pot made from eucalyptus from our garden and a kids rolling pin for using with play dough.


My daughter loves the rolling pin.


Thanks for reading.