Saturday 11 June 2016

Couple of sticks and a bit of string...

That's all it takes to make big bubbles, well that and a washer...

It's been a nice warm day today, and as is often the case the kids were in the garden blowing bubbles, so I decided to finally make a bubble wand and prove that a bit of string tied to two sticks makes bigger bubbles than they could blow with those little round plastic things, I know this isn't a remotely new idea, but my kids haven't seen one so they still think I'm a wizard.

Making one is easy, take two sticks and either drill holes in the end or you can just tie the string to the sticks, as I used some spare dowel I drilled holes.

Before you tie the string together slide a couple of washers onto the string, or a bead or anything that has a bit of weight to it, the idea being that the washer (weight) will cause the string to sag in the middle forming a rough triangle shape.


Here's a diagram - 
Simple.

Here's a few pictures of the one I made - 


Washer - 
Any kind of weight will do.


End of left stick - 

Left stick.

End of right stick - 

Right stick.


The whole thing - 

That looks like it might work.

And that's about it, it's really simple and works well you can make it any size you want, obviously the longer the string the larger the bubbles you can use any old sticks as long as they are sort of straight I used the type of string that you'd use for tying parcels up with (it was the first thing I grabbed) and in all it took about five minutes (if that) to make and the kids used it until they ran out of bubble mixture.


Large bubble blowing commences - 

The cat wasn't as impressed as the kids.

Even bigger - 

They seem to be getting the hang of it.

It was good to see that something this simple can hold their attention for so long, I suspect that had we had a gallon or two of bubble mix, or let them use all our washing up liquid they'd still be out there, and that may well be the down side, it'll cost a fortune in bubble mix or washing up liquid, but it's worth it to hear them laugh and gasp in amazement at the size of bubbles they can make.

Thanks for reading.

Friday 3 June 2016

Bookmarks from a scrap bit of wood...

I have a lot of random bits of wood from various sources, left overs from jobs and projects, and also from keeping the garden in check, recently I cut a couple of fairly big branches off a Sycamore that over hangs our garden, most of which I used as poles for growing things up, I'm in the process of fan training some of our fruit trees, I had some left over and decided to make myself a book mark or two in much the same way as the one I made for my wife.

For a small Christmas present I made my wife this bookmark as she kept using random bits of paper, letters or anything thin enough to stick in a book so I figured she should have a proper one so I cut a slice of cherry root and made her one with an owl on the top.

This one -

Pretty simple, but it looks better than an old letter.

As it turns out I'm just as bad for using random things as bookmarks and I decided I should have a bookmark as well, so using a bit of the Sycamore branch I set about making some bookmarks, the first thing is slicing up the branch, this can be done with a hand saw as long as you're careful, a band saw would be better, but I don't have one so a hand saw it was.

I took the branch and clamped it in my vice and just cut down roughly in several places to create slices, the wood was still a bit wet and the centre piece started to split so I wrapped a load of tape round the end and left the wood to dry out (I left it about a week)

Branch sliced and wrapped - 

The cuts are straight (ish)

Split centre slice - 


Still got some usable bits.

After a week I cut the slices off the branch apart from the centre one they where okay and had no splits so it was on to making them a bit thinner.

Wood slices - 

Loads of bookmarks.

To thin out the slices I made a guide that I could clamp into my vice, it's basically a piece of wood with another piece attached to one end, but not flush so that it creates a crude height guide and stops the wood sliding off the wood, once I had my guide I started planing.

Planing (and some sanding) commences - 

Some nice green patterns in the wood.

Now I could have left it there, it would be fine as a bookmark, but i thought I'd add a bit extra to it like I did with the owl one, so I went with dragons.

To get the dragon design onto the wood I printed out something I liked and then on the other side of the paper I covered the design in pencil, once that was done I taped the piece of wood to the paper and using some embossing tools I went over the outline and transferred it to the wood.

Design printed out (this was one of two) - 

I liked it, but you can choose anything you like.

Back covered in pencil - 

Make sure it's all covered.

Wood taped on to stop it moving about - 

Taped down well.

Embossing tools at the ready -

Cheap to buy online, handy for all sorts of things.

To transfer the design is just a matter of going over the printed part, pencils will work fine for this, I use the embossing tools mainly for drawing on thin metal but with wood they tend to indent it which helps for the next step.

Transference complete - 

Time for burning.

Once I'd got the design transferred I got out my wood burning (pyrography) tool and set about going over the design, if you don't have a pyrography tool you could always try it the old fashioned way, ever heard of poker work ? 

It's what people used before pyrography tools were invented, basically as far back as the Egyptians (and probably further) people have heated up small tools and burnt designs into wood, a small nail would do, as long as you insulate the end you hold, you could try a soldering iron, or why not paint a design ?

Design burned in - 

I need a lot more practice.

And I could have left it there, but no I decided to partly cut out each design with my scroll saw, which could also be done by hand with a coping saw, you could probably carve them using a dremel type tool as well.

All cut out - 

Ready for bookmarking.

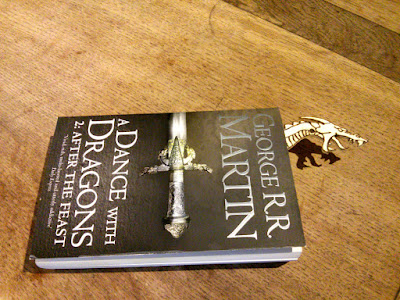
Better test one out to make sure it works - 

Road test results are in... it works.

And if you want something more simple you could cut out a basic shape and experiment with a bit of colour, but remember to seal the wood with wax or varnish otherwise the colour could leak onto the books pages.

An experiment in colour - 

Colourful.

Believe it or not I used printer ink from one of those refill kits you can buy cheaply, but wood dyes work just as well and felt tipped markers would probably give similar results once the ink has soaked into the wood.

I have used some tools that people may not have, but all you really need is a hand saw a wood plane and some sandpaper all of which can be bought for less than £10 and you can always prepare a load of wood slices and let the kids design their own bookmarks on a day when it's chucking it down with rain outside.

Thanks for reading.