
For the last week or so I've been full steam ahead on building a chicken coop, we said we'd get some last year, but weren't really prepared for it, now we are, so we have no excuse.
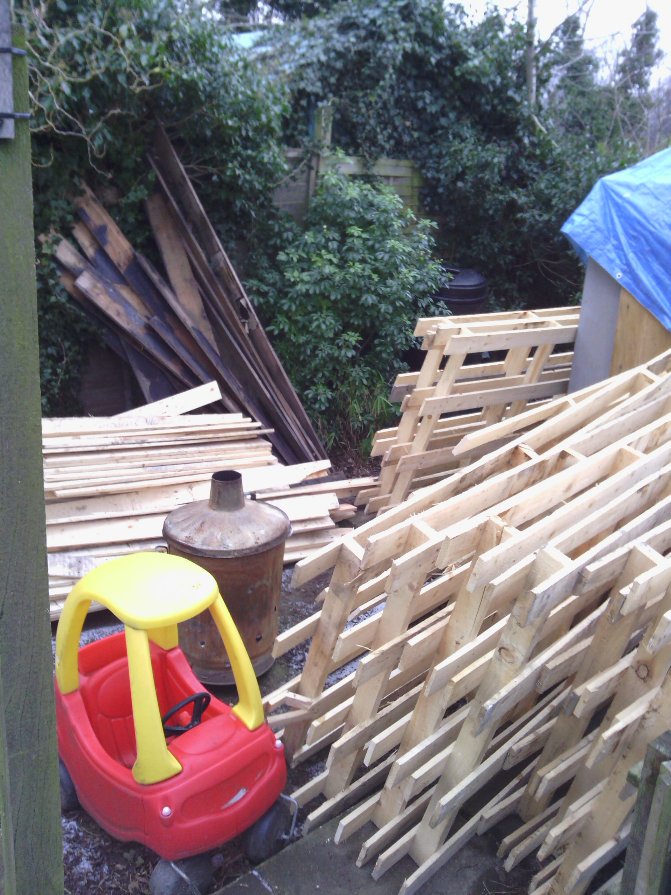
I was lucky as most of the wood to build the coop and run (with a shed load left over) has come free of charge in the form of pallets, 7 foot long pallets to be exact, I saw them in the car park of an industrial unit that was being re-furbished and asked the people doing the work if I could have them, they said yes, one chap even gave me a lift with a load, which when you only have a push bike and small trailer is a good thing.
Although I'd be the first to admit I might have over done it slightly -
We spent some time trying to figure out the best way to build the coop, and it seems there are a lot of conflicting ideas, so we went with what works for us, to that end we've put the nest box on one side of the coop, the main door on the front and the pop on the opposite side to the nest box.

Update - I should have added a more up to date photo of the coop as it is now, shortly after this photo was taken I extended the run, and added a roof over it, although the chickens spend most of their time out in the garden, the run is only really used by them when the weather is bad, and at night.
This is the finished coop -
I was lucky as most of the wood to build the coop and run (with a shed load left over) has come free of charge in the form of pallets, 7 foot long pallets to be exact, I saw them in the car park of an industrial unit that was being re-furbished and asked the people doing the work if I could have them, they said yes, one chap even gave me a lift with a load, which when you only have a push bike and small trailer is a good thing.
Although I'd be the first to admit I might have over done it slightly -
 |
| I'd already dismantled most of them. |
The only wood I bought was for the main frame work, this I got cheap, the only other things I had to buy were something for the roof ( I've used felt) and wire mesh for the run, and to patch up the fencing where the coop now lives.
Construction has begun -
 |
| A basic frame work with pallet cladding. |
You can see the method I used, basically I've just used the planks of wood from the pallets to clad the frame, I've fixed it all together using screws.
We spent some time trying to figure out the best way to build the coop, and it seems there are a lot of conflicting ideas, so we went with what works for us, to that end we've put the nest box on one side of the coop, the main door on the front and the pop on the opposite side to the nest box.
The nest box side -
 |
| It rained a fair bit. |
Luckily as I'm a little bit of a squirrel I managed to find the hinges and bolts for the nest box door, and the main door.
Things progressed quite quickly, although this is mostly down to the weather being good for a change. The whole coop measures roughly 3 feet by 3 feet, the roof slopes backwards from 3 feet to about 2 and a half feet and it's about 5 feet high, I made it like this to allow some space underneath the coop, this gives the chickens some extra room and allows for air to flow around the coop.
Adding the wire mesh -
 |
| Coop nearly done. |
The coop and the run have been built in 2 parts, this makes it easier to move about (which we intend to do from time to time) and it makes life easier for cleaning and repairing. We have decided to start small, just 3 chickens for now, and maybe later on down the line we'll get a few more.
All done (well the coop any way)
 |
| Just the run to do, and a coat of paint. |
The run fixes onto the side of the coop, this gives us access to the nest box and the front of the coop (via the main door) we hope the kids will be helping out with the day to day chicken keeping duties, which is another reason for making it easy to get into.
The nest box area -
 |
| Should be cosy with a bit of bedding. |
The pop hole, with hatch -
 |
| String operated hatch. |
The run, partly completed -
 |
| Coop & run where we intend to keep it. |
And here it is, all done in woodland green (it's what the fashionable chickens have)
 |
| It's a nice colour. |
The patch of earth it's sitting on is where our pond used to be, we filled it in so we could have chickens, the whole area was fenced off when we had the pond, so we intend to patch up the fences and when the weathers nice the chickens will be able to come out to play in the larger area, and when we go out or if the weather isn't so good they will be in their run and coop.
The nest box door -
 |
| Easy egg collection. |
I've used nice strong bolts for both doors -
 |
| Found in the depths of my shed. |
The hatch for the pop can be opened easily by hand, but I added a simple pulley type system, so the kids can open and close the hatch, it's just a bit of string and a couple of hooks.
The pulley system -
 |
| Simple really. |
And that's about it, I still have to fit a perch for the chickens, which I already have, just need to put it in the coop, but I want to make a tray to go underneath the perch, which we will be able to slide out to clean out any chicken sh ... ... err droppings.
I'm also planning on using the manure from the chickens on the garden and the allotment, so not only will we get fresh eggs (well in theory) we'll get free fertiliser as well and the kids will learn about chicken keeping.
I'd highly recommend getting hold of pallets when ever you have a building project like this, with the wood I have left (and there's a lot) I plan to fix up my dilapidated greenhouse, and make some more raised beds, and there's the path edging for the allotment, well you get the idea, plenty of uses for the wood I have, and I've saved a load of money.
The coop again -

Update - I should have added a more up to date photo of the coop as it is now, shortly after this photo was taken I extended the run, and added a roof over it, although the chickens spend most of their time out in the garden, the run is only really used by them when the weather is bad, and at night.
This is the finished coop -
 |
| Not the best picture perhaps, but you get the idea. |
You can read about the changes I made at the bottom of this post - It's all go here (opens in new window)
Thanks for reading.


That's brilliant! Big fan of pallets here too :D
ReplyDeleteThanks, it's worked out quite well, and it's not too heavy which means it can be moved easily by one person.
ReplyDeleteIt's annoying that pallets just get thrown away or burned,they really are great for building with.
Lucky you!! They seem hard to come by here :( The coop looks great, I'm sure it's inhabitants will be most comfy!
ReplyDeleteWe hope so, just need to buy some, which is proving harder than expected due to transport issues.
DeleteJob well done.
ReplyDeleteThanks, I'm slowly getting through the pile of pallets, currently building a play kitchen for the kids, which would be finished now if it only stopped raining ...
DeleteHi
ReplyDeleteI just wanted to let you know I have featured your pallet coop on my website here: http://knowledgeweighsnothing.com/make-a-chicken-coop-from-some-pallets/
I would have emailed you but I couldn't find your email address.
We get over 8000 visitors a day, so expect some traffic! Any problems with anything, contact me via my website.
Thanks
Many thanks for featuring our coop on your website, it's much appreciated.
DeleteHi! I'm really interested in making a coop like yours. Do you have more detailed plans for someone who has not much experience with construction?
ReplyDeleteThanks,
Ashley
I don't have any plans I'm afraid as I built it as I went along, I am planning to have a section on this blog some where for plans of things I've built, but even if you don't have much experience with building things it's still worth having a go, a good place to find plans for almost anything is instructables.com, there are loads of how to's on building coops on there.
Deletegona have a go just orderd the pallets lol
ReplyDeleteBuilding Storage Sheds for chicken require a little patience. The main thing that you need to remember while building a chicken coop is not to overbuild the coop. The coop should have a solid floor to keep all types of predators out. If possible you should build the coop from recycled materials. Make sure that you don't use rotten wood, worn or low quality materials, so that the material that you use dosen't wear out after some time.
ReplyDeleteHow many chickens can be kept in this coop?
ReplyDeleteWe've had four chickens in the coop and they still had room to move about, they only really use inside of the coop when they sleep or lay eggs, most of the time they are outside scratching about looking for things to eat.
DeleteI like this Guide. Keep it Up
ReplyDeleteExcellent idea to make the run separate.
ReplyDeleteReally love this coop design, wish you had detailed instructions/plans as how to re-create this. I'm thinking about trying to make one.
ReplyDeleteThanks for reading, I kind of made it up as I went along, it was quite an easy build.
ReplyDeleteLove what you did with this coop! I see the original post is from 2012. How did the coop age? Was there anything you would have done differently other than the modifications shown?
ReplyDeleteThank you for sharing your coop. This is probably the nicest pallet coop I have found.
Thanks for visiting, the coop is still in use, so we've had a good ten years use out of it, it's is a little rough around the edges but the chicken seem happy with it
DeleteVery interested I. Building the coop, I have about 20 pallets, how many did this coop take? Any modifications you would make if you made a second version? Have you ever made a coop for ducks?
ReplyDeleteI used long pallets that had been used for insulation boards, so I had a lot of wood, but depending on the size you want 20 pallets would probably make a coop big enough, can't say I've ever mad a coop for ducks, but I would think it's a similar construction
Delete