We like to spend a lot of time in and around all things nature, be it the local woods (we have a few) the beach and anywhere in between and one of the things we like to look at are moths, the problem however is that most moths (not all) fly at night so we usually try to attract some using a sheet and a light, this doesn't always have a lot of success, so we built an upgrade.
Here's the old sheet and light bulb (it's not the best, but it does work) -
Here's the old sheet and light bulb (it's not the best, but it does work) -
 |
| Doesn't get anymore basic. |
What we've done is to build what is known as a 'Skinner moth trap' you can buy these and various other types of trap, but we managed to knock one up using things we had lying about, so our cost nothing, not a single penny (to build anyway) it's basic so can be built easily no matter what diy skills you may or may not have.
Here's the finished trap set up and waiting for it to get dark -
 |
| Basic indeed, why the egg boxes? read on. |
It's basically a wooden box, in our case made from what was left of our daughters old wardrobe, we've recently (after three years of looking) bought her an old antique one, this seemed as good a way as any of recycling the old one.
The glass was from an old fish tank which I broke, most traps of this type use perspex, but we were building it as cheaply as possible, and the glass is toughened which is handy.
The bulb holder and wire I had lying about in the shed and the bulb is just an energy saving one, you can however buy lighting kits (that use mercury vapour bulbs) online specifically designed for fitting to your own moth traps, these can be pricey though, but may yield better results.
Sides roughly marked up -
 |
| The diagonal lines are where the glass will go. |
All you need to do is make a box with four sides and a base, we had to make this to a set size because of the glass, so we went with a box just wide enough to fit the glass in, if you use perspex you can always cut it to size.
The glass just sits at a 45 degree angle (roughly) so all that you need to add to the box is a couple of wooden blocks to stop the glass falling into it and to create a gap at the bottom, so it's basically a funnel, the idea being the moths will see the light and then fall into to the trap.
Wooden stoppers to hold the glass -
 |
| Rough, but they work. |
Stoppers and glass in place -
 |
| Just needs a base. |
For the light I used a random fitting I had lying about, this I fixed to a wooden bar that runs across the trap, it also acts as a carrying handle, the flex for the light runs under the bar and over the side.
Fitting the light -
 |
| You can see where the glass stops a little clearer. |
Testing, testing -
 |
| Let there be light. |
And that was it, as I said it's basic and as it's hobbled together from essentially scrap material it cost nothing, the only other you'll need is some egg boxes to put inside it, this gives the moths good places to hide, we did also fix a black umbrella to one side of the trap, this was to diffuse the light shining into windows as we didn't want to upset the neighbours.
I haven't put sizes because I worked to the glass sheets I had, and if you're not confident with wiring then you can either buy a kit or you can buy clip on light fittings so all you'll need is a bulb, we used a low energy bulb mainly because they are cheap to run, and they aren't as bright as incandescent ones.
Did it work ? well yes, although we didn't catch much, but weather conditions may have been a factor and we do have a lot of bats that fly over the garden, that and the fact that dad accidentally let the ones in the trap go before we got a good look at them, but we did manage to get a picture of one moth we caught.
Here it is, it's one we haven't seen before -
 |
| Ennomos alniaria - Canary-shouldered Thorn moth. |
If you don't fancy building a moth trap you can try baiting (sugaring) guides can be found online, lots of flowering plants in your garden will also attract moths, moths are pollinators, we usually get loads on our buddleia plants (especially the white ones) and failing that keep an eye out for caterpillars roaming about, you can take them home and watch them change or let them go we currently have two large species in the pupal stage.
Lasiocampa quercus - Oak Eggar moth.
Caterpillar -
 |
| Fuzzy. |
Pupal stage -
 |
| Cocoon also fuzzy. |
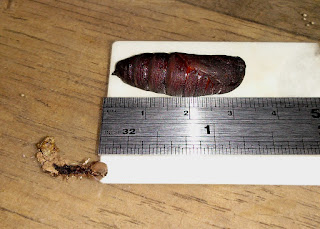
Mimas tiliae - Lime Hawk moth.
Caterpillar -
 |
| Kind of sausage like. |
Pupal stage -
 |
| The dried up thing on the left is what's left once it turns into a chrysalis. |
I wrote a post a few years back on 'The Humble moth' there are pictures of a Lime hawk moth we hatched out, along with an Angle shade moth in that post.
And if you do find any bugs and you're not sure what it might be then uksafari is a good site for identifying bugs of all kinds and for moths specifically we've found this site useful Ukmoths
We will be putting the trap out again soon, which is the good thing about it, it's easy to set up and leave for a few hours, just bare in mind that the lights are bright but you can shield the light easily with a sheet or put the trap at the bottom of the garden so as to not upset your neighbours.
And always let the moths go when you're finished looking at them, it's also advisable to not use the trap two or more days in a row, leave it a good few days between using it.
Thanks for reading.


