Wednesday, 26 March 2014

Headband holder ... ...

My daughter is always losing her things,specifically her headbands,she has quite a few of them,and she often gets annoyed that she can't find the right one for that particular day.

I always say to her that she should put them some where in her room,where she'll be able to find them again,but she doesn't always remember,so I made her a place for her headbands to live when they aren't on her head.


Here it is -


Not much to it really.

I did look online at various headband holder type things,they mostly seemed to be made from round things,like cardboard tubes,and I didn't have anything that would do,so I made this,it's basically a bit of wood with a rail on it that she can hook the headbands onto.

I also put a peg on so that she can hang her necklaces and bracelets on,as she often loses those as well (despite having numerous jewellery boxes) It's all made from a piece of match board (thin tongue and groove) apart from the peg,that's just a bit of 9mm dowel.

The flower was cut from a scrap bit of wood,and then I painted it to make it look a little nicer,and it adds a bit of colour to the whole thing,once the paint was dry I stuck it to the holder with a bit of glue.


Flower - 

Vaguely flower like.

The peg was also glued into place,I drilled a hole into the wood at and angle so the peg will point upwards,this helps stop things from sliding off.


Peg - 


Just enough room for a few trinkets.

The part that holds the headbands is made by sticking a couple of small squares of wood to a thin strip,which creates a kind of 'c' shape this is then fixed with of a few small nails and a bit of glue to the holder.

Here's a picture that shows how the rail sits away from the back board to create a gap that the ends of the headbands can fit into.


The rail - 


Simple really.
 

To hang the holder on the door I used four small hooks,two I fixed into the holder at each end,the other two I fixed into the door where the holder now hangs,it's light and doesn't need strong fixings.


And here it is hanging in it's new home - 


It works,and it's out of the way,so it shouldn't get knocked.

The whole thing cost no more than about £2, and now my daughter knows where her headbands are when she needs them.


Thanks for reading.


Thursday, 20 March 2014

Hoover cannon ...

For some time I've wanted to make a hoover cannon, and show the kids on some level at least a little bit about air pressure, a hoover cannon is great for this because they're fun and easy to make.

We actually made three different cannons, from stuff we had lying about the house, two are made from various bits of plastic pipe, and the third we made out of cardboard, which I have to be honest I didn't think was going to work.


Here they are -


Easy enough to make, especially the large white one.

They are all built the same way, a large tube for the projectile and a smaller tube to connect the hoover to, the bit on the end is basically a valve (it needs some tweaking as you'll see from the video) you don't need to make a valve, a bit of paper on the end is enough to achieve the same result.

As you can see the largest cannon is made from plastic pipe, with a fitting, it's all push together, so there's no gluing needed, I had the pipe already, and the fitting cost me about £2.00, the other two cannons are held together with black insulation tape, all I did was to cut a hole in the main tube to allow the air to flow, and that's about it.


Plenty of tape is best - 


The tape helps stop leaks as well as hold it all together.

The valve (burst disc) is a piece of thin plastic taped to a bit of thin plywood, which I cut a hole in and then glued to the end of each cannon, obviously there are three different sized ones, but they all work the same way, that being to seal the hole and then move when the projectile hits them.


The valve (burst disc) - 


The clear plastic is from the front of a box a toy came in.

We made a few different projectiles to fit the various cannons we also tried making them heavier to see if that affected how far they went, you can use various different things, tin foil screwed into a ball, old film cases, the plastic things from kinder eggs, wood, basically anything that will fit down the tube without getting stuck.


Some of our projectiles - 


I wrote on them so we could remember what weights we had.

Here's a simple diagram of how it all works, but there are numerous articles online on how to make these, and how they work, and there is a supersonic version of this that fires a ping pong ball at mach 1.2 (about 912 mph)


Diagram - 


A simple diagram.

Plastic tube is best, but you can use cardboard tubes as long as they are very strong ones, the sort that tin foil or cling film comes on, or the tubes you can get to post posters and the like, toilet rolls probably won't work. 


Here's a video of ours in action, you can see I need to work on the valve / burst disc set up, they weren't meant to fly off the ends of the cannons, and we should have really added some kind of trigger set up to make it easier to load and fire the cannons, we may make  changes to them at a later date.


Cannons in action - 


Thanks for watching.


Tuesday, 4 March 2014

Swing out tool holders ...

Spring is almost here, and in a bid to get more organised, and while I'm decorating and waiting for the weather to warm up a little so I can get some gardening done I decided to try and sort some of my tools into a more orderly fashion.

For some time I've had my small files amongst other things in old cups, which to be honest isn't the best way to keep them, especially when it comes to finding a specific thing, but I found a better solution on Pinterest of all places.


And here is the better solution -


Made from scrap bits of wood.


These are slightly different from the ones I saw on Pinterest, firstly the hinge is all wood, even the pivot, the others used a bolt, after having a quick look I couldn't find any that would do, so I just used a bit of 9mm dowel and put a couple of pegs in either end to stop it all falling apart, it's handy because I've been experimenting with wooden hinges of different designs, and these are kind of a prototype for another project I'm working on.


A close up of the hinge section - 


Pictures a bit fuzzy, but you get the idea.


And another picture - 


A simple hinge, using dowel and a peg.


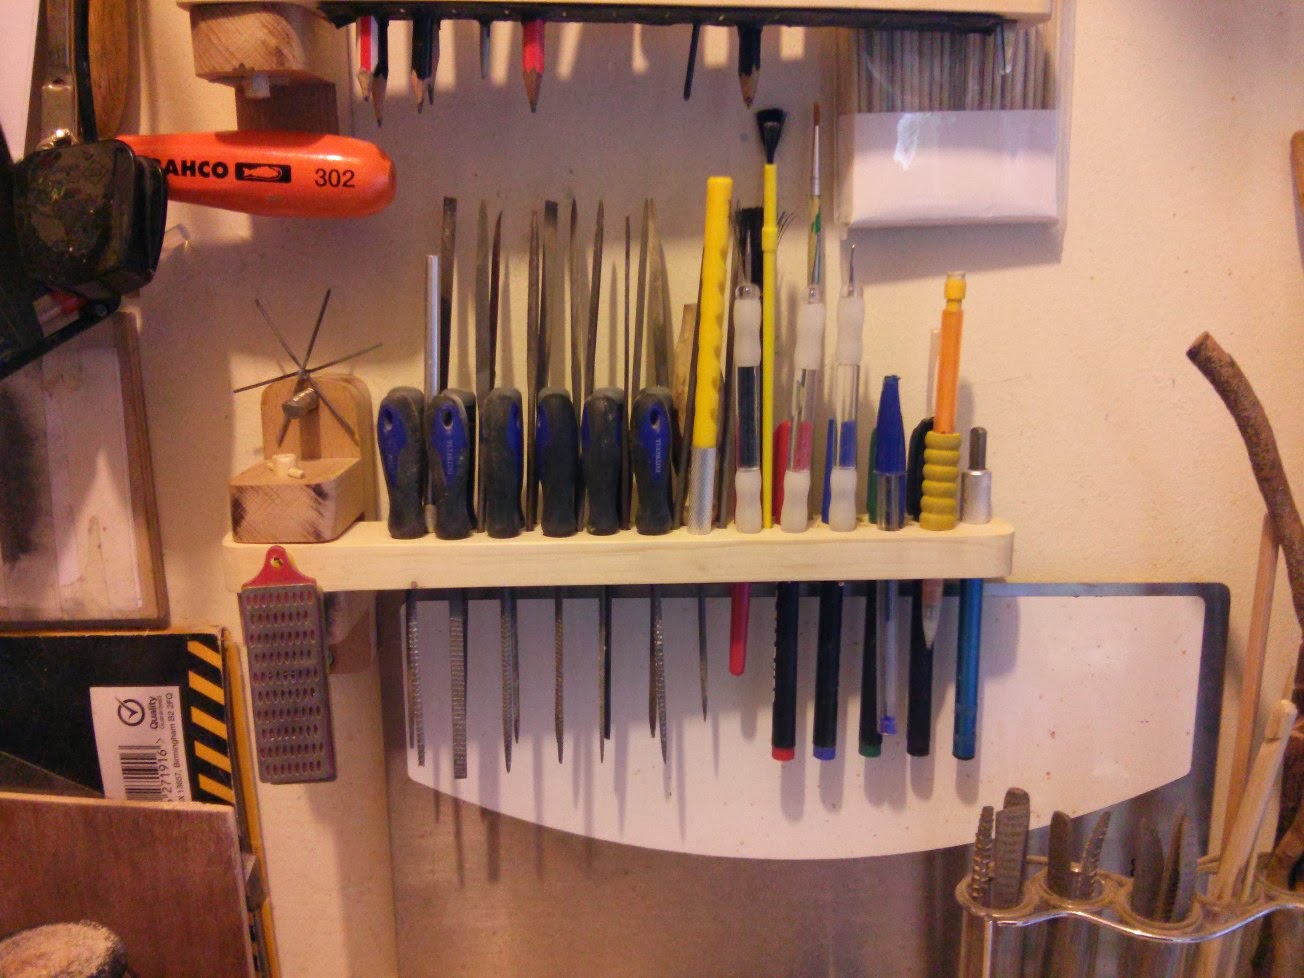
The other change I made is the holes for my various tools, as an example some of the small files I use from time to time don't have handles, and as such they would fall through some of the larger holes, and the same can be said for pencils and pens and other things, so I came up with a way to hold items of different sizes, using a piece of old inner tube.


All I did was to drill a series of holes all the same size in one of the holders, and on the under side of it I stapled a bit of inner tube, then I just made a series of small holes in the inner tube that correspond to the holes in the wood.


Like so - 


I could have made a neater job of it to be honest.


The idea is that when I stick a pencil or pen (or other item) into the holder the inner tube grips it and stops it from falling through the holder, and because the inner tube is rubber it will stretch to different sizes meaning I can put different sized things into the holder with out having to worry about it falling out.


Kind of like this - 


You can see where the inner tube has stretched around the pencil.

And that's about it, I now have more organised tools, and because the holders are hinged I can just move them around to get at the tools at the back, I'm also thinking of adding a small lamp to one of them so I can get better lighting when I'm doing small jobs, fixing them to the wall is easy enough, a couple of screws does the job.


Here they are all ready in use -


Makes for a more productive work space.


Here's a quick look at a small wooden box I made that has wooden hinges on the lid, making the hinges out of wood allows for some creativity because lets face it sometimes hinges can be a bit boring, not that these are exciting, but as I said I'm still experimenting.


Wooden box with wooden hinges - 


Not much to say really, it's a box.

Thanks for reading.