Tuesday, 11 December 2012

Festive turning ... ...

To be honest I haven't had much time of late for blogging or much else, other than Christmas related stuff (where does the time go ?) seems it was just about summer last time I looked, now it's two weeks until Christmas day !

But I've tried to carry on the family tradition of making stuff for the festive season, so I managed to make a couple of things on my lathe in the way of decorations.

First up, not very elaborate, but quite pleasing none the less -


It kind of resembles a Christmas tree.

I made two - 

Not quite the same as the last one, but similar.

As wood turning goes these are pretty basic, more or less tree shaped (as in Christmas tree) with a twisted loop of copper wire as a means to hang them on the tree, I made them from bits of scrap wood (Pear in this case) and just gave them a bit of a polish with beeswax.

The next item, and most likely the last thing I'll make this year (unless I suddenly find myself with free time) is a snow man, and I made all the parts on my lathe, even the tiny nose, I used copper pins for the eyes and buttons.


Meet Frosty - 


My wife's handy work in the background, this years Yule log.

I decided making a snowman would be a fun thing to do, although I have to say I'm not sure I've quite got the dimensions right, but it does resemble a snowman, sort of.


Here's a picture of the components - 


All made from Pine and on my lathe.

And as you may have noticed from the picture he is also a storage box, perfect for hiding a few sweets in.

The only thing I didn't make was the copper pins I used for it's eyes and buttons, and the lacquer I used to coat it with, I could have gone the whole hog and painted it white and then used different colours for it's nose,eyes and buttons, but I quite like the way it looks in plain wood, I could have spent more time on the finish and used some of the polishes I normally use on other stuff, but figured it would get a lot of attention from the kids, so I didn't go too mad on the finish, and besides I can always paint it next year and it'll be new all over again.


I think he cuts quite a dashing profile myself - 


Might have to make the body segments a little more rounded next time.

There are loads of things you can make for Christmas, and a variety of materials you can use, and it doesn't have to cost a load of money either, I'm lucky in that I have a lathe and various other tools which allow me to make stuff like this, but it could just as easily have been made from clay, or paper, or even knitted.

Merry Christmas and all the best for the new year.

Thanks for reading.

Thursday, 15 November 2012

Casting with sand ...

We've often wanted to make different things using Plaster of Paris, and although we have lots of different types of moulds there are times when these just won't do, and that's when a tub full of sand comes in handy.

Sand casting isn't a new idea, in fact it's been around for thousands of years, and is normally used for casting things from various metals.

The oldest known casting in existence, is a cast of a frog in Copper, found in  Mesopotamia from around 3200bc

The Victorians used sand to cast iron, well I say sand it wasn't quite the same as normal beach sand, it had some other stuff in it as well, but the principle is the same, you use the sand to hold the shape of what ever it is you want to make a cast of.


Like this -


It's about a 'foot' long ...

The tub is just a normal storage tub, but you could do this in a sand pit, or make a wooden box, the sand is the kind you use in a kids sand pit, the main reason I used this type of sand over say building sand is the grains, the play sand is quite fine, where as some building sands are coarser, and the finer the grains the less detail will be lost in the casting process.

The plaster is just bog standard Plaster of Paris, which you can buy from model shops, Ebay, Amazon and numerous other places, you don't need to add anything to it (apart from water obviously) and you can also use this method to cast animal foot prints when you're out and about, just take a bag of plaster and a bottle of water, it will take about 20 - 30 minutes to set, so you may have to wait a bit, or just walk about looking at other stuff for a bit.


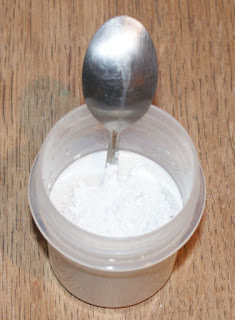
The plaster - 


Not much left, I'll have to get some more.

 This stuff came from a mosaic tile making kit, you can also add paint to the plaster while you mix it for more interesting colours, or you can leave it white.


Mixing - 


Don't tell my wife I used a spoon to mix it.

You want to keep it to be pourable, but not too runny or too thick other wise it won't work very well, something like batter/pancake mix consistency should be okay, please bear in mind that plaster dust is very fine, so don't go breathing it in, wearing a mask is a good idea.


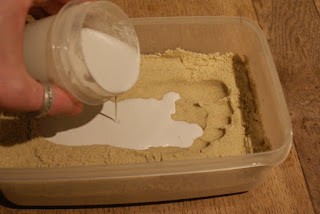
Ready to go - 

Let pouring commence.

 Into the mould it goes - 


Will it work ?

The trick to this is having the sand damp enough so that when you press your shape into it, it holds the shape and stays there while you pour in the plaster, you do lose some definition, but not much and I've found that simple things come out quite well, like feet for example, you can also use a bowl to make a hole in the sand and then pour the plaster in the hole, and just as it starts to set you could push your shape into it then, you can also do this to make baby hand prints, and it's cheaper than buying one of those kits online.


It's set ! - 

Vaguely foot shaped.

Once your cast has set you'll need to brush the sand off it, and remember that even though it only takes 20 - 30 minutes to set it will be 24 hours before it's fully hardened, so be careful with it, you won't get all the sand of it, but having that sandy texture is quite nice, and if you wanted to make something look like stone this would help.

You can speed up the drying a bit by using a hair dryer or warm oven, be careful not to burn yourself, I would go easy with the heat though, you don't want it to crack.


Here are the sand removal tools - 


Please use an old toothbrush.

Brush the sand gently from the cast using the paint brush, the toothbrush is for later on to get any stubborn bits of sand out.


Most of the sand cleared now - 


Yep it's a foot.

I've found it's best to leave it for an hour or so before going at it with the toothbrush, but once you've got the sand off it it you should be left with a slightly textured plaster cast of what ever you chose to cast.


The foot all done - 


Definitely my daughters foot, only cleaner.

Of course there are loads of things you can mould, here are a few others we've done, hands are a good one, we also used an Ammonite as a mould, a skull (plastic one, but a real skull should work) and I have plans to make some Christmas decorations as well, which should be fun, basically anything you can push into the sand, but somethings will turn out better than others.


Some of our casts - 


I think they turned out quite well.

The Ammonite actually looks quite fossil like, as it has some sand stuck to it, makes it look more like rock, my wife is planning on using it to decorate a box she's making for our sons fossil collection.


I had to try a skull, this will come in handy for next Halloween - 


Creepy.

And if you do go out and try to make some plaster casts of animal foot prints I'd recommend making a frame to hold the plaster, this can be done with thick card, or plastic, kind of like the frames they use in criminal investigations, which is what is good about this kind of thing, not only is it fun, but it's informative you can show how footprints are taken from crime scenes, and you could also go into how this type of technique was (and still is) used in engineering, even for things like bridge building (all be it a slightly more complicated version)


Here's the moulding frame (this one is cardboard) - 


Simple to make and use.

It's just four bits of card with cuts about half way down on each end - 


Four sides all done.

Then you just slot them together and away you go, you can always make one out of plastic, or even easier would be to cut one of those 4 pint plastic milk bottle in half and then cut the bottom of it, although this will limit the size of the things you can cast.


The Ammonite again - 


Probably the one that came out the best.

 Thanks for reading.


Wednesday, 7 November 2012

Project Pull Cart ... ...

There are times when not having a car can be problematic, and since the kids are now too big for push chairs and buggies we now have to do a lot of carrying of bags and such like, which if I'm honest is a pain, especially on library day (shudders) you'd be surprised how books will fit into a bag, there's also the chicken feed run, the bags of feed and corn weigh in at 20kg each, so I figured it was high time I did something to make things a little easier, that didn't involve the very expensive learning to drive and buy a car bit.


And this is it -


It'll give the neighbours something to talk about.

This is quite a large build, but I'll try and condense it down as much as I can, without missing anything important out.

Basically this is built in much the same way we used to build go-carts when we were kids (many moons ago) I've even used the old buggy wheels from my daughters old (and broken) buggy.

The only things I bought for this was a sheet of 12mm plywood and two long bolts & nuts and a few large washers, everything else I either had lying about or made by hand, such as the yoke (the bit that allows it to turn) and the handle for pulling it.

So first things first, I marked out a half sheet of plywood (which you can get cut in store if you don't have a power saw) and then trimmed it to the size I wanted, which in this case was just under 1 metre long and about 50cm wide (not that much different in size to the buggy the wheels came of)


The Plywood - 


You can just make out the lines.

What you are aiming for though is a rough 'T' shape, at least if you build one the way I have that's what you'll want, once I had the rough shape I then used one of my wife's cake tins to mark out the curves on the front and the sides (shh don't tell her I used the tin) When you mark out your sheet make sure it fits between the wheels you use, especially if they have axles, in short build the frame of the cart to fit the wheels, rather than make the wheels fit the cart, and if you don't have any wheels you can buy wheel kits for making go-carts and pull carts.


The front and sides - 


Sweeping curves for aerodynamic purposes.

I marked two points on the front end for the pivot that will allow the front axle to turn, mainly because I can then use smaller wheels (when I find some) as it is the buggy wheels are 12 inches, so I had to accommodate them, but it will just mean a little trim here and there when and if I find smaller wheels.

Next I made the axles, now this required a router, and depending on the wheels you have I'd suggest doing things this way for extra strength.


The wheels (with axles) - 


Now just to beef them up a bit.

To add a little extra strength to the axles I made a channel in a length of wood which then fits round the old axle, this also made fixing things together a bit easier.


The wood, with channels cut out - 


The one channel is meant to be off centre.

New axles (front) - 


New axles (back) - 


I used some glue to make sure they don't move about.

Fixing the back axle was just a matter of lining it up where I wanted it, and then screwing through the ply wood sheet into the wood of the axle.


The back axle fixed - 


Sturdy enough.

Having got this far I then had to think about the yoke, which is the bit that allows you to pull the cart and steer it, now had I been building this in metal I could have welded up some thin steel in half the time it took me to build the front axle assembly, but I wanted to see if I could do it in wood, well why not ?


The front axle with yoke - 


I turned out quite well.

It has to be said that had I gone for a two wheeled type cart then I wouldn't have need a front axle, or a way to steer it, but such is life.

The yoke is made from two bit of plywood with a piece of the same wood I'd used for the axles, it may bit a little bigger than it needs to be, but I figured I'd make it as strong as I could, but keep the whole thing relatively light weight, as it stands the whole completed cart weighs in at 11kg (yes I did weigh it) which isn't too bad.


A slightly better picture of the yoke and front axle - 


It was 'D' shaped originally, but I thought I'd make it more interesting.

You can (sort of) see how it fits onto the front axle, the steering bolt goes through the frame of the cart and then through the axle, which is why the channel for the axle is off centre (to allow for the bolt) and through the yoke, you can also see there's a fair sized gap between the handle and the sides of the yoke (above the bolt) so much so that I decided to pack that part out with some thick washers, it shouldn't be a problem, but this will be one of the major stress points when we use the cart, but as it turns easily, even with a heavy weight in it (I tested it by standing in the cart) I think it'll be fine, guess I'll find out when we start using it.


The yoke again with the packing washers - 


Seems better like this.

There are also a couple of washers between the main frame and the front axle, where it pivots for steering purposes, this should stop things rubbing together, you can see the gap between the two bits of plywood in the picture above.


Here's a top view of the front axle - 


You can see how the axle pivots on the large bolt.

I also added two support beams under the cart, the plywood was strong enough to hold my weight (I weigh 13 stones) but I figured better safe than sorry, and adding the extra supports also stopped a little bit of flexing in the main frame.


Extra supports - 


Makes thing a lot stronger.

As for the arm and the handles either side of it, I made these from a piece of wood left over form making the axles, and a bit of old fence post.


The arm - 


Again curved for better aerodynamics.

Where I've used bolts on the cart I've also used some steel tube (which came from the old buggy) to sheath the bolts, this will stop the threads digging into the wood, it also should help to make things like the yoke more secure.


The arm bolt and sheath - 


I've used the same method on the main steering pivot.


The handles for pulling the cart -


They aren't quite identical.

I turned the handles quickly (perhaps a little too quickly) on my lathe, from an old bit of fence post, they fit into the arm with a screw and a load of strong glue.


Handles fitted to the arm - 


All fixed.
 

For the sides of the box that will hold whatever we put in it I used plywood for the first section, then some thin tongue and groove to build the sides up, mainly because I ran out of ply wood, and to be honest I prefer the way the tongue and groove looks, kind of gives it an old fashioned feel (well I think it does) and then I painted it all in black gloss, because painting anything black makes it go faster.

Before it was painted though I did have to make a few adjustments, the first being the turning circle, or the lack of a good one, so I cut out a little extra from each side.


Final adjustments -

Taking out an extra inch made all the difference.

The other small problem was that when the steering was in full lock the tires rubbed on the frame, so to fix that I added a couple of stoppers to each side of the axle.


You can see how the tires rubbed in the next picture - 


Not that much of a problem, but a problem all the same.

Whilst this isn't really an issue, it might cause problems while turning the cart, and I didn't want the tires rubbing on the frame.


The stoppers - 


I had to touch up the paint job a bit.

Basically all the stoppers do is 'stop' the axle from turning quite so much, I think they stop the tires about 10mm from the frame, which still keeps the turning circle.


Here's what I mean - 


A simple solution.

And that's about it, I am planning on drawing up some detailed instructions for some of the things I've made (including this) my descriptions aren't always the best, so keep an eye out for them appearing on here at some point, although I've made a pull cart it wouldn't take much to make a go-cart using this type of method.

Ready for it's first job, which is most likely going to be a trip for chicken feed for over winter, and a trip to the library, the kids will very pleased they can once again clear the shelves of books to read at home, without dad moaning about the massive amount of books he has to carry.


Thanks for reading.


Friday, 2 November 2012

Finishing small turned items ... ...

Those of you who drop in on a regular basis will know I turn a variety of things, including small memory boxes, and although this is simple enough I've often wondered if I couldn't find a better way to do things, especially when it comes to finishing the boxes.


Things like this (these are both made from walnut) -


Normally I use a friction based method when it comes to finishing the ends, and when I polish them, simply put I use a scrap bit of wood and wedge what ever I've turned onto it, this works for the most part, but it's not the most secure way of doing things.


Here's the old method -

+


I turn the scrap wood so it's just slightly too big, then wedge the work onto it, there are other ways of doing this, like using tape for example, but if I'm honest I've had to re-sand a few pieces due to them deciding they no longer want to stay where I put them, so I figured I needed a new method. (you'd be surprised how much a small bit of wood hurts when it hits you at 2500rpm)

Then I had a brain wave, I have some sanding drums, which I use in my router as a make shift spindle sander, these I figured would be ideal for holding the boxes whilst I finish the bottoms and tops, and when I apply the polish.


Sanding drums -


The pink coloured ones are home made.

All I needed to do was find a way of holding them in the lathe so that I could use them, and for that I used an old chuck from a broken power drill.

I had to use the chuck because the shafts on the sanding drums are a little small for my chuck to grip tightly, although the drill chuck will come in handy for other things.


The old drill chuck - 


Chuck.

And to use the drums is just a case of fitting the drum into the drill chuck, and then sliding the piece to be finished onto the sanding drum, obviously I have to put that lot into the lathe chuck as well.


Like so -


A turn or two of the small nut you can see in the picture above and it's ready to go, it does work very well, I had thought that the work piece might wobble at speed due to things being slightly off centre when the rubber gets compressed, but it seems to be okay, there's a short video of me using it to sand the bottom of a small box, and how easy it is to remove the work using the old friction based method at the end of this post (and yes I'm aware that using the sanding drums is still friction based, it's just better friction)

Now it's quite easy to make your own sanding drums, all you need is a rubber cork, the sort you use in wine brewing (the ones the air locks fit into) a nut and bolt, and a few washers.


Components - 

Works in exactly the same way as a sanding drum.

Basically the way this works is that in tightening the nut and bolt up the rubber cork compresses and as it does this it gets wider, and thus grips the sanding belt, or in this case the bit of wood I'm messing about with.

I did add small section of copper tube to slide over the bolt and hold the cork a little tighter as I thought this would help keep things a little more centred, but as it turns out it doesn't make a difference.


Here's a homemade one compressed - 


Simple, but effective.

And that's it, it has to be said that the sanding drum kits can be picked up for as little as £9.99 (from places like ScrewFix) but sometimes they just aren't the right size, which is why I made the other ones, and as the corks are angled slightly this makes things easier with some of the small things I turn.


My homemade ones - 


They'd do for sanding as well no doubt.

Here's one of the bought ones - 


Not much difference.

And in case you're thinking this isn't going to work, here's the video I mentioned, the first part is me using the sanding drums and the second bit shows how easy the work can come off using the old method.


The piece that needs finishing - 


I actually made these marks for this post.

The finishing (video) -


And if further proof is needed here's a small Walnut memory box I made using the homemade drums to hold the work while I did the finishing and polishing.


The Memory box (it's made from Walnut sap wood, which is why it's lighter than usual) -


Another one to add to the collection.

Thanks for reading.