
First post of the year, bit later than I'd intended, but sometimes that's just the way it is.
Anyway while I'm twiddling my thumbs waiting for spring to make an appearance I thought I'd attempt to solve a small problem we have with condensation from our tumble dryer, we've used it more than we would have liked this winter, mainly because it's not really been the best weather for drying stuff on the washing line, obviously where possible you should try and vent to the outside, but if you can't then this is an easy and low cost option, it might not be the most effective, but it does work.
If you have a tumble dryer without a built in condenser you'll know it can put out a fair bit of condensation, which can lead to things getting damp (like walls) and that can then lead to mold growing, so how to solve it ? well there are ways, of course, the easiest is probably putting the dryer hose out of a window, or a cat flap, in some cases you can have vents put through the walls of your house, which basically means a four inch hole in the wall, or you could buy a condenser box, they range from £5 to around £30, but it's pretty easy to build one using a plastic tub, which you can pick up for as little as £1.
Here's the one I built -
 |
| For some odd reason it reminds me of the teletubbies. |
As you can see it's a plastic tub with the dryer hose stuck in it, and that's all the ones you can buy are, although some do require the use of ice, but I'll get to that in a bit.
I built this using a tub (cost £2) the rest of the stuff I had, I used an off cut of plywood to strengthen the lid as it was a little flimsy for my liking, but that's about it.
Ingredients -
 |
| Not much to it really. |
The idea is that the warm air from the dryer is blown into the box, where it condenses, the water collects in the tub and not on the walls.
All I needed to do was get the hose to fit to the lid and it was ready for a test run, I marked the center of the plywood, and then drew round the hose fitting (which we already had) then I cut out the hole.
Wood ready for cutting -
 |
| This wouldn't be needed with a stronger tub. |
Once I'd cut the hole in the wood I used that as a template for the lid, then I cut out the hole in the lid.
Marking the lid -
 |
| Probably should have gone for a flat lid. |
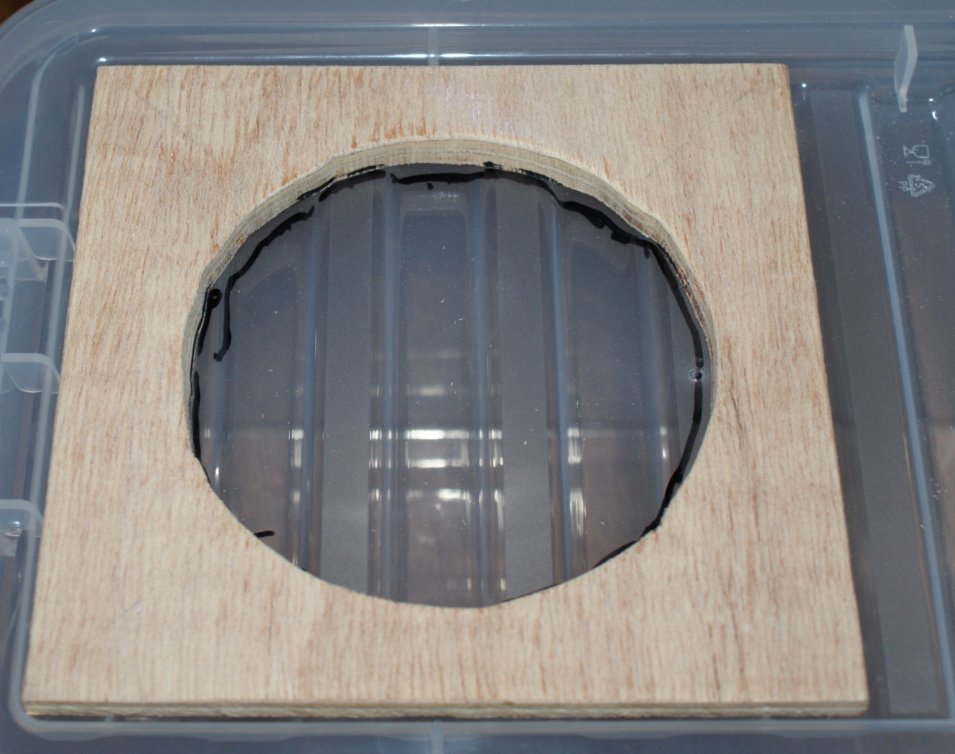
Then I just had to push the hose fitting through the wood and the lid, and then fix the wood in place, which I did with a few small screws.
Here's the fitting in place -
 |
| Under side of the lid. |
 |
| Top of the lid. |
You can see in the picture above the thread for the dryer hose to screw into, turns out this fitting came with the dryer, probably in case you already had some kind of vent system in place.
The two hose fittings -
 |
| One end for the dryer, and the other for the condenser. |
You could use either fitting for the condenser box, as long as the hole is a snug fit it won't come out.
The last thing to do was make some small holes in the lid for the air to escape, otherwise it would have just blown the lid open once the pressure had built up a little.
Vent holes -
 |
| I just used an 8mm drill bit. |
And that's it basically, the idea is simple, you're just using the box to collect the moisture from the warm air, rather than the walls.
Now I mentioned that some of the shop bought condensers use ice, the idea of that is that it keeps the temperature in the box down and thus helps the water vapour to condense, it's basically the same process that causes your windows to steam up when it's colder outside than the temperature inside.
Here's how much water the box collected after about an hour of use -
 |
| Not a huge amount, but it means it works. |
The picture above was from just using the box as is (no ice) I did also try it with a tub of ice cubes in it, and didn't really notice a massive difference in the amount of water that collected, which we use to water the house plants, mainly the Gardenia as it doesn't like tap water.
Obviously this will only be used when the weather is too wet or cold for drying clothes outside, but it did make a difference to our utility room, it wasn't as damp after using the box, and I'm still tweaking it, I've recently made the lid seal better, so not so much air escapes out of the sides of the tub, of course a more expensive tub would have a better seal, but it would also cost more, but for £2 this works just as well as a bought one, if the reviews I read are anything to go by.
PS - The fluff that collects in the vent on a tumble dryer is great for starting fires with a fire steel, goes up like a treat.
Thanks for reading.


wow thank u
ReplyDeleteWish I had seen this before I spent £10.00 on my plastic tub with no instructions so I don't know if it uses water, ice etc.
ReplyDeleteI made a similar design but with a lower longer profile box and half filled it with water. The water helps to cool the vapor and create condensation. An empty box alone will do very little
ReplyDeleteI find it works just as well whether it's got ice or cold water in it, it does collect quite a bit of water when we use it.
DeleteWhy do u need to put water in it?? As a dryer gives out water?? Surely you'd have to empty the water after each use??
DeleteGoing to give this a go when I manage to get a hold of a cheap tub. Will try and ask around for some small square of wood.
ReplyDeleteThank you for this brilliant idea.
Thankyou its great just what iwas looking for
ReplyDeleteDoesn't all the "fluff" get mushy combined with the condensation?
ReplyDeleteNo, our dryer has built in fluff filters, but you could easily make one from and old pair of tights over one end of the tube.
DeleteThank you for sharing this. I wish I read it early...I have Siemens tumble dryer http://hardware.be/wasdroger/siemens and it needs condenser box a lot. i've just odered one at amazon and I understood that I could save my money and made it by myself! thank you for your project!
ReplyDeletegood work, but... i bought condenser box, same princip as here, but still have too much vapour coming out of the box. tryed with water, ice, and those ice boxes for portable refrigerators. no much difference. fluffs stay in water, water stay in box, but vapour still comes out and moisture walls, and rest of bathroom stuff. so, now i have to find out how to block vapour or soak it with some stuffing.
ReplyDeleteIve just made one out of an old broken hand pump pressure washer container with pressure release taken off it will post results when tested
ReplyDeleteWhere did you buy the two hose fittings?have looked everywhere.
ReplyDeleteThe fittings I used came with our dryer, but places like Amazon and Ebay will have the fittings, and probably ready made condenser boxes.
ReplyDeleteThere's also a chap at our local market who sells all manner of random parts for appliances so if you have a local market or maybe a local appliance repair shop they might be able to help.
Searching for 'tumble dryer vent hose adaptor' and 'tumble dryer vent hose connector' should give you plenty of results.
Hope that helps.
Good idea! Thinking of the condensation process, would a metal container not be more efficient than plastic (assuming air temperature around the container would need to be colder than air pumped into box from dryer regardless of material used)?
ReplyDeleteThere is a better solution you know, its called venting outside!!
ReplyDelete